Cirkit Designer
Your all-in-one circuit design IDE
Home /
Component Documentation
How to Use Addressable LED Pixel Board WS2812B: Examples, Pinouts, and Specs

Introduction
The WS2812B is an addressable LED pixel board manufactured by WorldSemi Co. Ltd. This component is a type of LED strip that allows individual control of each LED's color and brightness through a single data line. It is commonly used for creating dynamic lighting effects in various applications such as decorative lighting, displays, and indicators.
Explore Projects Built with Addressable LED Pixel Board WS2812B
Wi-Fi Controlled LED Display with ESP32 and WS2812B
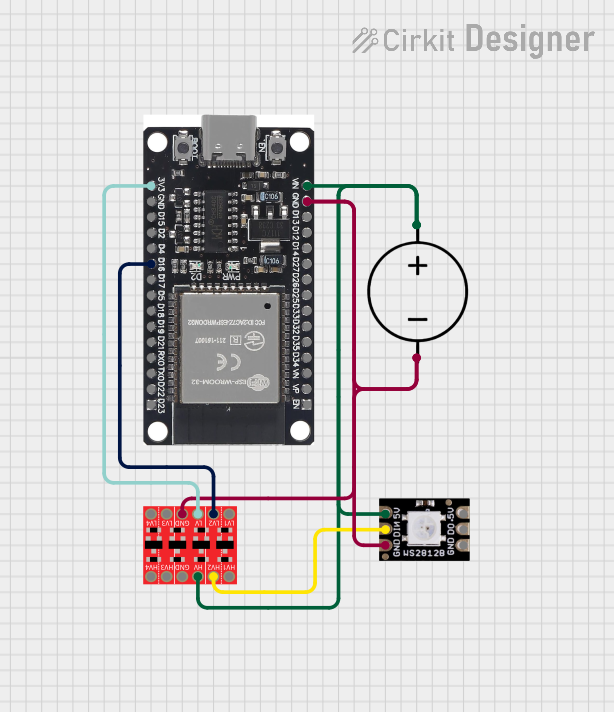
This circuit uses an ESP32 microcontroller to control an addressable LED pixel board (WS2812B) through a bi-directional logic level converter, ensuring proper voltage levels. The entire system is powered by a DC power source, with all components sharing a common ground.
ESP32-Controlled WS2812 LED Matrix Display with Resistor

This circuit features an ESP32 microcontroller connected to a 32x8 WS2812 LED matrix. The ESP32 controls the LED matrix through a 220-ohm resistor connected to its D12 pin, providing data input to the matrix, while power and ground connections are shared between the ESP32 and the LED matrix.
Arduino Nano Controlled Sound and Light Effects System with NeoPixel LEDs
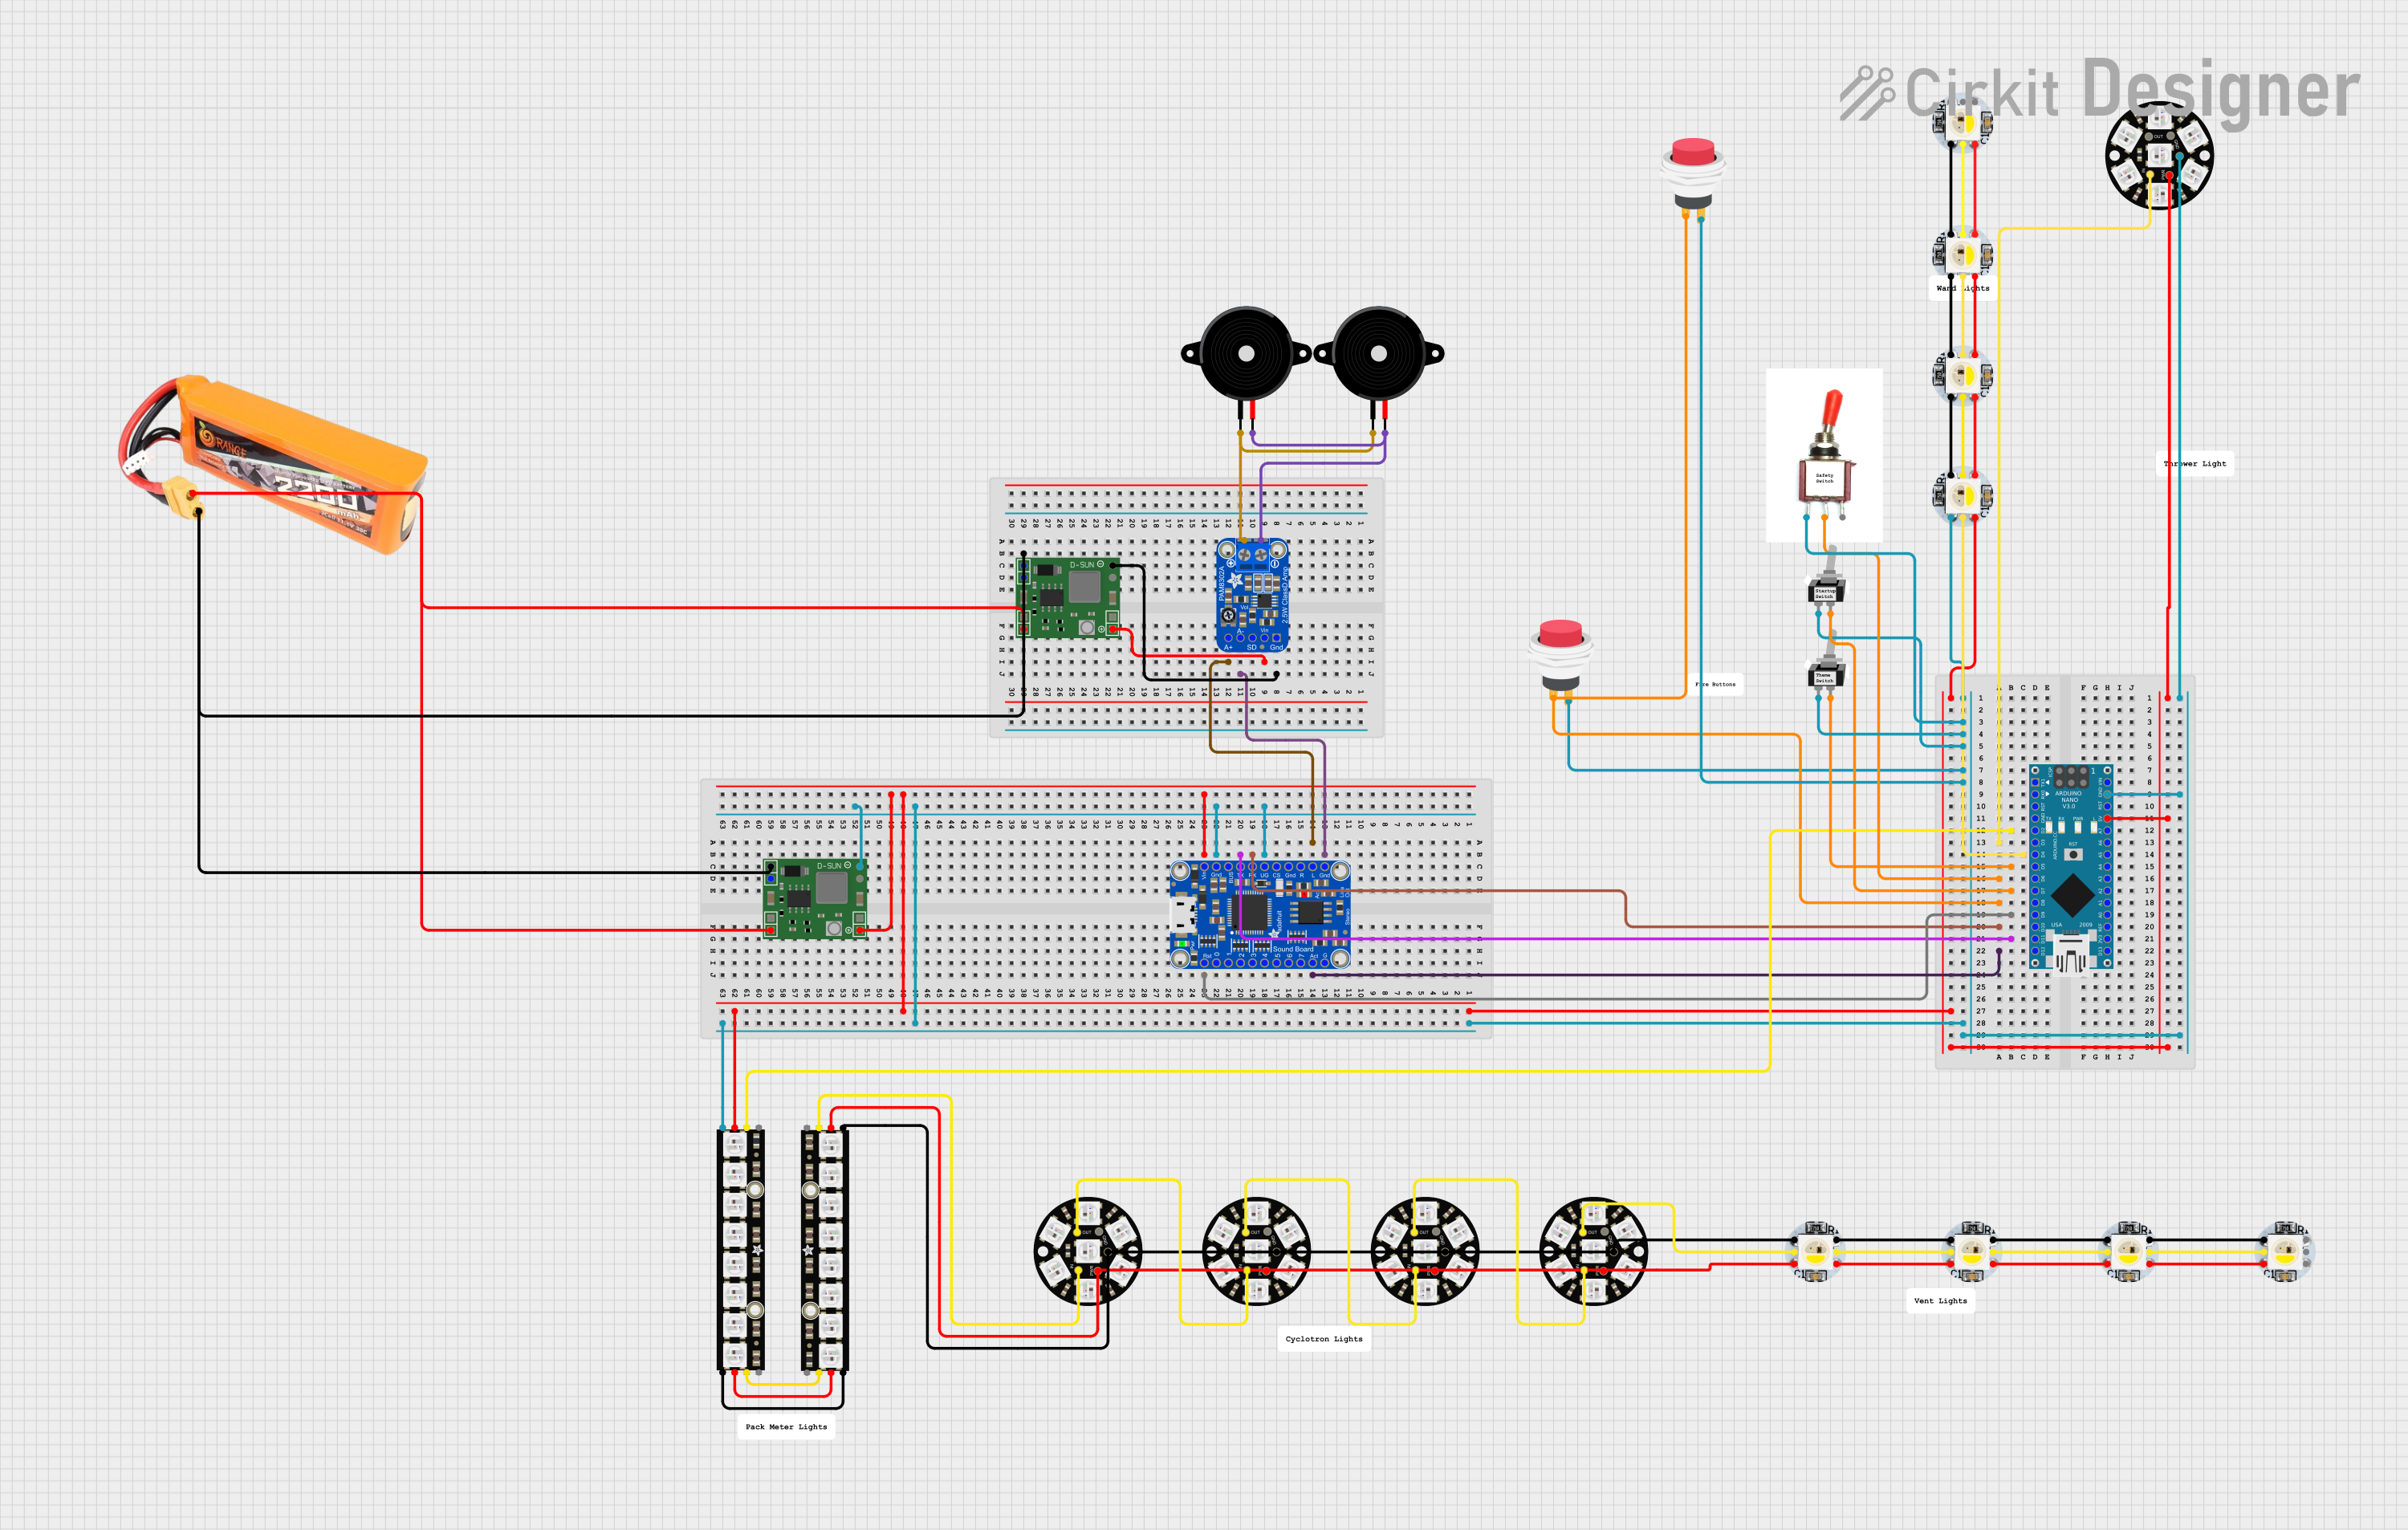
This circuit features an Arduino Nano microcontroller connected to a series of WS2812B LEDs, Adafruit NeoPixel Jewels, and Sticks, forming an addressable LED array. The Arduino controls the LED patterns and sequences, and interfaces with an Adafruit Audio FX Mini Sound Board for audio playback, which is amplified by an Adafruit PAM8302 amplifier connected to piezo speakers. The circuit includes toggle and push switches for user interaction, and uses a lipo battery with MP1584EN power regulators for power management. The embedded code on the Arduino facilitates complex lighting effects and sound playback, responding to switch states and button presses to create an interactive experience.
Arduino Mega 2560 and Raspberry Pi 4B Controlled WS2812 RGB LED Strip

This circuit features an Arduino Mega 2560 microcontroller programmed to control a WS2812 RGB LED strip and a white LED, indicating status or providing user feedback. The Arduino and the LED strip are powered by a common 5V supply, and the circuit includes interfacing with a Raspberry Pi 4B for potential communication or coordination between the two boards.
Explore Projects Built with Addressable LED Pixel Board WS2812B
Wi-Fi Controlled LED Display with ESP32 and WS2812B
This circuit uses an ESP32 microcontroller to control an addressable LED pixel board (WS2812B) through a bi-directional logic level converter, ensuring proper voltage levels. The entire system is powered by a DC power source, with all components sharing a common ground.
ESP32-Controlled WS2812 LED Matrix Display with Resistor
This circuit features an ESP32 microcontroller connected to a 32x8 WS2812 LED matrix. The ESP32 controls the LED matrix through a 220-ohm resistor connected to its D12 pin, providing data input to the matrix, while power and ground connections are shared between the ESP32 and the LED matrix.
Arduino Nano Controlled Sound and Light Effects System with NeoPixel LEDs
This circuit features an Arduino Nano microcontroller connected to a series of WS2812B LEDs, Adafruit NeoPixel Jewels, and Sticks, forming an addressable LED array. The Arduino controls the LED patterns and sequences, and interfaces with an Adafruit Audio FX Mini Sound Board for audio playback, which is amplified by an Adafruit PAM8302 amplifier connected to piezo speakers. The circuit includes toggle and push switches for user interaction, and uses a lipo battery with MP1584EN power regulators for power management. The embedded code on the Arduino facilitates complex lighting effects and sound playback, responding to switch states and button presses to create an interactive experience.
Arduino Mega 2560 and Raspberry Pi 4B Controlled WS2812 RGB LED Strip
This circuit features an Arduino Mega 2560 microcontroller programmed to control a WS2812 RGB LED strip and a white LED, indicating status or providing user feedback. The Arduino and the LED strip are powered by a common 5V supply, and the circuit includes interfacing with a Raspberry Pi 4B for potential communication or coordination between the two boards.
Technical Specifications
Key Technical Details
| Parameter | Value |
|---|---|
| Manufacturer | WorldSemi Co. Ltd. |
| Part ID | WS2812B |
| Operating Voltage | 3.5V - 5.3V |
| Operating Current | 60mA per LED (max) |
| Power Consumption | 0.3W per LED (max) |
| Communication | Single-wire data line |
| LED Color | RGB (Red, Green, Blue) |
| LED Control | PWM (Pulse Width Modulation) |
| Data Transfer Rate | 800 Kbps |
| Operating Temperature | -25°C to 80°C |
Pin Configuration and Descriptions
| Pin Number | Pin Name | Description |
|---|---|---|
| 1 | VDD | Power supply (3.5V - 5.3V) |
| 2 | DOUT | Data output to the next LED in the chain |
| 3 | GND | Ground |
| 4 | DIN | Data input from the microcontroller or previous LED |
Usage Instructions
How to Use the Component in a Circuit
- Power Supply: Connect the VDD pin to a 5V power supply and the GND pin to the ground.
- Data Line: Connect the DIN pin to the data output pin of your microcontroller (e.g., Arduino UNO).
- Chaining LEDs: If you are using multiple WS2812B LEDs, connect the DOUT pin of the first LED to the DIN pin of the next LED in the chain.
Important Considerations and Best Practices
- Capacitor: Place a 1000µF capacitor across the VDD and GND pins to stabilize the power supply.
- Resistor: Use a 330Ω resistor between the microcontroller's data pin and the DIN pin to protect the data line.
- Power Supply: Ensure your power supply can handle the total current draw of all LEDs in the strip.
- Heat Dissipation: Provide adequate ventilation or heat sinking if using a large number of LEDs to prevent overheating.
Example Circuit Diagram

Arduino UNO Example Code
#include <Adafruit_NeoPixel.h>

// Define the number of LEDs in the strip
#define NUM_LEDS 16

// Define the pin connected to the DIN of the WS2812B
#define DATA_PIN 6

// Create an instance of the Adafruit_NeoPixel class
Adafruit_NeoPixel strip = Adafruit_NeoPixel(NUM_LEDS, DATA_PIN, NEO_GRB + NEO_KHZ800);

void setup() {
  // Initialize the LED strip
  strip.begin();
  strip.show(); // Initialize all pixels to 'off'
}

void loop() {
  // Example: Set all LEDs to red
  for (int i = 0; i < NUM_LEDS; i++) {
    strip.setPixelColor(i, strip.Color(255, 0, 0)); // Red color
  }
  strip.show(); // Update the strip with new colors
  delay(500); // Wait for 500 milliseconds

  // Example: Turn off all LEDs
  for (int i = 0; i < NUM_LEDS; i++) {
    strip.setPixelColor(i, strip.Color(0, 0, 0)); // Turn off
  }
  strip.show(); // Update the strip with new colors
  delay(500); // Wait for 500 milliseconds
}
Troubleshooting and FAQs
Common Issues Users Might Face
- LEDs Not Lighting Up: Ensure the power supply is connected correctly and providing sufficient voltage. Check the data line connection and ensure the microcontroller is properly programmed.
- Flickering LEDs: This can be caused by insufficient power supply or poor connections. Ensure all connections are secure and the power supply can handle the current draw.
- Incorrect Colors: Verify the data line connection and ensure the correct color order (GRB) is used in the code.
Solutions and Tips for Troubleshooting
- Check Connections: Ensure all connections are secure and correctly oriented.
- Power Supply: Use a stable and sufficient power supply to avoid voltage drops.
- Code Verification: Double-check the code for correct pin definitions and color settings.
- Component Testing: Test individual components to isolate the issue.
By following this documentation, users can effectively utilize the WS2812B addressable LED pixel board in their projects, creating stunning and dynamic lighting effects with ease.