Cirkit Designer Logo
Cirkit Designer
Your all-in-one circuit design IDE
Home / 
Component Documentation

How to Use Adafruit 12 NeoPixel Ring: Examples, Pinouts, and Specs

Image of Adafruit 12 NeoPixel Ring
Cirkit Designer LogoDesign with Adafruit 12 NeoPixel Ring in Cirkit Designer

Introduction

The Adafruit 12 NeoPixel Ring is an innovative and versatile lighting solution that consists of a circular arrangement of 12 individually addressable RGB LEDs. Each LED on the ring can be controlled independently, allowing for a wide range of color and brightness combinations. This component is ideal for a variety of applications, including wearable technology, decorative lighting, and interactive projects. It is commonly used with microcontrollers such as the Arduino UNO, making it accessible for hobbyists and professionals alike.

Explore Projects Built with Adafruit 12 NeoPixel Ring

Use Cirkit Designer to design, explore, and prototype these projects online. Some projects support real-time simulation. Click "Open Project" to start designing instantly!
Arduino UNO Controlled NeoPixel Ring Light Show
Image of 6 Ring Series: A project utilizing Adafruit 12 NeoPixel Ring in a practical application
This circuit consists of an Arduino UNO microcontroller connected to six Adafruit 12 NeoPixel Rings, each with 12 LEDs, for a total of 72 LEDs. The Arduino controls the LEDs to display a yellow color with varying brightness, creating a pulsating effect.
Cirkit Designer LogoOpen Project in Cirkit Designer
Arduino-Controlled NeoPixel LED Display with Voltage Regulation
Image of KK project: A project utilizing Adafruit 12 NeoPixel Ring in a practical application
This circuit features an Arduino 101 controlling multiple individually addressable Adafruit NeoPixel LED rings, with power regulation and decoupling provided by 7805 voltage regulators and electrolytic capacitors, all powered by a 12V battery.
Cirkit Designer LogoOpen Project in Cirkit Designer
Arduino-Controlled NeoPixel Light Display with Rocker Switch
Image of EXP: A project utilizing Adafruit 12 NeoPixel Ring in a practical application
This circuit features an Arduino UNO microcontroller connected to an Adafruit 12 NeoPixel Ring and controlled by an SPST rocker switch. The switch enables or disables the signal from the Arduino to the NeoPixel Ring, which is powered by the Arduino's 5V output. The Arduino is programmed to interact with the NeoPixel Ring, potentially to control the lighting patterns or color output.
Cirkit Designer LogoOpen Project in Cirkit Designer
Arduino Nano Controlled NeoPixel Ring and Servo Interaction
Image of Flower: A project utilizing Adafruit 12 NeoPixel Ring in a practical application
This circuit features an Arduino Nano microcontroller connected to a pushbutton, a Tower Pro SG90 servo, and an Adafruit 12 NeoPixel Ring. The pushbutton's output is read by one of the digital pins on the Arduino, which likely controls the servo and the NeoPixel Ring based on the button's state. The servo and NeoPixel Ring are powered by the Arduino's 5V output, and all components share a common ground connection.
Cirkit Designer LogoOpen Project in Cirkit Designer

Explore Projects Built with Adafruit 12 NeoPixel Ring

Use Cirkit Designer to design, explore, and prototype these projects online. Some projects support real-time simulation. Click "Open Project" to start designing instantly!
Image of 6 Ring Series: A project utilizing Adafruit 12 NeoPixel Ring in a practical application
Arduino UNO Controlled NeoPixel Ring Light Show
This circuit consists of an Arduino UNO microcontroller connected to six Adafruit 12 NeoPixel Rings, each with 12 LEDs, for a total of 72 LEDs. The Arduino controls the LEDs to display a yellow color with varying brightness, creating a pulsating effect.
Cirkit Designer LogoOpen Project in Cirkit Designer
Image of KK project: A project utilizing Adafruit 12 NeoPixel Ring in a practical application
Arduino-Controlled NeoPixel LED Display with Voltage Regulation
This circuit features an Arduino 101 controlling multiple individually addressable Adafruit NeoPixel LED rings, with power regulation and decoupling provided by 7805 voltage regulators and electrolytic capacitors, all powered by a 12V battery.
Cirkit Designer LogoOpen Project in Cirkit Designer
Image of EXP: A project utilizing Adafruit 12 NeoPixel Ring in a practical application
Arduino-Controlled NeoPixel Light Display with Rocker Switch
This circuit features an Arduino UNO microcontroller connected to an Adafruit 12 NeoPixel Ring and controlled by an SPST rocker switch. The switch enables or disables the signal from the Arduino to the NeoPixel Ring, which is powered by the Arduino's 5V output. The Arduino is programmed to interact with the NeoPixel Ring, potentially to control the lighting patterns or color output.
Cirkit Designer LogoOpen Project in Cirkit Designer
Image of Flower: A project utilizing Adafruit 12 NeoPixel Ring in a practical application
Arduino Nano Controlled NeoPixel Ring and Servo Interaction
This circuit features an Arduino Nano microcontroller connected to a pushbutton, a Tower Pro SG90 servo, and an Adafruit 12 NeoPixel Ring. The pushbutton's output is read by one of the digital pins on the Arduino, which likely controls the servo and the NeoPixel Ring based on the button's state. The servo and NeoPixel Ring are powered by the Arduino's 5V output, and all components share a common ground connection.
Cirkit Designer LogoOpen Project in Cirkit Designer

Common Applications and Use Cases

  • Wearable electronics
  • Decorative lighting
  • Interactive art installations
  • Signal indicators
  • Custom computer case lighting
  • Prototyping for smart lighting systems

Technical Specifications

Key Technical Details

  • Operating Voltage: 5V DC
  • Max Current per LED: 60 mA (with all LEDs at full brightness)
  • Max Power Consumption: 12 LEDs x 60 mA = 720 mA
  • LED Type: WS2812 or equivalent
  • Communication Protocol: Single-wire (data) control (typically using a microcontroller's GPIO pin)

Pin Configuration and Descriptions

Pin Number Name Description
1 VDD Power supply (5V DC)
2 GND Ground connection
3 DIN Data input from microcontroller
4 DOUT Data output to the next NeoPixel in series

Usage Instructions

How to Use the Component in a Circuit

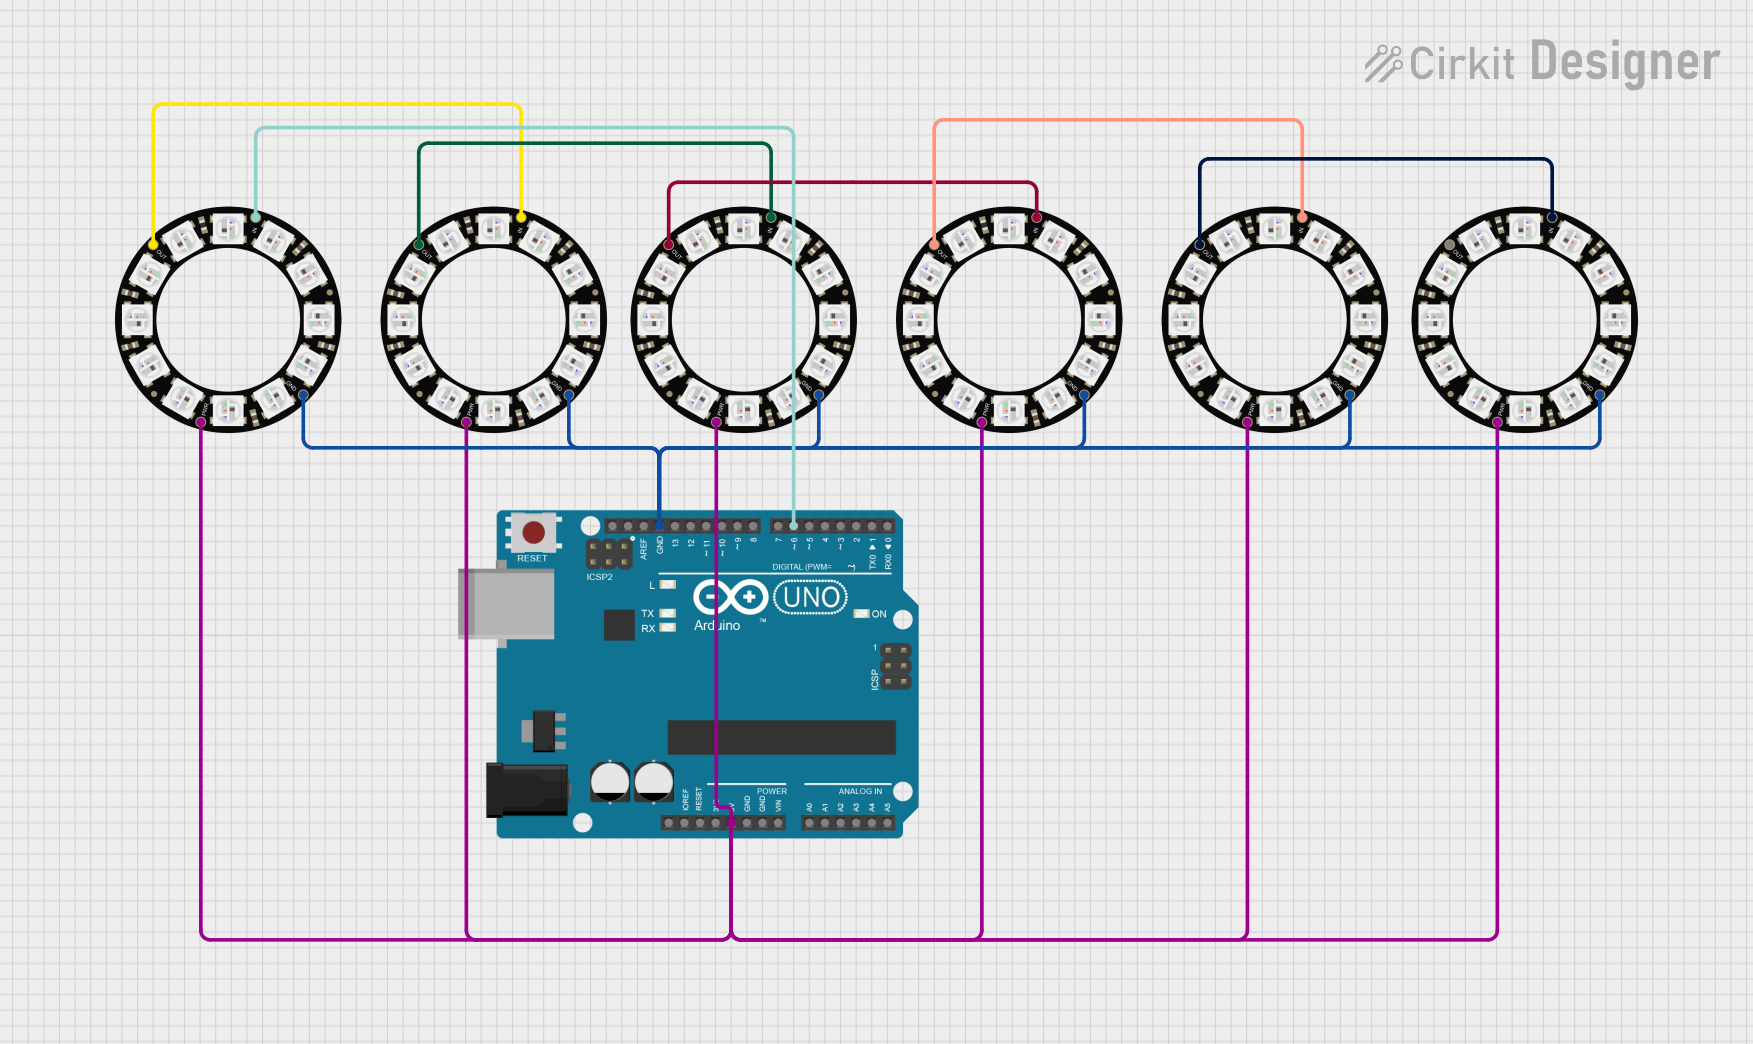
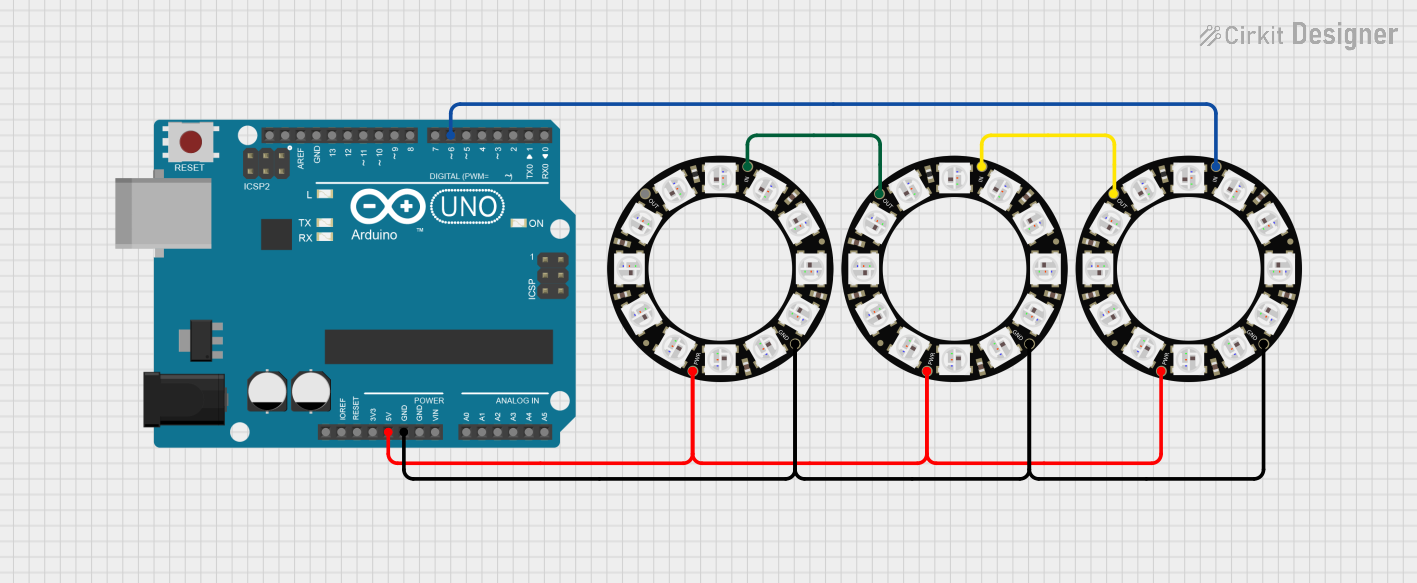
  1. Power Supply: Connect the VDD pin to a 5V power supply and the GND pin to the common ground of your circuit.
  2. Data Connection: Connect the DIN pin to a digital output pin on your microcontroller.
  3. Chaining NeoPixels: If you are connecting multiple NeoPixel rings or strips, connect the DOUT pin of the first ring to the DIN pin of the next.

Important Considerations and Best Practices

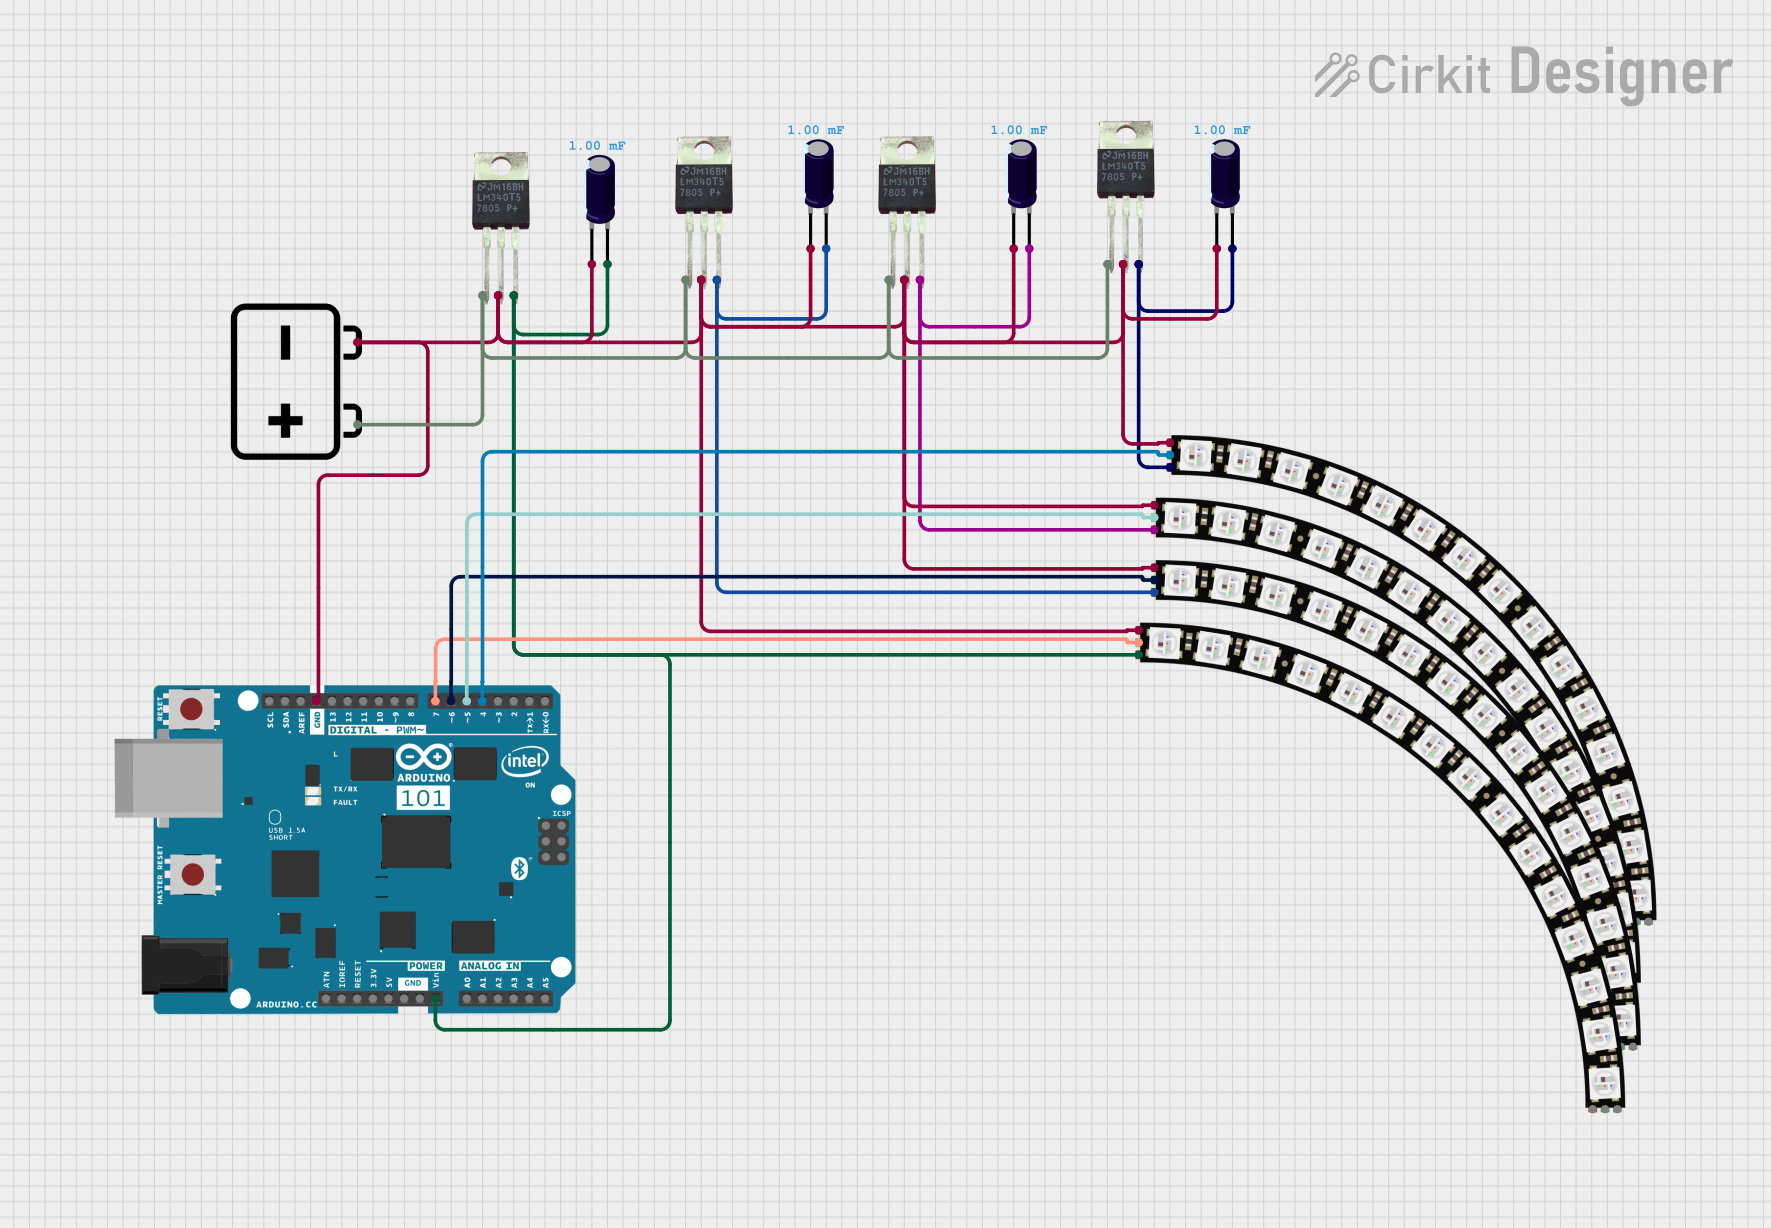
  • Power Requirements: Ensure your power supply can handle the maximum current draw if all LEDs are at full brightness.
  • Data Signal: Use a 300 to 500-ohm resistor on the data line to prevent spikes that can damage the first LED.
  • Capacitor: Place a 1000 µF, 6.3V or higher capacitor across the power inputs to prevent initial onrush of current from damaging the LEDs.
  • Level Shifting: If using a 3.3V microcontroller, use a level shifter to bring the data signal up to 5V.
  • Refresh Rate: Keep in mind that updating the LEDs too frequently can cause flickering. Aim for a refresh rate of 30Hz or higher for smooth animation.

Example Code for Arduino UNO

#include <Adafruit_NeoPixel.h>

#define PIN            6 // Define the pin connected to the NeoPixel data input
#define NUMPIXELS      12 // Number of NeoPixels in the ring

Adafruit_NeoPixel pixels(NUMPIXELS, PIN, NEO_GRB + NEO_KHZ800);

void setup() {
  pixels.begin(); // Initialize the NeoPixel ring
}

void loop() {
  for(int i=0; i<NUMPIXELS; i++) {
    pixels.setPixelColor(i, pixels.Color(150, 0, 0)); // Set color to red, moderate brightness
    pixels.show(); // Update the ring with the new color
    delay(50);
    pixels.setPixelColor(i, pixels.Color(0, 0, 0)); // Turn off the pixel
  }
}

Troubleshooting and FAQs

Common Issues Users Might Face

  • LEDs Not Lighting Up: Check power supply and connections. Ensure the data line is connected to the correct pin and that the code is uploaded correctly.
  • Flickering LEDs: This may be due to a power supply issue or too frequent updates. Ensure the power supply is stable and try reducing the refresh rate.
  • Incorrect Colors: Ensure the color order in the code matches the NeoPixel's color order (e.g., GRB vs. RGB).

Solutions and Tips for Troubleshooting

  • Power Issues: Use a separate power supply for the NeoPixels if the microcontroller cannot provide sufficient current.
  • Data Signal Integrity: Keep the data line as short as possible and use a resistor to prevent voltage spikes.
  • Code Verification: Double-check the pin definitions and color order in your code.

FAQs

Q: Can I control each LED individually? A: Yes, each LED is individually addressable using the Adafruit NeoPixel library.

Q: How many NeoPixel Rings can I chain together? A: This depends on your power supply and microcontroller's memory. Ensure you have enough current and RAM for the number of LEDs you plan to control.

Q: Do I need to use an Arduino UNO? A: No, you can use any microcontroller compatible with the Adafruit NeoPixel library, as long as it can provide a suitable data signal and power supply.

Q: Can I use a 3.3V logic level for the data signal? A: While the WS2812 LEDs may sometimes work at 3.3V logic, it is not guaranteed. Use a level shifter to ensure reliable operation at 5V logic levels.