Cirkit Designer Logo
Cirkit Designer
Your all-in-one circuit design IDE
Home / 
Component Documentation

How to Use Adafruit Quarter 60 NeoPixel Ring: Examples, Pinouts, and Specs

Image of Adafruit Quarter 60 NeoPixel Ring
Cirkit Designer LogoDesign with Adafruit Quarter 60 NeoPixel Ring in Cirkit Designer

Introduction

The Adafruit Quarter 60 NeoPixel Ring is a versatile and vibrant lighting solution for a wide range of projects. This component features a quarter-circle ring populated with 60 individually addressable RGB LEDs, which are based on the WS2812 or the upgraded WS2812B LED driver. The ring is designed to be chainable, allowing multiple rings to be connected together to create larger and more complex displays.

Explore Projects Built with Adafruit Quarter 60 NeoPixel Ring

Use Cirkit Designer to design, explore, and prototype these projects online. Some projects support real-time simulation. Click "Open Project" to start designing instantly!
Arduino-Controlled NeoPixel LED Display with Voltage Regulation
Image of KK project: A project utilizing Adafruit Quarter 60 NeoPixel Ring in a practical application
This circuit features an Arduino 101 controlling multiple individually addressable Adafruit NeoPixel LED rings, with power regulation and decoupling provided by 7805 voltage regulators and electrolytic capacitors, all powered by a 12V battery.
Cirkit Designer LogoOpen Project in Cirkit Designer
Arduino UNO Controlled NeoPixel Ring Light Show
Image of 6 Ring Series: A project utilizing Adafruit Quarter 60 NeoPixel Ring in a practical application
This circuit consists of an Arduino UNO microcontroller connected to six Adafruit 12 NeoPixel Rings, each with 12 LEDs, for a total of 72 LEDs. The Arduino controls the LEDs to display a yellow color with varying brightness, creating a pulsating effect.
Cirkit Designer LogoOpen Project in Cirkit Designer
Arduino-Controlled NeoPixel Light Display with Rocker Switch
Image of EXP: A project utilizing Adafruit Quarter 60 NeoPixel Ring in a practical application
This circuit features an Arduino UNO microcontroller connected to an Adafruit 12 NeoPixel Ring and controlled by an SPST rocker switch. The switch enables or disables the signal from the Arduino to the NeoPixel Ring, which is powered by the Arduino's 5V output. The Arduino is programmed to interact with the NeoPixel Ring, potentially to control the lighting patterns or color output.
Cirkit Designer LogoOpen Project in Cirkit Designer
Arduino UNO with APDS-9930 Sensor and NeoPixel Ring Light Control
Image of Burglar: A project utilizing Adafruit Quarter 60 NeoPixel Ring in a practical application
This circuit features an Arduino UNO microcontroller connected to an APDS-9930 Proximity and Ambient Light Sensor for sensing environmental light and proximity, and an Adafruit Quarter 60 NeoPixel Ring for visual output. The Arduino provides power to both the sensor and the NeoPixel Ring, and communicates with the sensor via I2C (SDA and SCL) and controls the NeoPixel Ring through a digital data input (D8). The provided code skeleton suggests that the Arduino is programmed to interact with these components, although the specific functionality is not implemented in the given code.
Cirkit Designer LogoOpen Project in Cirkit Designer

Explore Projects Built with Adafruit Quarter 60 NeoPixel Ring

Use Cirkit Designer to design, explore, and prototype these projects online. Some projects support real-time simulation. Click "Open Project" to start designing instantly!
Image of KK project: A project utilizing Adafruit Quarter 60 NeoPixel Ring in a practical application
Arduino-Controlled NeoPixel LED Display with Voltage Regulation
This circuit features an Arduino 101 controlling multiple individually addressable Adafruit NeoPixel LED rings, with power regulation and decoupling provided by 7805 voltage regulators and electrolytic capacitors, all powered by a 12V battery.
Cirkit Designer LogoOpen Project in Cirkit Designer
Image of 6 Ring Series: A project utilizing Adafruit Quarter 60 NeoPixel Ring in a practical application
Arduino UNO Controlled NeoPixel Ring Light Show
This circuit consists of an Arduino UNO microcontroller connected to six Adafruit 12 NeoPixel Rings, each with 12 LEDs, for a total of 72 LEDs. The Arduino controls the LEDs to display a yellow color with varying brightness, creating a pulsating effect.
Cirkit Designer LogoOpen Project in Cirkit Designer
Image of EXP: A project utilizing Adafruit Quarter 60 NeoPixel Ring in a practical application
Arduino-Controlled NeoPixel Light Display with Rocker Switch
This circuit features an Arduino UNO microcontroller connected to an Adafruit 12 NeoPixel Ring and controlled by an SPST rocker switch. The switch enables or disables the signal from the Arduino to the NeoPixel Ring, which is powered by the Arduino's 5V output. The Arduino is programmed to interact with the NeoPixel Ring, potentially to control the lighting patterns or color output.
Cirkit Designer LogoOpen Project in Cirkit Designer
Image of Burglar: A project utilizing Adafruit Quarter 60 NeoPixel Ring in a practical application
Arduino UNO with APDS-9930 Sensor and NeoPixel Ring Light Control
This circuit features an Arduino UNO microcontroller connected to an APDS-9930 Proximity and Ambient Light Sensor for sensing environmental light and proximity, and an Adafruit Quarter 60 NeoPixel Ring for visual output. The Arduino provides power to both the sensor and the NeoPixel Ring, and communicates with the sensor via I2C (SDA and SCL) and controls the NeoPixel Ring through a digital data input (D8). The provided code skeleton suggests that the Arduino is programmed to interact with these components, although the specific functionality is not implemented in the given code.
Cirkit Designer LogoOpen Project in Cirkit Designer

Common Applications and Use Cases

  • Wearable electronics and fashion accessories
  • Decorative lighting and art installations
  • Indicators and status lights for devices
  • Interactive art and stage performance props
  • Custom gaming setups and computer case modifications

Technical Specifications

Key Technical Details

  • Operating Voltage: 5V DC
  • Max Current per LED: 60 mA (with all LEDs at full brightness)
  • Max Power Consumption per LED: 0.3W (at 5V, full brightness)
  • LED Count: 60 individually addressable RGB LEDs
  • Communication Protocol: Single-wire (data) control (WS2812B protocol)
  • Viewing Angle: ~120 degrees
  • Luminosity: Variable, RGB color mixing

Pin Configuration and Descriptions

Pin Number Name Description
1 VDD Power supply (5V DC)
2 GND Ground connection
3 DIN Data input from microcontroller
4 DOUT Data output to the next NeoPixel component

Usage Instructions

How to Use the Component in a Circuit

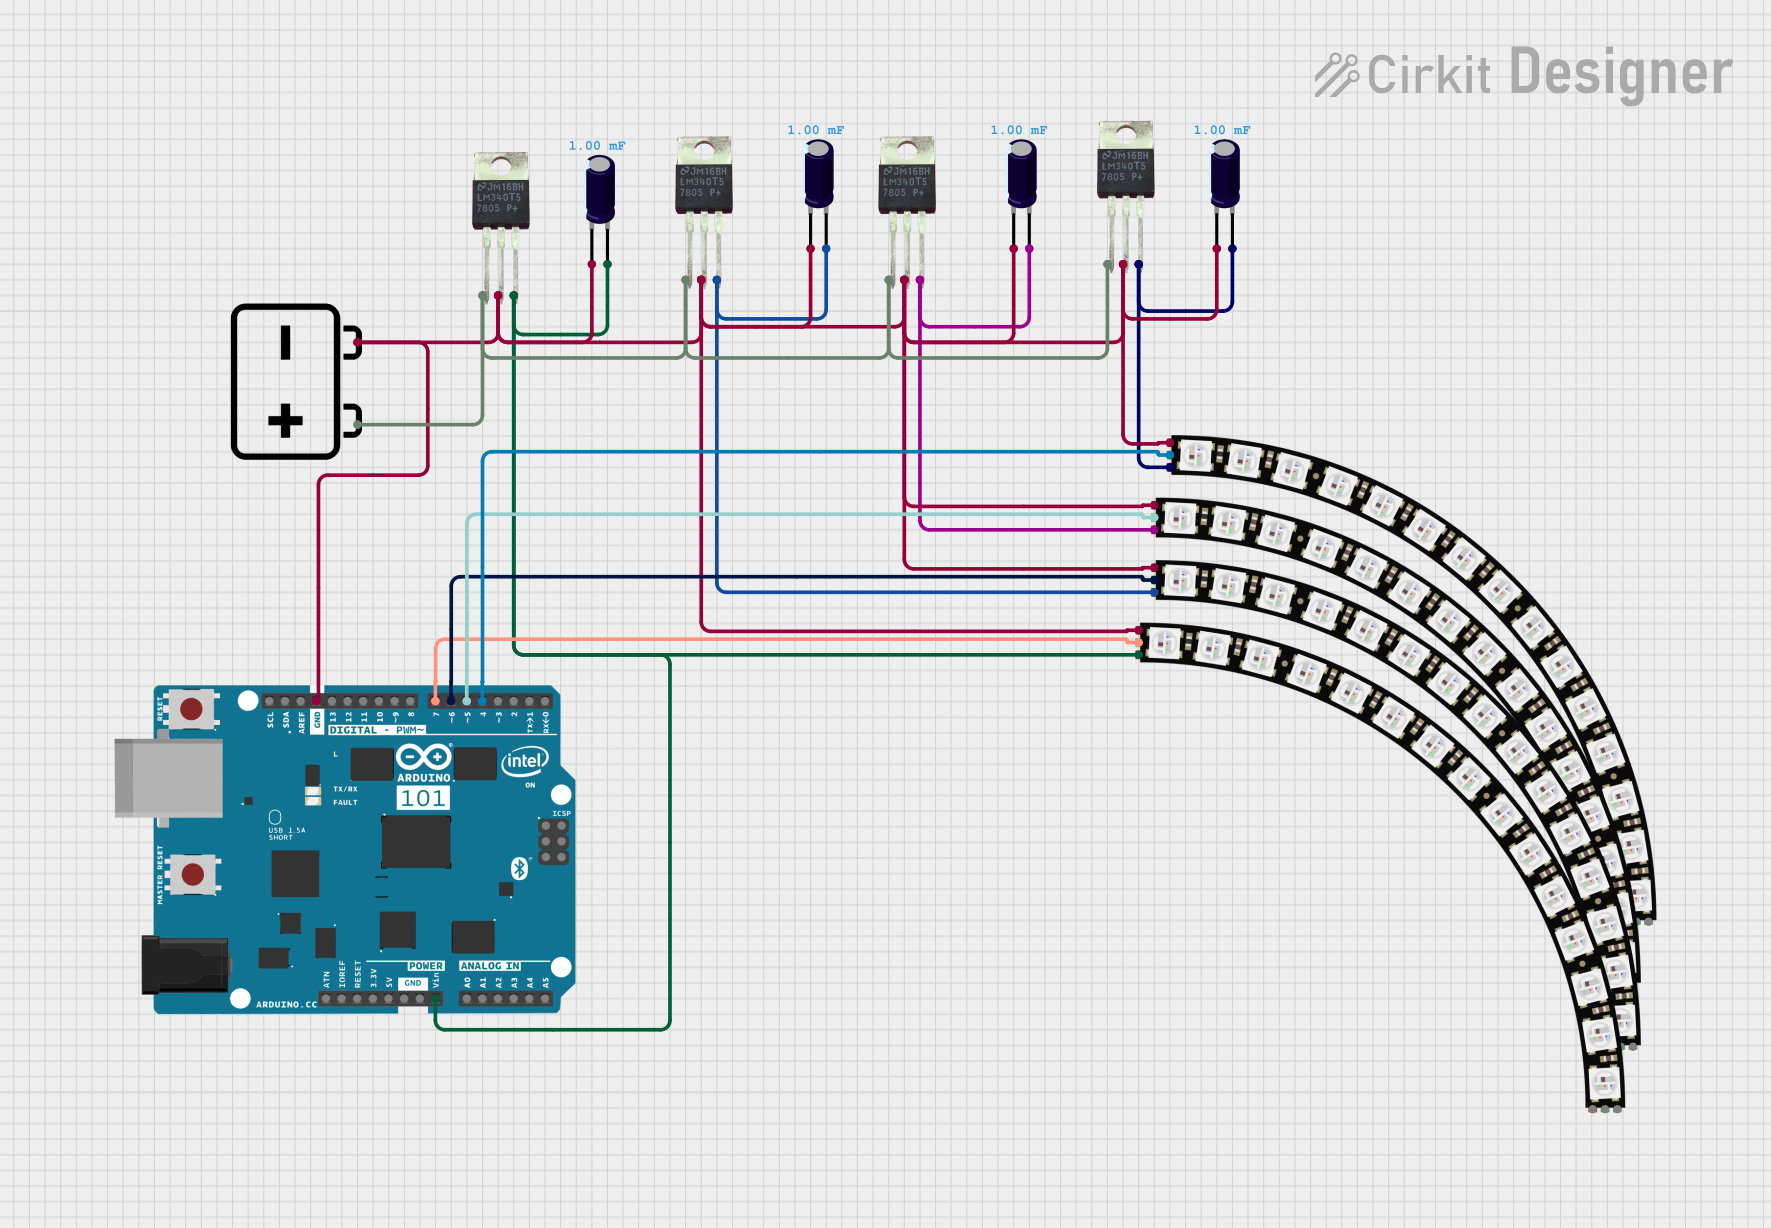
  1. Power Supply: Connect the VDD pin to a 5V power supply and the GND pin to the common ground in your circuit.
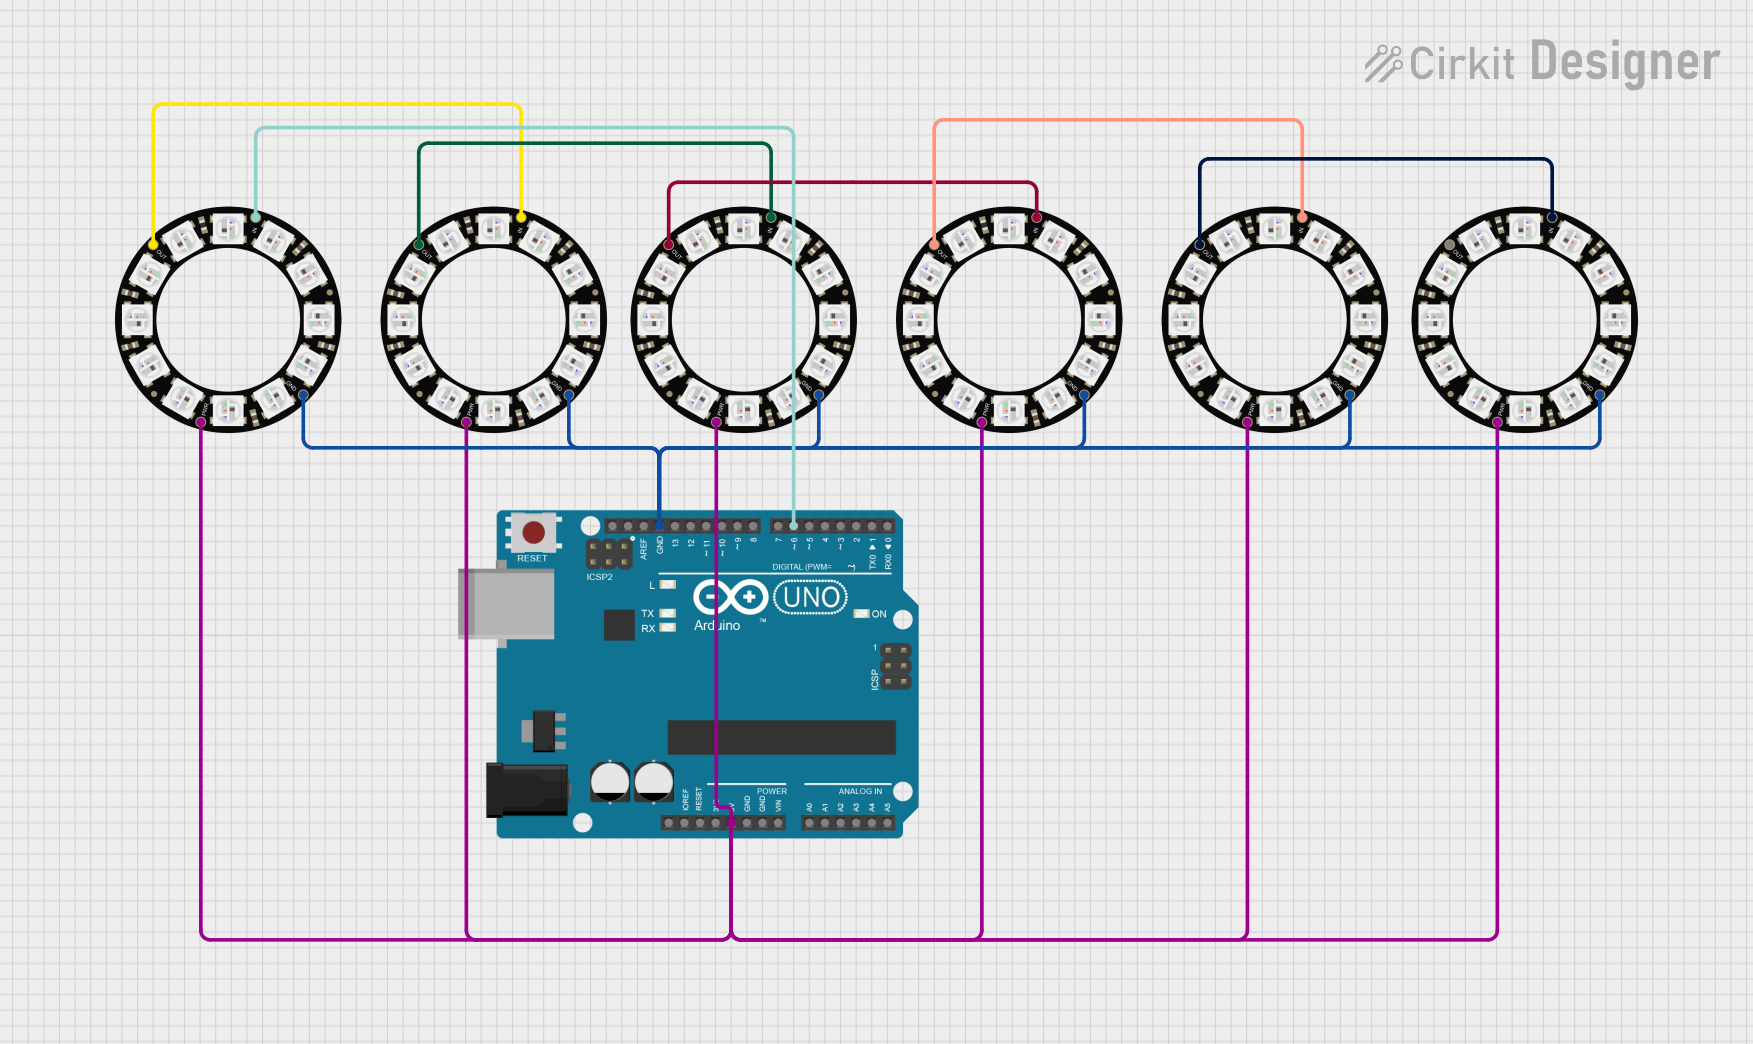
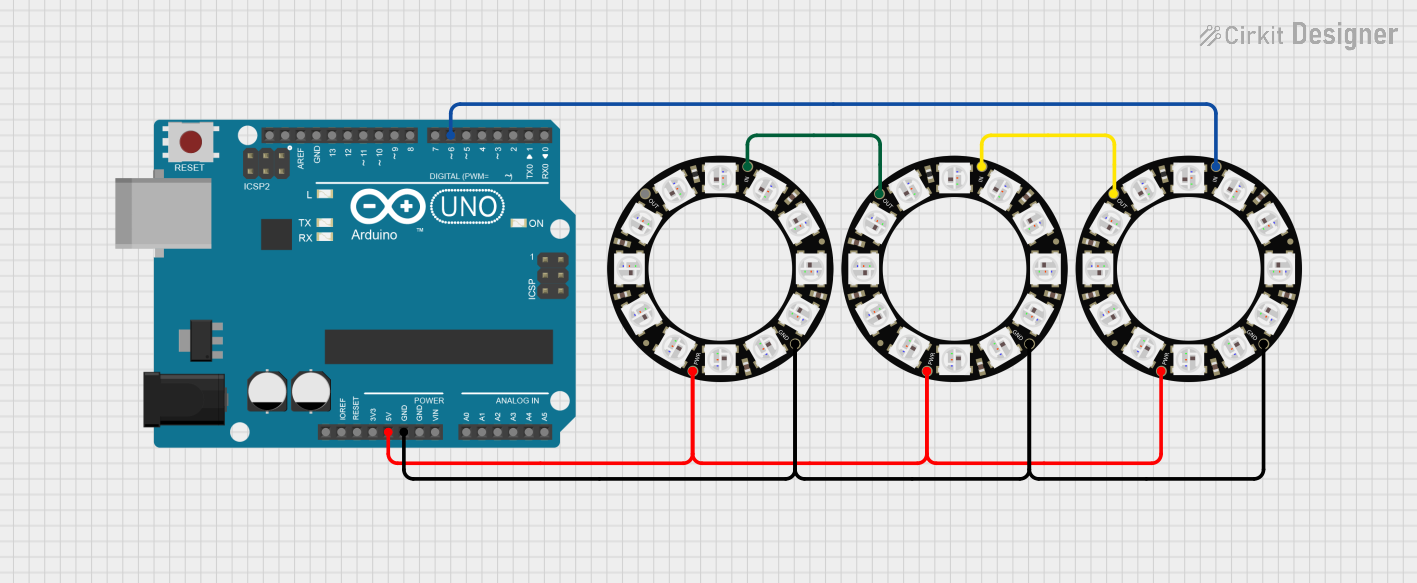
  2. Data Connection: Connect the DIN pin to a digital output pin on your microcontroller (e.g., an Arduino UNO).
  3. Chaining NeoPixels: If chaining multiple NeoPixel rings, connect the DOUT pin of the first ring to the DIN pin of the next.
  4. Capacitor: It's recommended to use a 1000 µF capacitor across the + and – terminals of the power supply to prevent initial onrush of current from damaging the LEDs.
  5. Resistor: Place a 300-500 Ohm resistor in series with the data input to protect the data pin.

Important Considerations and Best Practices

  • Power Requirements: Ensure your power supply can handle the maximum current draw when all LEDs are at full brightness.
  • Heat Dissipation: Be mindful of heat generation when operating at high brightness for extended periods.
  • Data Signal Integrity: Keep the data line as short as possible to prevent signal degradation, especially when chaining multiple rings.
  • Voltage Level Matching: If using a 3.3V microcontroller, a level shifter is recommended for the data line to match the 5V logic level of the NeoPixel.

Example Code for Arduino UNO

#include <Adafruit_NeoPixel.h>

#define PIN            6 // The pin connected to the NeoPixels
#define NUMPIXELS      60 // Number of NeoPixels in the ring

// Declare our NeoPixel strip object:
Adafruit_NeoPixel strip(NUMPIXELS, PIN, NEO_GRB + NEO_KHZ800);

void setup() {
  strip.begin(); // Initialize the strip
  strip.show(); // Initialize all pixels to 'off'
}

void loop() {
  for(int i=0; i<strip.numPixels(); i++) {
    strip.setPixelColor(i, strip.Color(255, 0, 0)); // Red color
    strip.show();
    delay(50);
    strip.setPixelColor(i, strip.Color(0, 0, 0)); // Off
  }
}

Troubleshooting and FAQs

Common Issues

  • LEDs Not Lighting Up: Check power supply and connections. Ensure the data input is connected to the correct microcontroller pin.
  • Flickering LEDs: This may be due to a poor power supply or long data lines. Shorten the data line and ensure a stable power source.
  • Incorrect Colors: Verify that the data signal is clean and not degraded. Check for correct RGB ordering in the code.

Solutions and Tips for Troubleshooting

  • Power Issues: Use a multimeter to check the voltage at the power supply and at the end of the NeoPixel ring.
  • Data Signal: Use an oscilloscope to check the integrity of the data signal if available.
  • Code Verification: Double-check the code for correct pin assignments and color values.

FAQs

Q: Can I cut the NeoPixel ring to fit my project? A: Yes, the ring can be cut at designated points, but be aware that this will reduce the number of usable LEDs.

Q: How many NeoPixel rings can I chain together? A: This depends on the power supply capacity and the microcontroller's ability to drive the data signal. With adequate power and signal boosting, many rings can be chained.

Q: Can I use a different microcontroller with the NeoPixel ring? A: Yes, any microcontroller with a digital output capable of the WS2812B protocol can be used. Adjustments in the code may be necessary.

Q: Do I need to use an external power supply? A: For a single ring, USB power may be sufficient. However, for multiple rings or full brightness, an external power supply is recommended.