How to Use Receiver: Examples, Pinouts, and Specs
Introduction
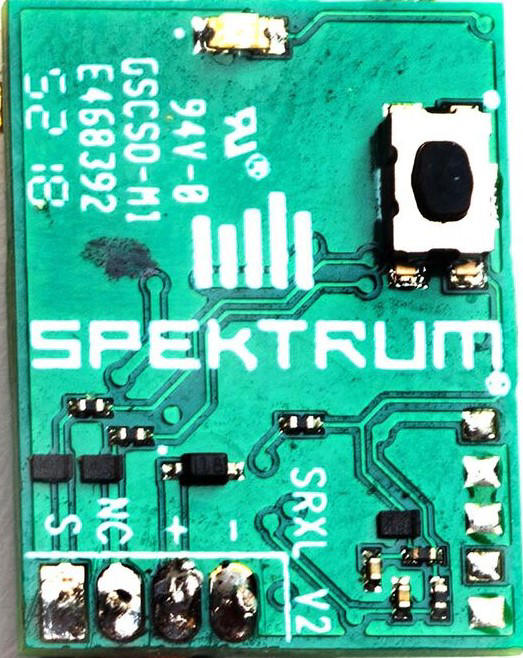
The Spektrum SRXL2 DSMX Serial Micro Receiver (Part ID: SRXL2) is a compact and efficient device designed to receive and process signals. It is commonly used in communication systems to decode and interpret incoming data. This receiver is particularly popular in remote control (RC) applications, such as drones, RC cars, and other hobbyist projects, due to its reliability and ease of integration.
Explore Projects Built with Receiver


Explore Projects Built with Receiver
Technical Specifications
Key Technical Details
| Parameter | Specification |
|---|---|
| Operating Voltage | 3.3V - 8.4V |
| Current Consumption | 30mA @ 5V |
| Frequency Range | 2.4GHz DSMX |
| Data Output | SRXL2 Serial Protocol |
| Dimensions | 18mm x 13mm x 5mm |
| Weight | 1.2g |
| Antenna Length | 26mm |
Pin Configuration and Descriptions
| Pin Number | Pin Name | Description |
|---|---|---|
| 1 | VCC | Power Supply (3.3V - 8.4V) |
| 2 | GND | Ground |
| 3 | SRXL2 | SRXL2 Serial Data Output |
| 4 | Bind | Binding Button for Receiver Pairing |
Usage Instructions
How to Use the Component in a Circuit
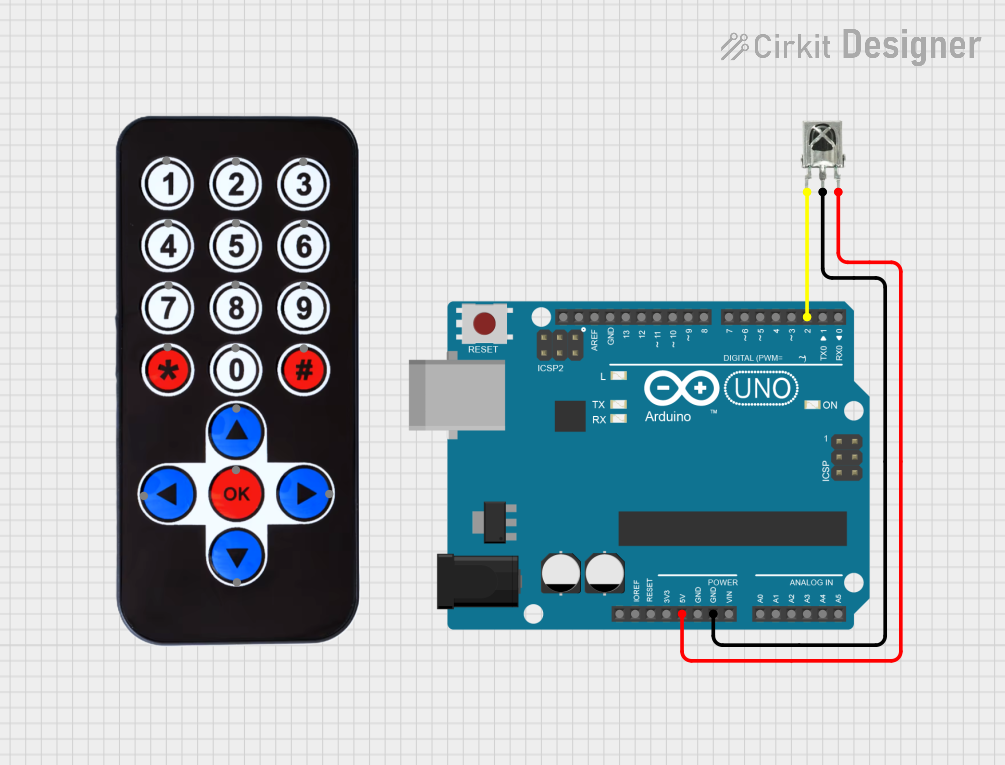
Power Supply: Connect the VCC pin to a power source within the range of 3.3V to 8.4V. Ensure that the power supply is stable and capable of providing sufficient current (at least 30mA).
Ground Connection: Connect the GND pin to the ground of your circuit to complete the power loop.
Data Connection: Connect the SRXL2 pin to the appropriate data input pin on your microcontroller or flight controller. This pin will transmit the decoded data from the receiver.
Binding: To pair the receiver with a transmitter, press and hold the Bind button while powering on the receiver. Follow the transmitter's binding procedure to complete the pairing process.
Important Considerations and Best Practices
- Antenna Placement: Ensure that the antenna is placed in a position with minimal obstructions to maintain a strong signal. Avoid placing the antenna near metal objects or other electronic components that may cause interference.
- Power Supply: Use a regulated power supply to prevent voltage fluctuations that could affect the receiver's performance.
- Firmware Updates: Check for firmware updates from Spektrum to ensure your receiver has the latest features and improvements.
Example Code for Arduino UNO
Below is an example code to interface the SRXL2 DSMX Serial Micro Receiver with an Arduino UNO. This code reads the data from the receiver and prints it to the Serial Monitor.
#include <SoftwareSerial.h>

// Define the SRXL2 pin
#define SRXL2_PIN 2

// Create a SoftwareSerial object
SoftwareSerial srxl2Serial(SRXL2_PIN, -1); // RX, TX (TX not used)

// Setup function
void setup() {
  // Initialize the Serial Monitor
  Serial.begin(9600);

  // Initialize the SRXL2 serial communication
  srxl2Serial.begin(115200);

  // Print a message to the Serial Monitor
  Serial.println("SRXL2 Receiver Initialized");
}

// Loop function
void loop() {
  // Check if data is available from the SRXL2 receiver
  if (srxl2Serial.available()) {
    // Read the incoming data
    int incomingByte = srxl2Serial.read();

    // Print the data to the Serial Monitor
    Serial.print("Received: ");
    Serial.println(incomingByte, HEX);
  }
}
Troubleshooting and FAQs
Common Issues Users Might Face
No Signal Reception:
- Solution: Ensure that the receiver is properly bound to the transmitter. Check the power supply and antenna placement.
Intermittent Signal Loss:
- Solution: Verify that there are no sources of interference nearby. Ensure that the antenna is not damaged and is properly positioned.
Receiver Not Powering On:
- Solution: Check the power connections and ensure that the voltage is within the specified range. Verify that the ground connection is secure.
FAQs
Q1: Can I use the SRXL2 receiver with other microcontrollers besides Arduino?
- A1: Yes, the SRXL2 receiver can be used with any microcontroller that supports serial communication. Ensure that the microcontroller's voltage levels are compatible with the receiver.
Q2: How do I update the firmware on the SRXL2 receiver?
- A2: Firmware updates can be performed using the Spektrum Programmer software. Follow the instructions provided by Spektrum for the update process.
Q3: What is the maximum range of the SRXL2 receiver?
- A3: The range of the SRXL2 receiver depends on various factors, including the environment and antenna placement. Under optimal conditions, it can achieve a range of several hundred meters.
By following this documentation, users can effectively integrate and utilize the Spektrum SRXL2 DSMX Serial Micro Receiver in their projects. For further assistance, refer to the official Spektrum support resources.