How to Use KY-026 Sensor de Flama: Examples, Pinouts, and Specs
Introduction
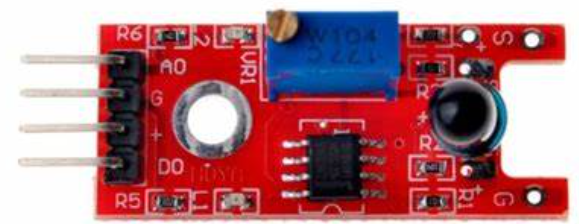
The KY-026 Flame Sensor is a compact and reliable device designed to detect the presence of flames or fire. It operates by sensing infrared (IR) radiation emitted by flames using a photodiode and a comparator circuit. The sensor provides both digital and analog outputs, making it versatile for various applications.
Explore Projects Built with KY-026 Sensor de Flama

Explore Projects Built with KY-026 Sensor de Flama
Common Applications and Use Cases
- Fire detection systems
- Safety and alarm systems
- Industrial flame monitoring
- Robotics and automation projects
- Educational and DIY electronics projects
Technical Specifications
The KY-026 Flame Sensor is designed for ease of use and integration into electronic systems. Below are its key technical details:
| Parameter | Specification |
|---|---|
| Operating Voltage | 3.3V to 5V |
| Output Type | Digital (D0) and Analog (A0) |
| Detection Range | Up to 80 cm (depending on flame size) |
| Detection Angle | 60° |
| Operating Temperature | -25°C to 85°C |
| Dimensions | 30mm x 15mm x 8mm |
Pin Configuration and Descriptions
The KY-026 Flame Sensor has four pins, as described in the table below:
| Pin | Name | Description |
|---|---|---|
| 1 | VCC | Power supply pin. Connect to 3.3V or 5V. |
| 2 | GND | Ground pin. Connect to the ground of the circuit. |
| 3 | D0 | Digital output pin. Outputs HIGH (1) when a flame is detected, LOW (0) otherwise. |
| 4 | A0 | Analog output pin. Provides a variable voltage proportional to the flame's intensity. |
Usage Instructions
The KY-026 Flame Sensor is straightforward to use in a circuit. Follow the steps below to integrate it into your project:
Connecting the Sensor
- Power the Sensor: Connect the
VCCpin to a 3.3V or 5V power source and theGNDpin to the ground. - Digital Output (D0): Connect the
D0pin to a digital input pin on your microcontroller (e.g., Arduino) to detect the presence of a flame. - Analog Output (A0): Optionally, connect the
A0pin to an analog input pin on your microcontroller to measure the flame's intensity.
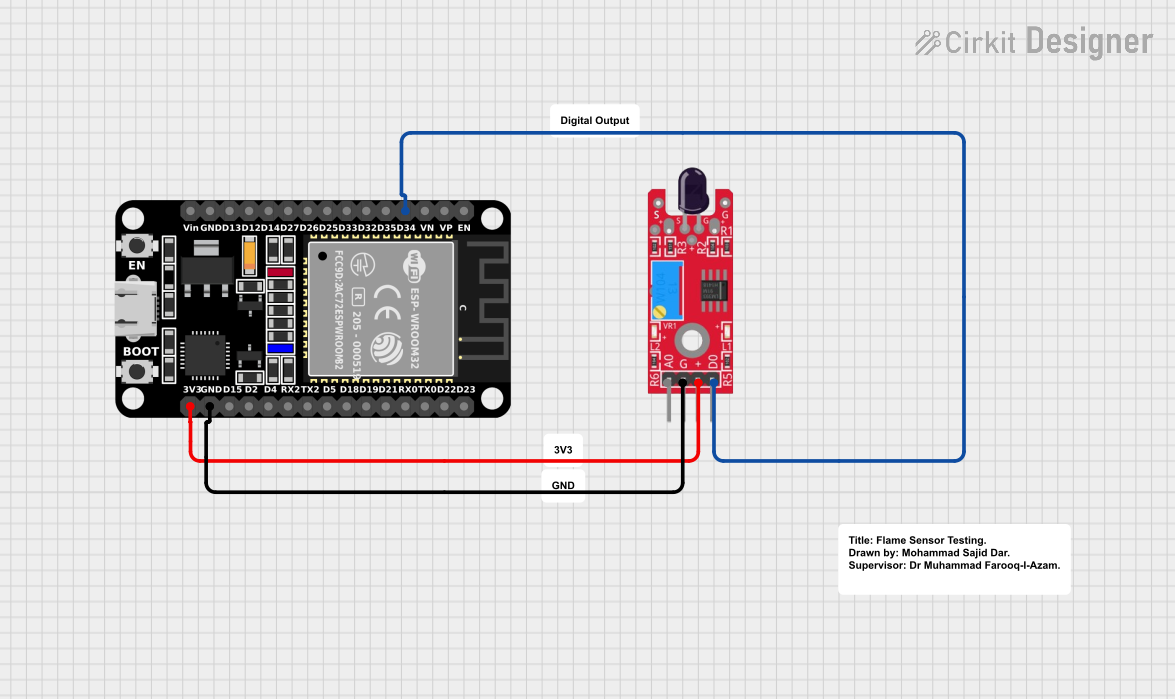
Example Circuit with Arduino UNO
Below is an example of how to connect the KY-026 Flame Sensor to an Arduino UNO:
| KY-026 Pin | Arduino UNO Pin |
|---|---|
| VCC | 5V |
| GND | GND |
| D0 | Digital Pin 2 |
| A0 | Analog Pin A0 |
Example Arduino Code
The following Arduino code demonstrates how to use the KY-026 Flame Sensor to detect flames and output the results via the Serial Monitor:
// Define pin connections
const int flameDigitalPin = 2; // Digital output pin (D0)
const int flameAnalogPin = A0; // Analog output pin (A0)

void setup() {
  pinMode(flameDigitalPin, INPUT); // Set D0 as input
  Serial.begin(9600); // Initialize serial communication
}

void loop() {
  // Read digital output
  int flameDetected = digitalRead(flameDigitalPin);

  // Read analog output
  int flameIntensity = analogRead(flameAnalogPin);

  // Print results to Serial Monitor
  if (flameDetected == HIGH) {
    Serial.println("Flame detected!");
  } else {
    Serial.println("No flame detected.");
  }

  Serial.print("Flame Intensity (Analog): ");
  Serial.println(flameIntensity);

  delay(500); // Wait for 500ms before next reading
}
Important Considerations and Best Practices
- Adjust Sensitivity: The sensor includes a potentiometer to adjust the sensitivity of the digital output. Turn the potentiometer clockwise or counterclockwise to fine-tune the detection threshold.
- Avoid False Positives: The sensor is sensitive to IR radiation, so avoid placing it near other IR sources (e.g., sunlight, IR LEDs) to prevent false detections.
- Optimal Placement: Position the sensor within the specified detection range and angle for accurate results.
- Power Supply: Ensure a stable power supply to avoid erratic behavior.
Troubleshooting and FAQs
Common Issues and Solutions
| Issue | Possible Cause | Solution |
|---|---|---|
| Sensor not detecting flames | Incorrect wiring or insufficient power | Verify connections and ensure a stable 3.3V or 5V power supply. |
| False flame detection | Interference from other IR sources | Shield the sensor from external IR sources or adjust its placement. |
| Analog output not varying | Flame is outside the detection range | Ensure the flame is within the specified range and angle of the sensor. |
| Digital output always HIGH or LOW | Sensitivity not properly adjusted | Use the potentiometer to fine-tune the sensitivity of the digital output. |
FAQs
Can the KY-026 Flame Sensor detect flames through glass?
No, the sensor cannot detect flames through glass as it blocks IR radiation.What is the maximum distance for flame detection?
The sensor can detect flames up to 80 cm away, depending on the flame's size and intensity.Can I use the KY-026 Flame Sensor outdoors?
While the sensor can operate in a wide temperature range, it is not waterproof. Use appropriate enclosures for outdoor applications.How do I know if the sensor is working?
The onboard LED will light up when a flame is detected, providing a visual indication of its operation.
By following this documentation, you can effectively integrate the KY-026 Flame Sensor into your projects for reliable flame detection.