Cirkit Designer Logo
Cirkit Designer
Your all-in-one circuit design IDE
Home / 
Component Documentation

How to Use Propeller Microcontroller: Examples, Pinouts, and Specs

Image of Propeller Microcontroller
Cirkit Designer LogoDesign with Propeller Microcontroller in Cirkit Designer

Introduction

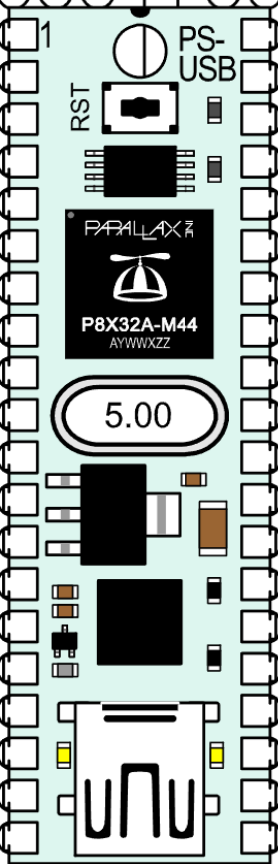
The Propeller Microcontroller (PBX32A), manufactured by Propeller, is a versatile and powerful microcontroller designed for multitasking applications. It features multiple cores, allowing it to run independent threads simultaneously. This makes it an excellent choice for complex control systems, robotics, real-time signal processing, and other applications requiring parallel processing.

Explore Projects Built with Propeller Microcontroller

Use Cirkit Designer to design, explore, and prototype these projects online. Some projects support real-time simulation. Click "Open Project" to start designing instantly!
Bluetooth-Controlled Robotic Vehicle with Ultrasonic Obstacle Detection and Motion Sensing
Image of 아두이노 드론: A project utilizing Propeller Microcontroller in a practical application
This circuit features a SparkFun Pro Micro microcontroller interfaced with an L298N DC motor driver to control two DC motors, an HC-SR04 ultrasonic sensor for distance measurement, a Bluetooth module HM-10 for wireless communication, and an MPU-6050 for motion tracking. The Pro Micro is responsible for processing sensor data and managing motor speeds and directions via the motor driver. Power is supplied by a 5V battery connected to the Pro Micro and a separate battery case providing 12V to the motor driver.
Cirkit Designer LogoOpen Project in Cirkit Designer
Arduino-Controlled Quadcopter with GPS and NRF24L01 Wireless Communication
Image of Octocopter Drone Circuit1: A project utilizing Propeller Microcontroller in a practical application
This circuit is designed for a quadcopter control system. It features an Arduino Pro Mini as the central microcontroller, interfacing with a GPS module for positioning, an NRF24L01 module for wireless communication, and an MPU-6050 for motion sensing. Power regulation is managed by an MP1584EN board, and four electronic speed controllers (ESCs) are connected to brushless motors for propeller control.
Cirkit Designer LogoOpen Project in Cirkit Designer
Arduino Mega 2560-Controlled Servo System with Bluetooth and Sensor Interface
Image of Završni: A project utilizing Propeller Microcontroller in a practical application
This is a microcontroller-based control system featuring an Arduino Mega 2560, designed to receive inputs from a rotary potentiometer, push switches, and an IR sensor, and to drive multiple servos and an LCD display. It includes an HC-05 Bluetooth module for wireless communication, allowing for remote interfacing and control.
Cirkit Designer LogoOpen Project in Cirkit Designer
Arduino-Controlled Bluetooth Robotic Vehicle with Relay-Switched Water Pump
Image of Project FYP: A project utilizing Propeller Microcontroller in a practical application
This is a microcontroller-based control system for DC motors and a water pump, featuring Bluetooth connectivity for wireless control. It uses an Arduino UNO, an HC-05 Bluetooth module, an L298N motor driver, and relays for pump activation, with a status LED and a manual power rocker switch.
Cirkit Designer LogoOpen Project in Cirkit Designer

Explore Projects Built with Propeller Microcontroller

Use Cirkit Designer to design, explore, and prototype these projects online. Some projects support real-time simulation. Click "Open Project" to start designing instantly!
Image of 아두이노 드론: A project utilizing Propeller Microcontroller in a practical application
Bluetooth-Controlled Robotic Vehicle with Ultrasonic Obstacle Detection and Motion Sensing
This circuit features a SparkFun Pro Micro microcontroller interfaced with an L298N DC motor driver to control two DC motors, an HC-SR04 ultrasonic sensor for distance measurement, a Bluetooth module HM-10 for wireless communication, and an MPU-6050 for motion tracking. The Pro Micro is responsible for processing sensor data and managing motor speeds and directions via the motor driver. Power is supplied by a 5V battery connected to the Pro Micro and a separate battery case providing 12V to the motor driver.
Cirkit Designer LogoOpen Project in Cirkit Designer
Image of Octocopter Drone Circuit1: A project utilizing Propeller Microcontroller in a practical application
Arduino-Controlled Quadcopter with GPS and NRF24L01 Wireless Communication
This circuit is designed for a quadcopter control system. It features an Arduino Pro Mini as the central microcontroller, interfacing with a GPS module for positioning, an NRF24L01 module for wireless communication, and an MPU-6050 for motion sensing. Power regulation is managed by an MP1584EN board, and four electronic speed controllers (ESCs) are connected to brushless motors for propeller control.
Cirkit Designer LogoOpen Project in Cirkit Designer
Image of Završni: A project utilizing Propeller Microcontroller in a practical application
Arduino Mega 2560-Controlled Servo System with Bluetooth and Sensor Interface
This is a microcontroller-based control system featuring an Arduino Mega 2560, designed to receive inputs from a rotary potentiometer, push switches, and an IR sensor, and to drive multiple servos and an LCD display. It includes an HC-05 Bluetooth module for wireless communication, allowing for remote interfacing and control.
Cirkit Designer LogoOpen Project in Cirkit Designer
Image of Project FYP: A project utilizing Propeller Microcontroller in a practical application
Arduino-Controlled Bluetooth Robotic Vehicle with Relay-Switched Water Pump
This is a microcontroller-based control system for DC motors and a water pump, featuring Bluetooth connectivity for wireless control. It uses an Arduino UNO, an HC-05 Bluetooth module, an L298N motor driver, and relays for pump activation, with a status LED and a manual power rocker switch.
Cirkit Designer LogoOpen Project in Cirkit Designer

Common Applications and Use Cases

  • Robotics and automation systems
  • Real-time signal processing
  • Audio and video processing
  • Industrial control systems
  • Educational projects and prototyping
  • Internet of Things (IoT) devices

Technical Specifications

The Propeller Microcontroller (PBX32A) is designed to deliver high performance and flexibility. Below are its key technical specifications:

General Specifications

Parameter Value
Manufacturer Propeller
Part ID PBX32A
Number of Cores 8
Clock Speed Up to 80 MHz per core
Program Memory 32 KB
RAM 32 KB
Operating Voltage 3.3 V
I/O Voltage 3.3 V (5 V tolerant inputs)
GPIO Pins 32
Communication Protocols UART, SPI, I2C
Power Consumption ~80 mA (typical)
Package Type QFP-44

Pin Configuration and Descriptions

The PBX32A microcontroller has 44 pins, with 32 general-purpose I/O (GPIO) pins. Below is the pin configuration:

Pin Number Pin Name Description
1-32 P0-P31 General-purpose I/O pins
33 VDD Power supply (3.3 V)
34 VSS Ground
35 RESn Active-low reset pin
36 XI Crystal oscillator input
37 XO Crystal oscillator output
38 VIO I/O voltage reference (3.3 V)
39 BOEn EEPROM boot enable (active low)
40 TEST Test pin (leave unconnected in normal use)
41-44 NC Not connected

Usage Instructions

The Propeller Microcontroller is designed for ease of use in a variety of applications. Below are the steps and best practices for using the PBX32A in a circuit.

How to Use the Component in a Circuit

  1. Power Supply: Connect the VDD pin to a 3.3 V power source and the VSS pin to ground. Ensure a stable power supply to avoid erratic behavior.
  2. Clock Source: Connect a crystal oscillator (e.g., 5 MHz) to the XI and XO pins. Alternatively, use an external clock signal on the XI pin.
  3. GPIO Configuration: Use the P0-P31 pins for input/output operations. Configure these pins in software as needed for your application.
  4. Communication: Use the UART, SPI, or I2C protocols for interfacing with other devices. Ensure proper pull-up resistors for I2C communication.
  5. Reset: Connect the RESn pin to a push-button or external reset circuit for manual resets.

Important Considerations and Best Practices

  • Voltage Levels: Ensure all I/O signals are within the 3.3 V range. While inputs are 5 V tolerant, outputs are not.
  • Decoupling Capacitors: Place decoupling capacitors (e.g., 0.1 µF) close to the VDD and VSS pins to filter noise.
  • Boot Configuration: Use the BOEn pin to enable or disable booting from an external EEPROM.
  • Programming: Use the Propeller Tool software to write and upload code to the microcontroller.

Example Code for Arduino UNO Integration

Although the Propeller Microcontroller is not directly programmable via Arduino IDE, it can communicate with an Arduino UNO using UART. Below is an example of how to send data from an Arduino UNO to the PBX32A:

// Arduino UNO code to send data to the Propeller Microcontroller via UART

void setup() {
  Serial.begin(9600); // Initialize UART communication at 9600 baud
}

void loop() {
  Serial.println("Hello, Propeller!"); // Send a message to the Propeller
  delay(1000); // Wait for 1 second before sending the next message
}

On the Propeller side, you can use its UART library to receive and process the data.

Troubleshooting and FAQs

Common Issues and Solutions

  1. Microcontroller Not Responding

    • Cause: Incorrect power supply or missing decoupling capacitors.
    • Solution: Verify the power supply is 3.3 V and add decoupling capacitors near the VDD and VSS pins.
  2. Communication Failure

    • Cause: Mismatched baud rates or incorrect wiring.
    • Solution: Ensure the baud rate settings match on both devices and check the wiring.
  3. GPIO Pins Not Functioning

    • Cause: Pins not configured correctly in software.
    • Solution: Double-check the pin configuration in your code.
  4. Overheating

    • Cause: Excessive current draw or short circuits.
    • Solution: Check for short circuits and ensure the current draw is within the microcontroller's limits.

FAQs

Q: Can the PBX32A run multiple programs simultaneously?
A: Yes, the PBX32A has 8 cores, allowing it to run up to 8 independent threads simultaneously.

Q: Is the PBX32A compatible with 5 V logic?
A: The GPIO inputs are 5 V tolerant, but outputs operate at 3.3 V. Use level shifters if needed.

Q: What software is used to program the PBX32A?
A: The Propeller Tool software is the official IDE for programming the PBX32A.

Q: Can I use the PBX32A without an external crystal oscillator?
A: Yes, the PBX32A has an internal RC oscillator, but using an external crystal provides better timing accuracy.