How to Use ENC28J60 MINI: Examples, Pinouts, and Specs

Introduction
The ENC28J60 MINI is a compact Ethernet controller designed to enable microcontrollers to connect to Ethernet networks. It features an integrated Media Access Control (MAC) and Physical Layer (PHY) interface, making it a versatile and cost-effective solution for adding Ethernet connectivity to embedded systems. Its small form factor and SPI interface make it ideal for applications where space and simplicity are critical.
Explore Projects Built with ENC28J60 MINI
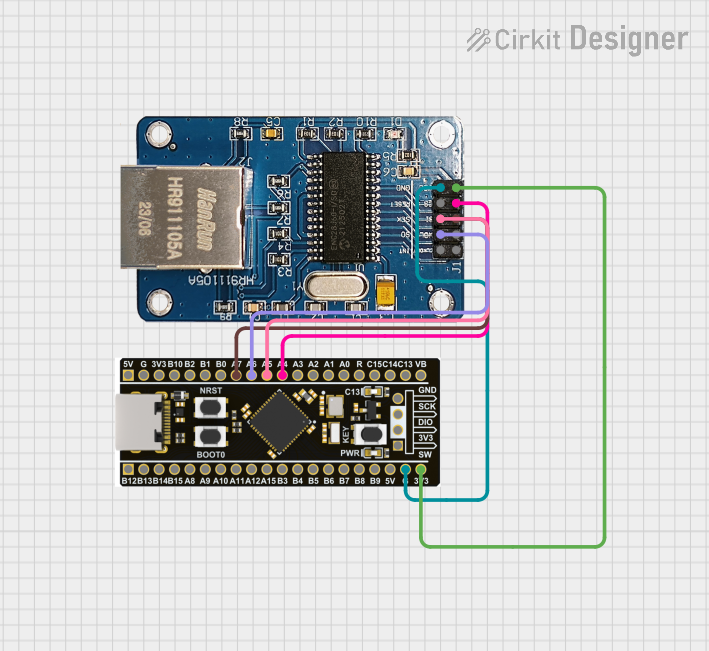


Explore Projects Built with ENC28J60 MINI
Common Applications and Use Cases
- IoT devices requiring Ethernet connectivity
- Home automation systems
- Industrial control and monitoring
- Network-enabled sensors and actuators
- Embedded web servers for remote control and monitoring
Technical Specifications
Key Technical Details
- Operating Voltage: 3.3V (logic level)
- Power Consumption: ~180mA (typical)
- Communication Interface: SPI (Serial Peripheral Interface)
- Data Rate: 10 Mbps (Ethernet)
- Integrated MAC and PHY: Yes
- Buffer Memory: 8 KB
- Operating Temperature: -40°C to +85°C
- Dimensions: Compact PCB module (varies by manufacturer)
Pin Configuration and Descriptions
The ENC28J60 MINI module typically has a 10-pin header for interfacing with a microcontroller. Below is the pinout:
| Pin | Name | Description |
|---|---|---|
| 1 | VCC | Power supply input (3.3V). |
| 2 | GND | Ground connection. |
| 3 | CS | Chip Select (active low). Used to enable SPI communication with the module. |
| 4 | SCK | SPI Clock. Synchronizes data transfer between the microcontroller and module. |
| 5 | SI (MOSI) | Master Out Slave In. SPI data input to the ENC28J60 from the microcontroller. |
| 6 | SO (MISO) | Master In Slave Out. SPI data output from the ENC28J60 to the microcontroller. |
| 7 | INT | Interrupt output. Signals events like packet reception or transmission errors. |
| 8 | WOL | Wake-on-LAN. Used to wake the system via Ethernet (optional, not always used). |
| 9 | RESET | Active low reset pin. Resets the ENC28J60 module. |
| 10 | NC | Not connected (varies by manufacturer, may be left unconnected). |
Note: Always refer to the specific datasheet of your ENC28J60 MINI module for exact pinout details, as variations may exist.
Usage Instructions
How to Use the ENC28J60 MINI in a Circuit
- Power Supply: Connect the VCC pin to a 3.3V power source and GND to the ground.
- SPI Interface: Connect the SPI pins (CS, SCK, MOSI, MISO) to the corresponding SPI pins on your microcontroller.
- Interrupt Pin: Optionally, connect the INT pin to a GPIO pin on your microcontroller to handle interrupts.
- Reset Pin: Connect the RESET pin to a GPIO pin or a pull-up resistor for manual or software-controlled resets.
- Ethernet Connection: Plug an Ethernet cable into the RJ45 port on the module.
Important Considerations and Best Practices
- Voltage Levels: The ENC28J60 operates at 3.3V logic levels. If your microcontroller uses 5V logic, use a level shifter to avoid damaging the module.
- SPI Speed: Configure the SPI clock speed to a maximum of 20 MHz for reliable communication.
- Decoupling Capacitors: Place decoupling capacitors (e.g., 0.1 µF) near the VCC and GND pins to reduce noise.
- Ethernet Cable: Use a high-quality Ethernet cable to ensure stable network communication.
- Libraries: Use an ENC28J60-compatible library (e.g., the
UIPEthernetlibrary for Arduino) to simplify software development.
Example: Connecting ENC28J60 MINI to Arduino UNO
Below is an example of how to connect the ENC28J60 MINI to an Arduino UNO and use it to serve a basic web page.
Wiring Diagram
| ENC28J60 MINI Pin | Arduino UNO Pin |
|---|---|
| VCC | 3.3V |
| GND | GND |
| CS | Pin 10 |
| SCK | Pin 13 |
| MOSI | Pin 11 |
| MISO | Pin 12 |
| RESET | Pin 9 (optional) |
| INT | Pin 2 (optional) |
Arduino Code Example
#include <UIPEthernet.h> // Include the ENC28J60 library

// MAC address and IP address for the ENC28J60 module
byte mac[] = { 0xDE, 0xAD, 0xBE, 0xEF, 0xFE, 0xED };
IPAddress ip(192, 168, 1, 177);

// Create an Ethernet server on port 80
EthernetServer server(80);

void setup() {
  // Initialize serial communication for debugging
  Serial.begin(9600);
  while (!Serial) {
    ; // Wait for serial port to connect
  }

  // Start the Ethernet connection
  if (Ethernet.begin(mac) == 0) {
    Serial.println("Failed to configure Ethernet using DHCP");
    // Manually configure IP address if DHCP fails
    Ethernet.begin(mac, ip);
  }

  // Start the server
  server.begin();
  Serial.print("Server is at ");
  Serial.println(Ethernet.localIP());
}

void loop() {
  // Listen for incoming clients
  EthernetClient client = server.available();
  if (client) {
    Serial.println("New client connected");
    boolean currentLineIsBlank = true;
    while (client.connected()) {
      if (client.available()) {
        char c = client.read();
        Serial.write(c); // Echo received data to the serial monitor

        // Check for the end of the HTTP request
        if (c == '\n' && currentLineIsBlank) {
          // Send a basic HTTP response
          client.println("HTTP/1.1 200 OK");
          client.println("Content-Type: text/html");
          client.println("Connection: close");
          client.println();
          client.println("<!DOCTYPE HTML>");
          client.println("<html>");
          client.println("<h1>Hello from ENC28J60!</h1>");
          client.println("</html>");
          break;
        }
        if (c == '\n') {
          currentLineIsBlank = true;
        } else if (c != '\r') {
          currentLineIsBlank = false;
        }
      }
    }
    // Give the client time to receive the data
    delay(1);
    client.stop();
    Serial.println("Client disconnected");
  }
}
Note: Ensure the
UIPEthernetlibrary is installed in your Arduino IDE before uploading the code.
Troubleshooting and FAQs
Common Issues
No Ethernet Connection:
- Cause: Incorrect wiring or power supply issues.
- Solution: Double-check all connections and ensure the module is powered with 3.3V.
Module Not Responding:
- Cause: SPI communication failure.
- Solution: Verify SPI connections and ensure the correct SPI pins are used.
DHCP Fails:
- Cause: Network configuration issues.
- Solution: Use a static IP address instead of DHCP.
Slow or Unstable Connection:
- Cause: Poor-quality Ethernet cable or electrical noise.
- Solution: Use a shielded Ethernet cable and add decoupling capacitors.
FAQs
Can I use the ENC28J60 MINI with a 5V microcontroller?
- Yes, but you must use a level shifter to convert 5V logic to 3.3V.
What is the maximum Ethernet speed supported?
- The ENC28J60 supports a maximum speed of 10 Mbps.
Is the ENC28J60 MINI compatible with Arduino?
- Yes, it is compatible and can be used with libraries like
UIPEthernet.
- Yes, it is compatible and can be used with libraries like
Can I use the ENC28J60 MINI for PoE (Power over Ethernet)?
- No, the ENC28J60 MINI does not support PoE natively. You would need additional hardware for PoE functionality.