How to Use HD44780 I2C LCD Adapter: Examples, Pinouts, and Specs
Introduction
The HD44780 I2C LCD Adapter is a module designed to simplify the connection of an HD44780-compatible LCD display to a microcontroller. By utilizing I2C communication, this adapter significantly reduces the number of pins required for interfacing, making it ideal for projects with limited GPIO availability. It is widely used in applications such as DIY electronics, prototyping, and embedded systems where visual feedback or data display is needed.
Explore Projects Built with HD44780 I2C LCD Adapter


Explore Projects Built with HD44780 I2C LCD Adapter
Common Applications and Use Cases
- Displaying sensor data in IoT projects
- User interfaces for embedded systems
- Debugging and monitoring microcontroller outputs
- Educational projects and prototyping
Technical Specifications
- Operating Voltage: 5V DC (compatible with 3.3V logic levels in some cases)
- Communication Protocol: I2C (Inter-Integrated Circuit)
- Default I2C Address: 0x27 (can vary depending on the manufacturer; some modules use 0x3F)
- Compatible LCD Types: HD44780-based LCDs (e.g., 16x2, 20x4)
- Adjustable Contrast: Via onboard potentiometer
- Backlight Control: Software-controllable via I2C commands
- Dimensions: Typically 41mm x 19mm x 15mm (may vary slightly by manufacturer)
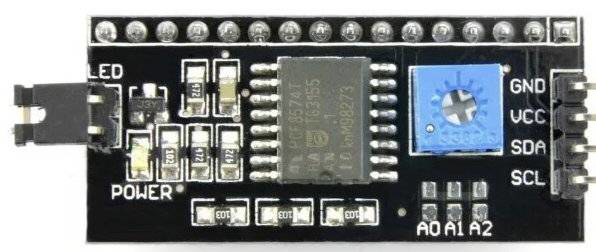
Pin Configuration and Descriptions
The HD44780 I2C LCD Adapter has a 4-pin header for I2C communication and power. Below is the pinout:
| Pin Name | Description |
|---|---|
| GND | Ground (0V) |
| VCC | Power supply (5V or 3.3V) |
| SDA | I2C data line |
| SCL | I2C clock line |
The adapter also has a 16-pin header that connects to the HD44780 LCD module. This header is pre-soldered and does not require user modification.
Usage Instructions
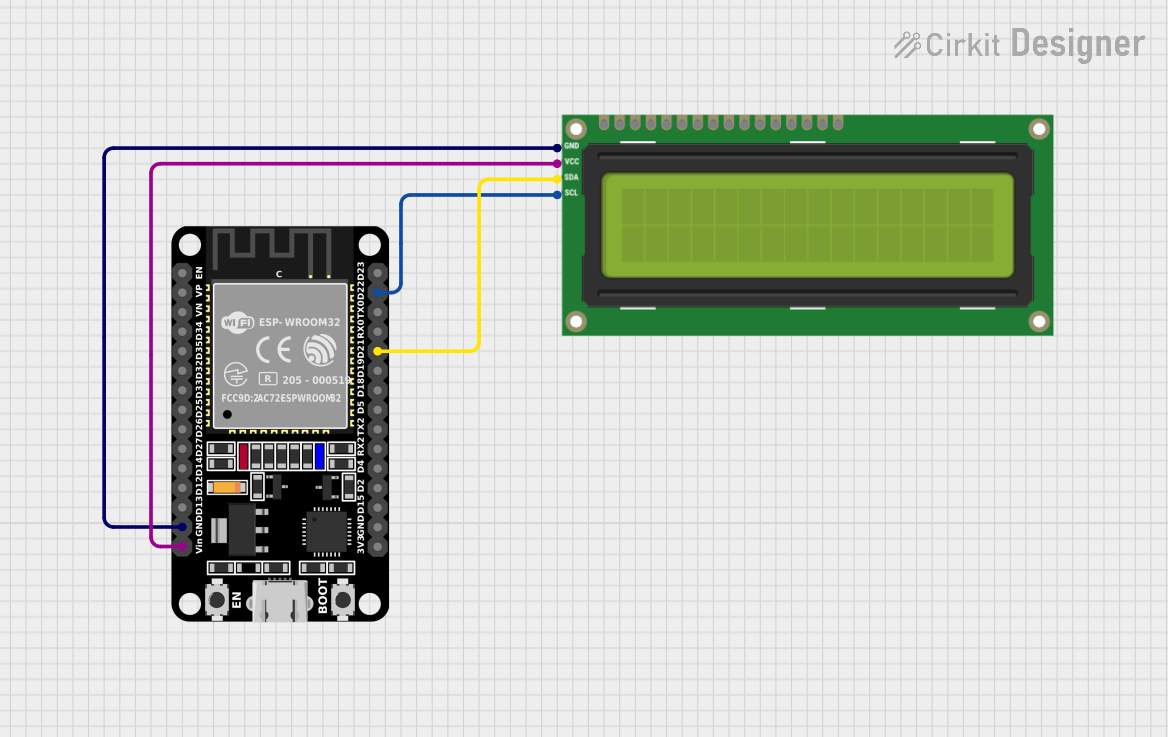
Connecting the Adapter to a Microcontroller
- Power the Adapter: Connect the
VCCpin to the 5V (or 3.3V) pin of your microcontroller and theGNDpin to the ground. - Connect I2C Lines: Connect the
SDAandSCLpins of the adapter to the corresponding I2C pins on your microcontroller. For an Arduino UNO:SDAconnects to A4SCLconnects to A5
- Attach the LCD: Plug the adapter into the 16-pin header of the HD44780 LCD module. Ensure proper alignment of the pins.
Arduino Example Code
Below is an example of how to use the HD44780 I2C LCD Adapter with an Arduino UNO:
#include <Wire.h>               // Include the Wire library for I2C communication
#include <LiquidCrystal_I2C.h>  // Include the library for I2C LCD

// Initialize the LCD with the I2C address (default is 0x27) and dimensions (16x2)
LiquidCrystal_I2C lcd(0x27, 16, 2);

void setup() {
  lcd.begin();                  // Initialize the LCD
  lcd.backlight();              // Turn on the backlight
  lcd.setCursor(0, 0);          // Set the cursor to the first column, first row
  lcd.print("Hello, World!");   // Print a message to the LCD
}

void loop() {
  lcd.setCursor(0, 1);          // Set the cursor to the first column, second row
  lcd.print(millis() / 1000);   // Display the elapsed time in seconds
  delay(1000);                  // Update the display every second
}
Important Considerations and Best Practices
- I2C Address: Verify the I2C address of your adapter. If the default address (0x27) does not work, use an I2C scanner sketch to detect the correct address.
- Contrast Adjustment: Use the onboard potentiometer to adjust the LCD contrast for optimal visibility.
- Pull-Up Resistors: Some I2C adapters include onboard pull-up resistors for the SDA and SCL lines. If your circuit already has pull-ups, ensure they do not conflict.
- Power Supply: Ensure the adapter and LCD are powered with the correct voltage to avoid damage.
Troubleshooting and FAQs
Common Issues
LCD Not Displaying Anything
- Cause: Incorrect wiring or I2C address.
- Solution: Double-check the connections and use an I2C scanner to confirm the address.
Flickering or Unstable Display
- Cause: Insufficient power supply or loose connections.
- Solution: Ensure a stable 5V power source and secure all connections.
Backlight Not Turning On
- Cause: Backlight control not enabled in the code.
- Solution: Use the
lcd.backlight()function in your code to enable the backlight.
Incorrect Characters Displayed
- Cause: Incorrect initialization or incompatible library.
- Solution: Ensure you are using the correct library (
LiquidCrystal_I2C) and initialize the LCD with the correct dimensions.
FAQs
Can I use this adapter with a 3.3V microcontroller?
- Yes, most adapters are compatible with 3.3V logic levels, but confirm with the manufacturer.
How do I find the I2C address of my adapter?
- Use an I2C scanner sketch to detect the address. This is especially useful if the default address (0x27) does not work.
Can I control the backlight brightness?
- No, the backlight is either on or off. Brightness control requires additional circuitry.
What is the maximum cable length for I2C communication?
- The I2C protocol is designed for short distances (typically less than 1 meter). For longer distances, consider using I2C extenders.
By following this documentation, you can effectively integrate the HD44780 I2C LCD Adapter into your projects and troubleshoot common issues with ease.