Cirkit Designer Logo
Cirkit Designer
Your all-in-one circuit design IDE
Home / 
Component Documentation

How to Use iFlight BLITZ BEC 5v/12v: Examples, Pinouts, and Specs

Image of iFlight BLITZ BEC 5v/12v
Cirkit Designer LogoDesign with iFlight BLITZ BEC 5v/12v in Cirkit Designer

Introduction

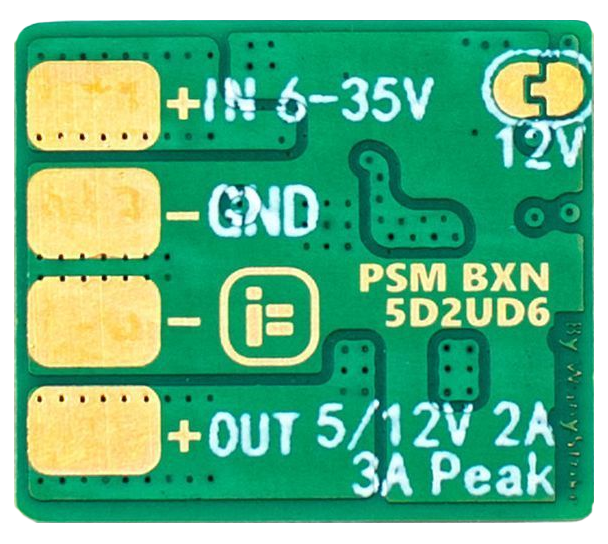
The iFlight BLITZ BEC 5V/12V is a compact and efficient Battery Eliminator Circuit (BEC) designed to provide a stable output voltage of either 5V or 12V. This component is widely used in remote control (RC) applications, such as drones, airplanes, and cars, to power servos, receivers, flight controllers, and other onboard electronics directly from a LiPo battery. By regulating the battery's voltage, the BEC ensures reliable operation of sensitive electronics while protecting them from voltage fluctuations.

Explore Projects Built with iFlight BLITZ BEC 5v/12v

Use Cirkit Designer to design, explore, and prototype these projects online. Some projects support real-time simulation. Click "Open Project" to start designing instantly!
Battery-Powered Quadcopter with BLDC Motors and GPS
Image of file: A project utilizing iFlight BLITZ BEC 5v/12v in a practical application
This circuit is designed for a quadcopter, featuring four BLDC motors each controlled by an Electronic Speed Controller (ESC). The ESCs are powered by a LiPo battery through a power module, and the system is managed by an APM 2.0 flight controller, which also interfaces with a GPS module, an RC receiver, and telemetry for communication.
Cirkit Designer LogoOpen Project in Cirkit Designer
Raspberry Pi-Controlled Drone with Brushless Motors and Camera Module
Image of ROV: A project utilizing iFlight BLITZ BEC 5v/12v in a practical application
This circuit is designed for a multi-motor application, likely a drone or a similar vehicle, featuring eight brushless motors controlled by two 4-in-1 electronic speed controllers (ESCs). The ESCs are powered by a 3s2p 18650 battery pack and interfaced with a Pixhawk flight controller for motor management. Additionally, the system includes a Raspberry Pi 4B for advanced processing and control, which is connected to a NoIR camera module and a cooling fan, and a power module to supply and monitor the power to the Pixhawk.
Cirkit Designer LogoOpen Project in Cirkit Designer
GPS-Enabled Telemetry Drone with Speedybee F405 WING and Brushless Motor
Image of Pharmadrone Wiring: A project utilizing iFlight BLITZ BEC 5v/12v in a practical application
This circuit is designed for a remote-controlled vehicle or drone, featuring a flight controller that manages a brushless motor, servomotors for actuation, telemetry for data communication, and a GPS module for positioning. It is powered by a lipo battery and includes a receiver for remote control inputs.
Cirkit Designer LogoOpen Project in Cirkit Designer
GPS-Enabled Remote-Controlled Vehicle with Motion Sensing
Image of UAV Build: A project utilizing iFlight BLITZ BEC 5v/12v in a practical application
This circuit is designed to control a pair of brushless DC (BLDC) motors via electronic speed controllers (ESCs), which are connected to a distribution board that distributes power from a LiPo battery. The circuit includes a Teensy 4.0 microcontroller interfaced with a GPS module and an MPU-6050 for navigation and orientation, as well as multiple servos for additional actuation, all powered through a distribution board. A Mini 360 Buck Converter is used to step down the battery voltage, and a FLYSKY FS-IA6 receiver is included for remote control capabilities.
Cirkit Designer LogoOpen Project in Cirkit Designer

Explore Projects Built with iFlight BLITZ BEC 5v/12v

Use Cirkit Designer to design, explore, and prototype these projects online. Some projects support real-time simulation. Click "Open Project" to start designing instantly!
Image of file: A project utilizing iFlight BLITZ BEC 5v/12v in a practical application
Battery-Powered Quadcopter with BLDC Motors and GPS
This circuit is designed for a quadcopter, featuring four BLDC motors each controlled by an Electronic Speed Controller (ESC). The ESCs are powered by a LiPo battery through a power module, and the system is managed by an APM 2.0 flight controller, which also interfaces with a GPS module, an RC receiver, and telemetry for communication.
Cirkit Designer LogoOpen Project in Cirkit Designer
Image of ROV: A project utilizing iFlight BLITZ BEC 5v/12v in a practical application
Raspberry Pi-Controlled Drone with Brushless Motors and Camera Module
This circuit is designed for a multi-motor application, likely a drone or a similar vehicle, featuring eight brushless motors controlled by two 4-in-1 electronic speed controllers (ESCs). The ESCs are powered by a 3s2p 18650 battery pack and interfaced with a Pixhawk flight controller for motor management. Additionally, the system includes a Raspberry Pi 4B for advanced processing and control, which is connected to a NoIR camera module and a cooling fan, and a power module to supply and monitor the power to the Pixhawk.
Cirkit Designer LogoOpen Project in Cirkit Designer
Image of Pharmadrone Wiring: A project utilizing iFlight BLITZ BEC 5v/12v in a practical application
GPS-Enabled Telemetry Drone with Speedybee F405 WING and Brushless Motor
This circuit is designed for a remote-controlled vehicle or drone, featuring a flight controller that manages a brushless motor, servomotors for actuation, telemetry for data communication, and a GPS module for positioning. It is powered by a lipo battery and includes a receiver for remote control inputs.
Cirkit Designer LogoOpen Project in Cirkit Designer
Image of UAV Build: A project utilizing iFlight BLITZ BEC 5v/12v in a practical application
GPS-Enabled Remote-Controlled Vehicle with Motion Sensing
This circuit is designed to control a pair of brushless DC (BLDC) motors via electronic speed controllers (ESCs), which are connected to a distribution board that distributes power from a LiPo battery. The circuit includes a Teensy 4.0 microcontroller interfaced with a GPS module and an MPU-6050 for navigation and orientation, as well as multiple servos for additional actuation, all powered through a distribution board. A Mini 360 Buck Converter is used to step down the battery voltage, and a FLYSKY FS-IA6 receiver is included for remote control capabilities.
Cirkit Designer LogoOpen Project in Cirkit Designer

Common Applications and Use Cases

  • Powering flight controllers, receivers, and servos in RC drones and airplanes.
  • Supplying stable voltage to FPV (First Person View) cameras and video transmitters.
  • Providing regulated power to microcontrollers and sensors in robotics projects.
  • Replacing onboard voltage regulators in custom electronics projects.

Technical Specifications

The iFlight BLITZ BEC 5V/12V is designed to handle a wide range of input voltages and provide a stable output for various electronic components. Below are the key technical details:

General Specifications

Parameter Value
Input Voltage Range 7V - 26V (2S to 6S LiPo)
Output Voltage Options 5V or 12V (selectable)
Maximum Output Current 3A (continuous)
Efficiency Up to 95%
Dimensions 18mm x 13mm x 5mm
Weight 2g

Pin Configuration and Descriptions

Pin Name Description
VIN Input voltage pin. Connect to the positive terminal of the LiPo battery.
GND Ground pin. Connect to the negative terminal of the LiPo battery.
VOUT Output voltage pin. Provides regulated 5V or 12V, depending on the setting.
SEL Voltage selection pin. Use a solder bridge or jumper to select 5V or 12V.

Usage Instructions

How to Use the iFlight BLITZ BEC 5V/12V in a Circuit

  1. Determine the Required Output Voltage: Decide whether your application requires 5V or 12V. Use the SEL pin to configure the output voltage:

    • For 5V output, connect the SEL pin to the 5V pad.
    • For 12V output, connect the SEL pin to the 12V pad.
    • Ensure the solder bridge or jumper is properly configured before powering the circuit.
  2. Connect the Input Voltage:

    • Connect the VIN pin to the positive terminal of your LiPo battery (2S to 6S).
    • Connect the GND pin to the negative terminal of the battery.
  3. Connect the Output Voltage:

    • Connect the VOUT pin to the device or circuit requiring regulated power.
    • Ensure the connected device does not exceed the maximum output current of 3A.
  4. Power On the Circuit:

    • Once all connections are secure, power on the LiPo battery. The BEC will regulate the input voltage and provide a stable output.

Important Considerations and Best Practices

  • Heat Dissipation: Although the BEC is highly efficient, it may generate heat under high loads. Ensure adequate ventilation or cooling if operating near the maximum current limit.
  • Voltage Selection: Double-check the SEL pin configuration before powering the circuit to avoid damaging connected devices.
  • Input Voltage Range: Ensure the input voltage is within the specified range (7V to 26V). Exceeding this range may damage the BEC.
  • Polarity: Always verify the polarity of your connections. Reversing the input voltage can permanently damage the component.

Example: Using the BEC with an Arduino UNO

The iFlight BLITZ BEC can be used to power an Arduino UNO from a LiPo battery. Below is an example setup:

  1. Configure the BEC to output 5V using the SEL pin.
  2. Connect the VIN pin to the positive terminal of a 3S LiPo battery (11.1V nominal).
  3. Connect the GND pin to the negative terminal of the battery.
  4. Connect the VOUT pin to the 5V pin on the Arduino UNO.
  5. Connect the GND pin of the BEC to the GND pin on the Arduino UNO.

Here is a simple Arduino code example to blink an LED while powered by the BEC:

// Blink an LED connected to pin 13 of the Arduino UNO
// Ensure the BEC is providing 5V to the Arduino's 5V pin

void setup() {
  pinMode(13, OUTPUT); // Set pin 13 as an output
}

void loop() {
  digitalWrite(13, HIGH); // Turn the LED on
  delay(1000);            // Wait for 1 second
  digitalWrite(13, LOW);  // Turn the LED off
  delay(1000);            // Wait for 1 second
}

Troubleshooting and FAQs

Common Issues and Solutions

  1. No Output Voltage:

    • Cause: Incorrect SEL pin configuration.

    • Solution: Verify the SEL pin is correctly set to 5V or 12V.

    • Cause: Loose or incorrect connections.

    • Solution: Check all connections, ensuring VIN and GND are properly connected to the battery.

  2. Overheating:

    • Cause: Operating near or above the maximum current limit.
    • Solution: Reduce the load on the BEC or improve cooling/ventilation.
  3. Output Voltage Fluctuations:

    • Cause: Input voltage is outside the specified range.
    • Solution: Ensure the input voltage is between 7V and 26V.
  4. Connected Device Not Powering On:

    • Cause: Device requires a different voltage.
    • Solution: Verify the required voltage of the connected device and adjust the SEL pin configuration accordingly.

FAQs

Q: Can I use the BEC to power multiple devices simultaneously?
A: Yes, as long as the total current draw does not exceed 3A.

Q: How do I switch between 5V and 12V output?
A: Use the SEL pin to configure the output voltage. Refer to the pin configuration table for details.

Q: Is the BEC compatible with 1S LiPo batteries?
A: No, the minimum input voltage is 7V, which is higher than the voltage of a 1S LiPo battery.

Q: Can I use the BEC with non-LiPo power sources?
A: Yes, as long as the input voltage is within the 7V to 26V range.