How to Use SparkFun Fuse Breakout Board: Examples, Pinouts, and Specs

Introduction
The SparkFun Fuse Breakout Board is an essential tool designed for electronics enthusiasts and professionals who work with prototyping and testing electrical circuits. This board simplifies the process of integrating a fuse into your circuit, providing a safe and accessible way to protect your electronics from overcurrent conditions. Common applications include power supply protection, automotive circuit modifications, and any project where circuit safety is a concern.
Explore Projects Built with SparkFun Fuse Breakout Board

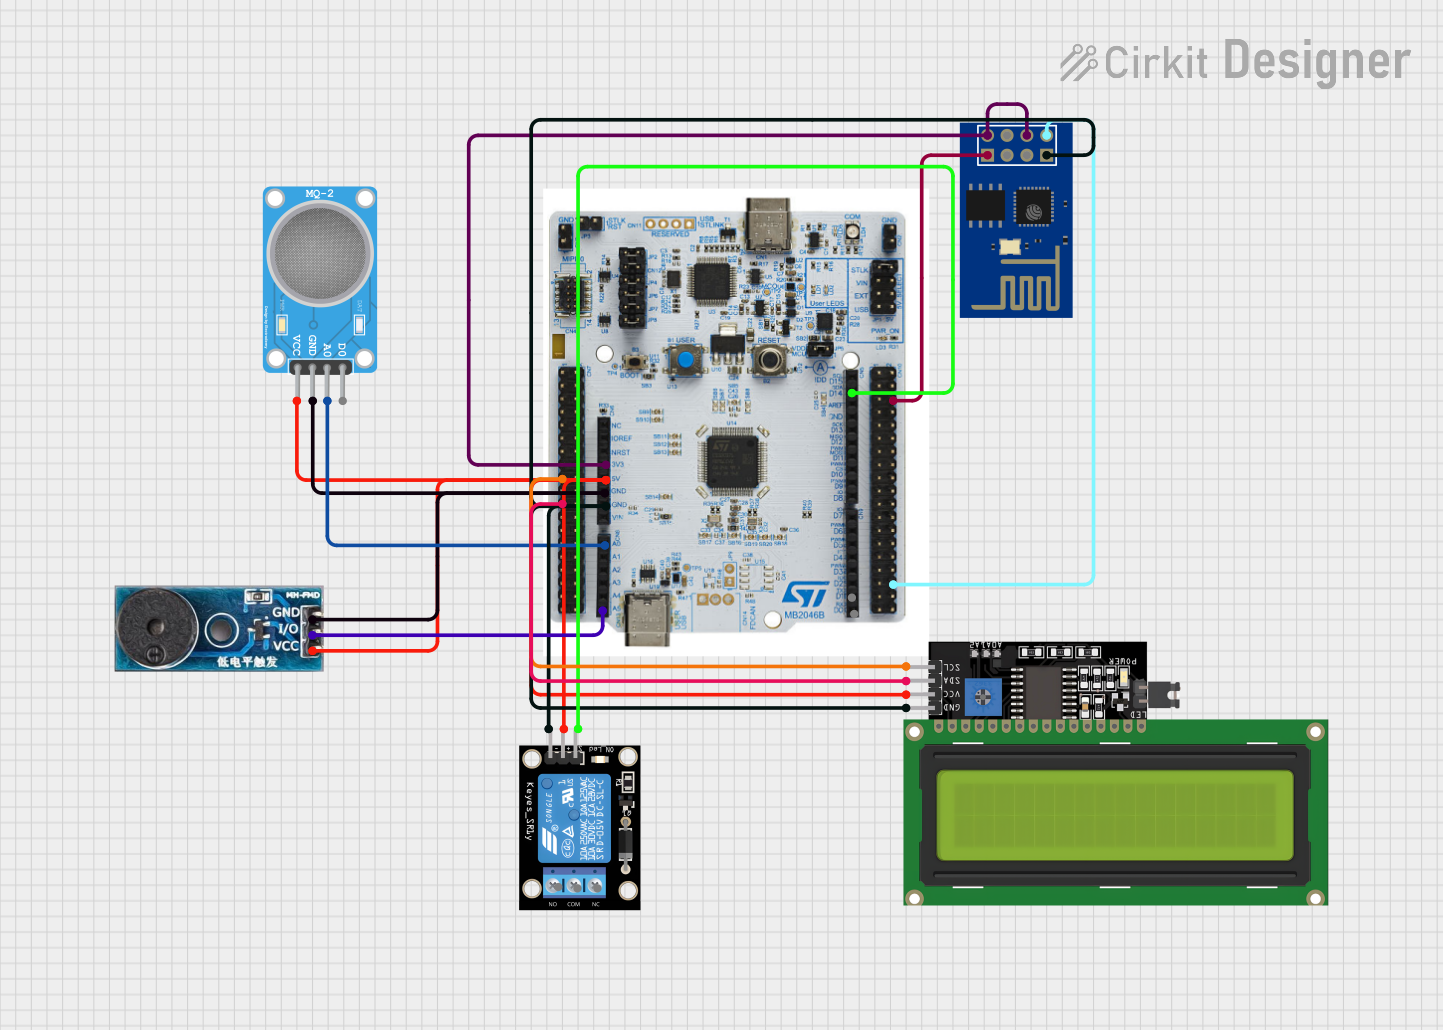

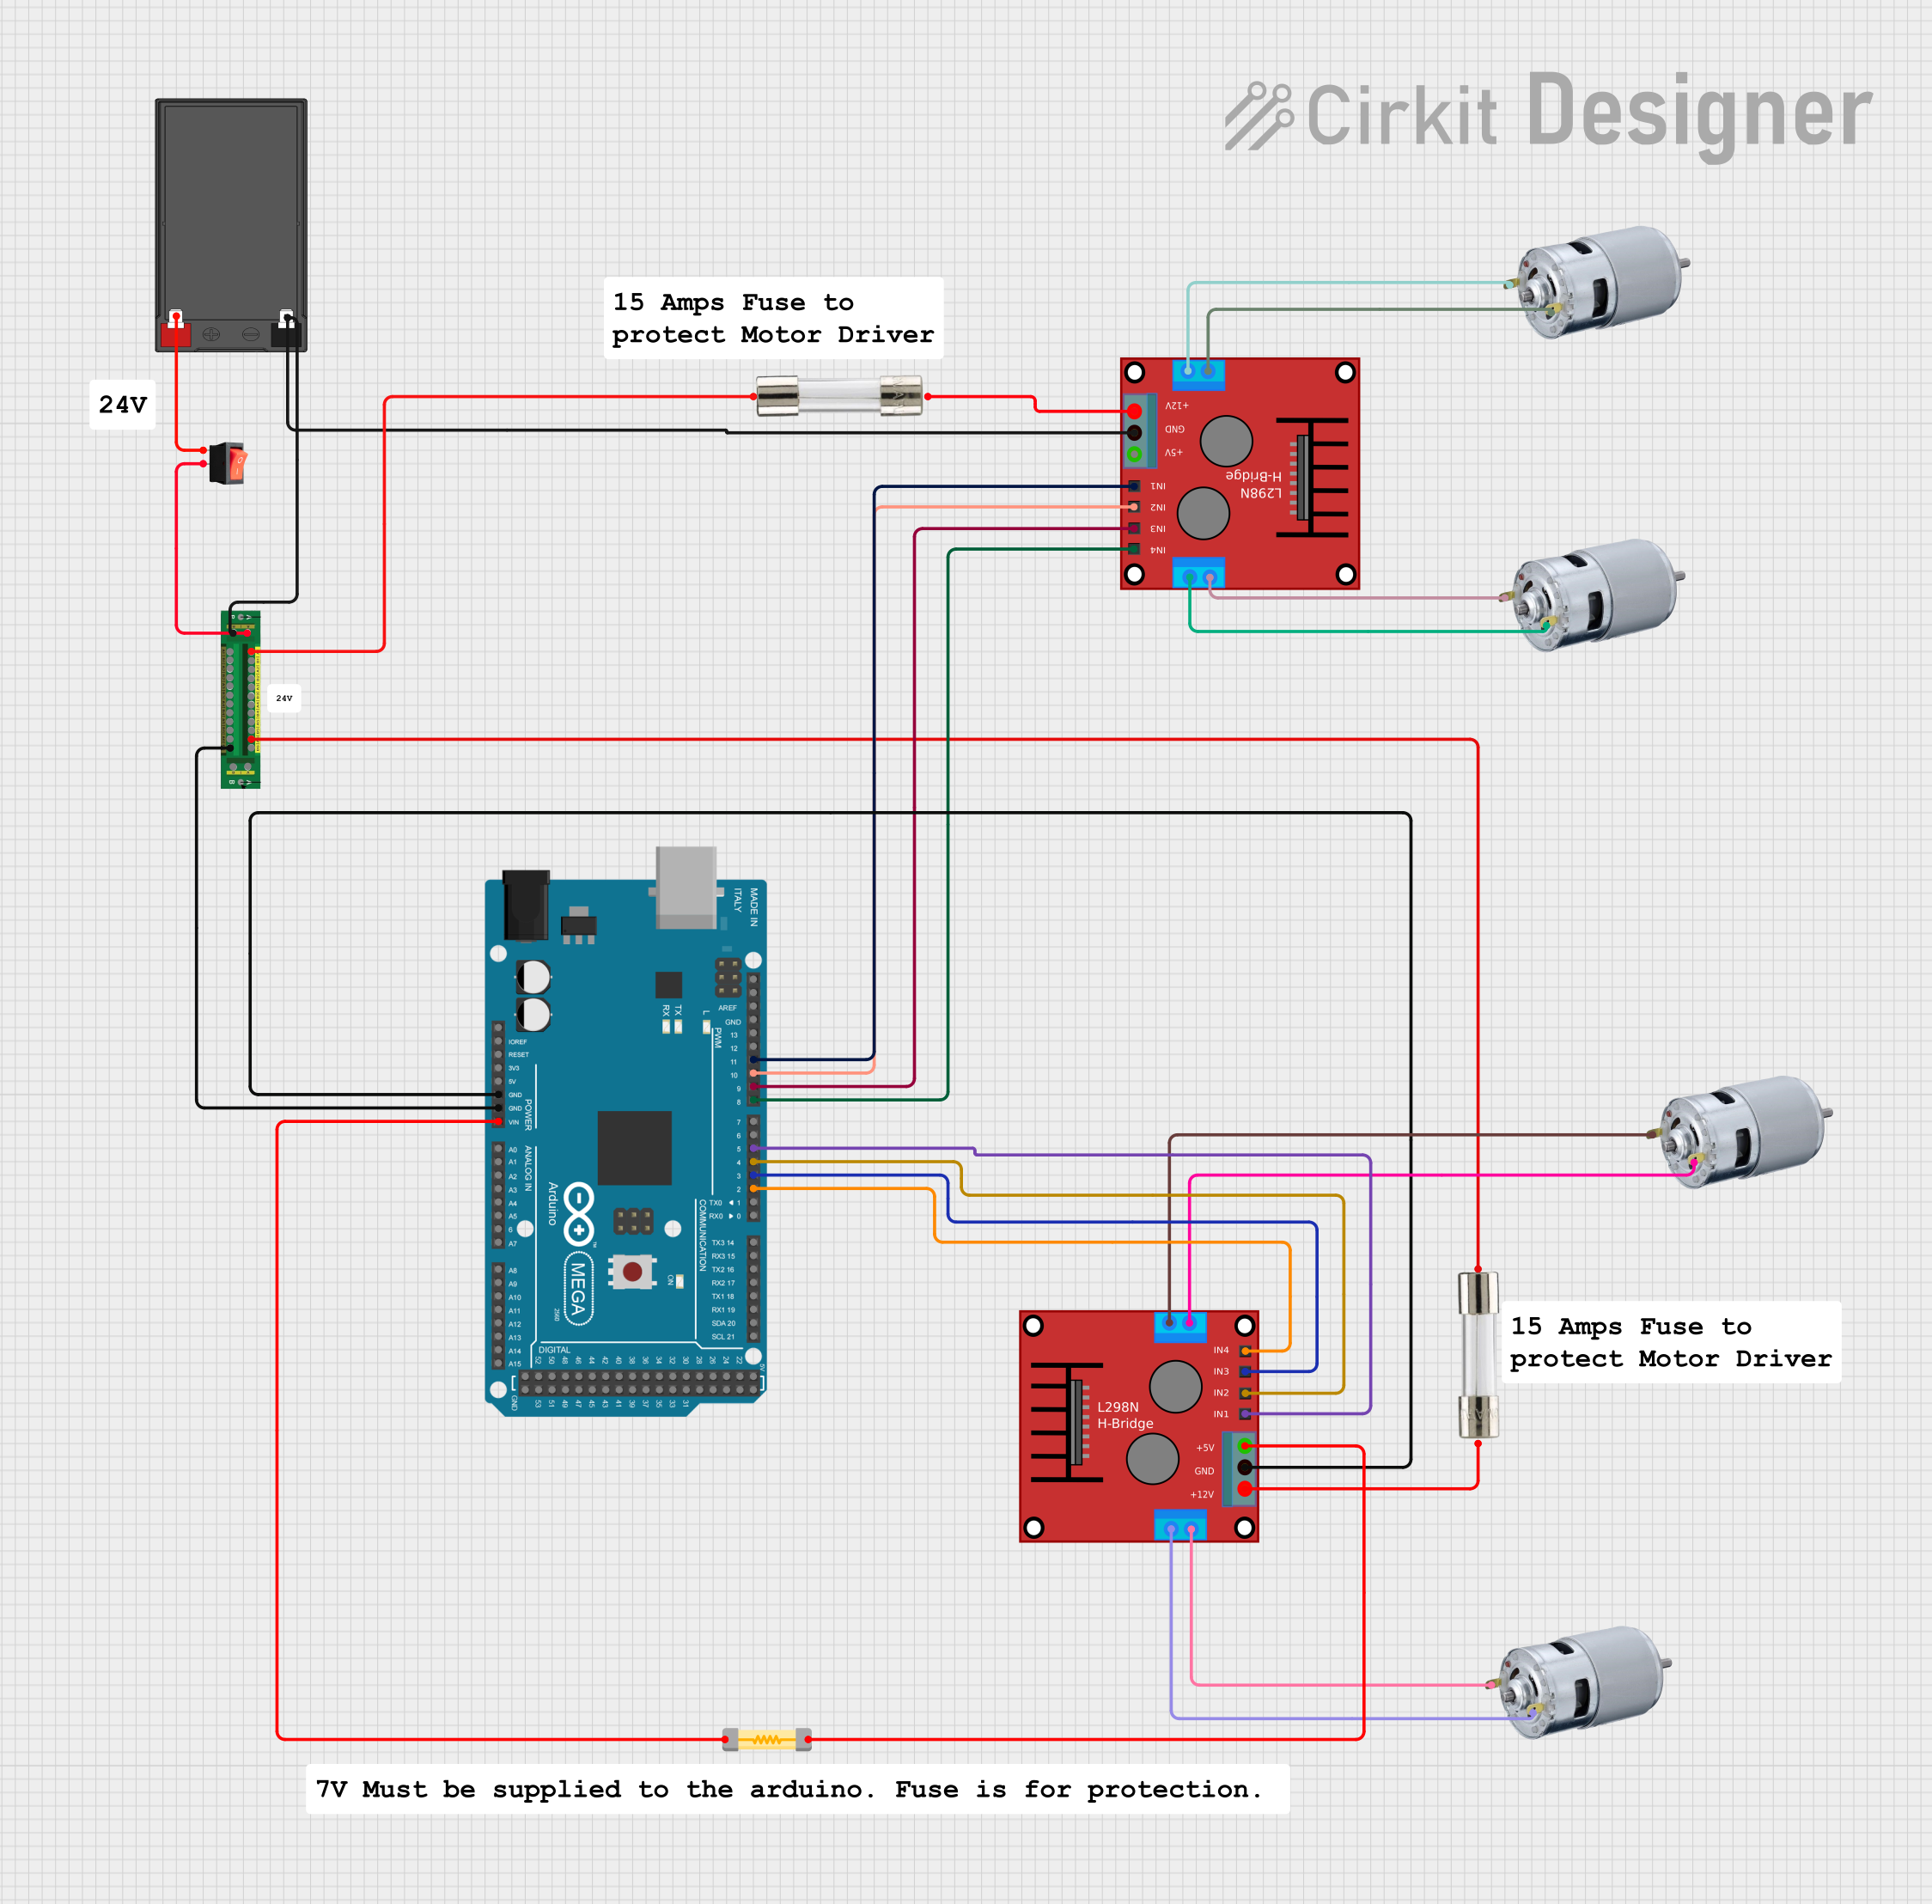
Explore Projects Built with SparkFun Fuse Breakout Board
Technical Specifications
Key Technical Details
- Operating Voltage: Typically matches the voltage rating of the selected fuse
- Current Rating: Determined by the fuse used (e.g., 1A, 2A, 5A, etc.)
- Fuse Type Compatibility: Standard through-hole fuses (5mm x 20mm size)
- Dimensions: 38.1mm x 12.7mm (1.5in x 0.5in)
- Mounting Holes: Sized for M3 or #4-40 screws
Pin Configuration and Descriptions
| Pin Name | Description |
|---|---|
| IN | Input voltage line; connect to the voltage source |
| OUT | Output voltage line; connect to the load/circuit |
| GND | Ground connection (if applicable) |
Usage Instructions
Integrating the Fuse Breakout Board into a Circuit
Selecting a Fuse: Choose a fuse with an appropriate current rating for your circuit. The rating should be slightly higher than the normal operating current but low enough to protect against overcurrent conditions.
Mounting the Fuse: Insert the fuse into the provided slots on the breakout board. Ensure a snug fit and good electrical contact.
Wiring: Connect the 'IN' pin to the positive voltage supply. The 'OUT' pin should be connected to the positive side of your load or circuit. If your circuit requires a ground connection, use the 'GND' pin to connect to the system ground.
Testing: Before applying power, double-check all connections. Once verified, apply power and monitor the circuit for proper operation.
Best Practices
- Always disconnect power before replacing the fuse.
- Use a fuse with a voltage rating equal to or greater than the circuit voltage.
- Secure the breakout board to your project using the mounting holes to prevent movement and potential short circuits.
- Consider using a fuse holder cap for additional safety and ease of fuse replacement.
Troubleshooting and FAQs
Common Issues and Solutions
- Fuse Blows Immediately After Powering On: Check for shorts or incorrect wiring in your circuit. Ensure the current rating of the fuse is appropriate for the load.
- Intermittent Power or No Power to Load: Verify that the fuse is properly seated in the breakout board. Inspect the fuse for any signs of damage or an open circuit.
- Board Overheating: Ensure that the current flowing through the fuse and board does not exceed the recommended ratings.
FAQs
Q: Can I use any type of fuse with this board? A: The board is designed for standard 5mm x 20mm through-hole fuses. Other types or sizes of fuses will not be compatible.
Q: What happens if I use a fuse with a higher current rating than needed? A: Using a fuse with a higher current rating may not provide adequate protection for your circuit and could allow damage to occur before the fuse blows.
Q: Is it possible to use this board without a ground connection? A: Yes, the ground connection is not mandatory for the fuse function. It is provided for convenience in circuits that require a common ground reference.
Example Code for Arduino UNO
The following example demonstrates how to use the SparkFun Fuse Breakout Board with an Arduino UNO to control a simple load, such as an LED.
// Define the output pin connected to the 'OUT' pin of the Fuse Breakout Board
const int loadPin = 13; // Using the onboard LED for demonstration

void setup() {
  // Set the load pin as an output
  pinMode(loadPin, OUTPUT);
}

void loop() {
  // Turn on the load (LED)
  digitalWrite(loadPin, HIGH);
  delay(1000); // Wait for 1 second

  // Turn off the load (LED)
  digitalWrite(loadPin, LOW);
  delay(1000); // Wait for 1 second
}
Remember, the code above does not interact directly with the Fuse Breakout Board, as the board serves a protective role in the physical circuit. The example simply illustrates how a load controlled by an Arduino might be connected through the Fuse Breakout Board.