How to Use Surface Mount Relay: Examples, Pinouts, and Specs
Introduction
The Omron G6K-2P is a compact surface mount relay designed for efficient and reliable switching of high-power circuits using low-power control signals. This electromechanical relay is ideal for applications where space is limited, thanks to its small form factor and surface-mount design. It is widely used in telecommunications, industrial automation, home appliances, and other electronic systems requiring precise and dependable switching.
Explore Projects Built with Surface Mount Relay

Explore Projects Built with Surface Mount Relay
Common Applications
- Telecommunications equipment
- Signal switching in measurement devices
- Home automation systems
- Industrial control systems
- Consumer electronics
Technical Specifications
The following table outlines the key technical specifications of the Omron G6K-2P surface mount relay:
| Parameter | Value |
|---|---|
| Manufacturer | Omron |
| Part Number | G6K-2P |
| Contact Configuration | DPDT (Double Pole Double Throw) |
| Coil Voltage Range | 3V DC to 24V DC |
| Contact Rating | 1A at 30V DC / 0.3A at 125V AC |
| Coil Resistance | Varies by coil voltage (e.g., 178Ω for 12V DC) |
| Switching Voltage (Max) | 125V AC / 110V DC |
| Switching Current (Max) | 1A |
| Insulation Resistance | 1000 MΩ (minimum) at 500V DC |
| Dielectric Strength | 1000V AC for 1 minute |
| Operating Temperature Range | -40°C to +85°C |
| Mounting Type | Surface Mount (SMD) |
| Dimensions | 10mm x 6mm x 5.2mm |
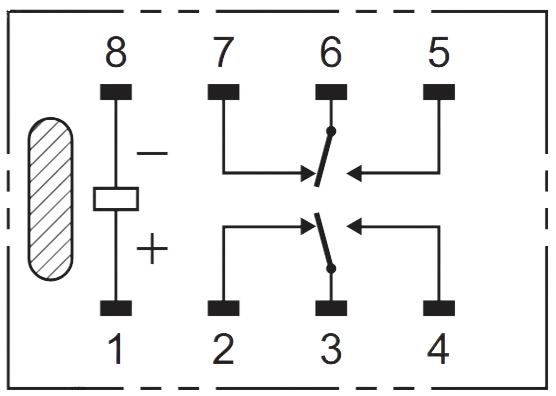
Pin Configuration and Descriptions
The Omron G6K-2P relay has a total of 8 pins. The pin configuration is as follows:
| Pin Number | Description |
|---|---|
| 1 | Coil Terminal 1 |
| 2 | Coil Terminal 2 |
| 3 | Common Contact (Pole 1) |
| 4 | Normally Closed (NC) Contact 1 |
| 5 | Normally Open (NO) Contact 1 |
| 6 | Common Contact (Pole 2) |
| 7 | Normally Closed (NC) Contact 2 |
| 8 | Normally Open (NO) Contact 2 |
Usage Instructions
How to Use the Component in a Circuit
- Power the Coil: Connect the relay's coil terminals (Pins 1 and 2) to a DC voltage source within the specified coil voltage range (e.g., 12V DC). Use a current-limiting resistor if necessary.
- Control the Load: Connect the load circuit to the relay's contact terminals. For example:
- Connect the load to the Common (COM) terminal (Pins 3 and 6).
- Use the Normally Open (NO) terminal (Pins 5 and 8) if you want the circuit to close when the relay is activated.
- Use the Normally Closed (NC) terminal (Pins 4 and 7) if you want the circuit to open when the relay is activated.
- Switching: Apply the appropriate voltage to the coil terminals to activate the relay and switch the load circuit.
Important Considerations and Best Practices
- Voltage Matching: Ensure the coil voltage matches the relay's rated voltage to avoid damage.
- Current Handling: Do not exceed the maximum contact current rating (1A) to prevent overheating or failure.
- PCB Design: Use proper PCB layout techniques to ensure reliable soldering and minimize noise.
- Flyback Diode: Add a flyback diode across the coil terminals to protect the driving circuit from voltage spikes when the relay is deactivated.
- Environmental Conditions: Operate the relay within the specified temperature range (-40°C to +85°C).
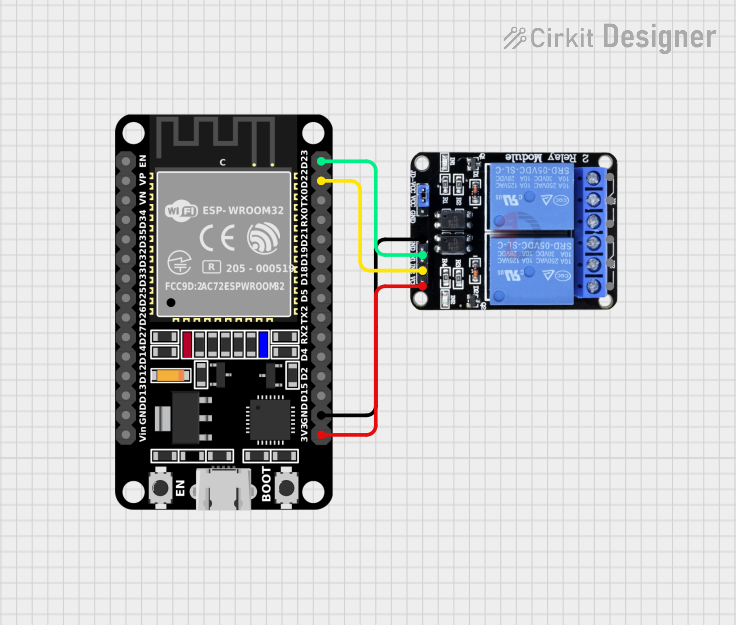
Example: Using the G6K-2P with an Arduino UNO
Below is an example of how to control the Omron G6K-2P relay using an Arduino UNO:
// Example: Controlling Omron G6K-2P Relay with Arduino UNO
// Pin 7 of Arduino is used to control the relay

const int relayPin = 7; // Define the pin connected to the relay's coil

void setup() {
  pinMode(relayPin, OUTPUT); // Set relay pin as output
  digitalWrite(relayPin, LOW); // Ensure relay is off at startup
}

void loop() {
  digitalWrite(relayPin, HIGH); // Activate the relay
  delay(1000); // Keep relay on for 1 second
  digitalWrite(relayPin, LOW); // Deactivate the relay
  delay(1000); // Keep relay off for 1 second
}
Note: Use a transistor or relay driver circuit to interface the relay with the Arduino, as the Arduino's GPIO pins cannot directly supply the required current for the relay coil.
Troubleshooting and FAQs
Common Issues and Solutions
Relay Not Activating
- Cause: Insufficient coil voltage or current.
- Solution: Verify the power supply voltage and ensure it matches the relay's rated coil voltage. Check for loose connections.
Relay Stuck in One State
- Cause: Damaged contacts or coil.
- Solution: Inspect the relay for physical damage. Replace the relay if necessary.
Excessive Heat
- Cause: Overcurrent through the contacts or coil.
- Solution: Ensure the load current does not exceed the relay's maximum contact rating. Use a heat sink or cooling mechanism if needed.
Noise or Interference in Circuit
- Cause: Electromagnetic interference (EMI) from the relay.
- Solution: Add a snubber circuit or use shielded cables to minimize noise.
FAQs
Q1: Can the G6K-2P relay switch AC loads?
Yes, the relay can switch AC loads up to 0.3A at 125V AC. Ensure the load does not exceed the specified ratings.
Q2: Is the relay polarity-sensitive?
No, the relay's coil terminals (Pins 1 and 2) are not polarity-sensitive, but adding a flyback diode requires correct polarity.
Q3: Can I use the relay for high-frequency switching?
The G6K-2P is not designed for high-frequency switching. For such applications, consider using a solid-state relay (SSR).
Q4: How do I solder the relay onto a PCB?
Use a reflow soldering process compatible with the relay's surface-mount design. Follow the manufacturer's recommended soldering profile to avoid damage.
By following this documentation, you can effectively integrate the Omron G6K-2P surface mount relay into your electronic projects.