Cirkit Designer Logo
Cirkit Designer
Your all-in-one circuit design IDE
Home / 
Component Documentation

How to Use Adafruit Yellow 15x7 CharliePlex FeatherWing: Examples, Pinouts, and Specs

Image of Adafruit Yellow 15x7 CharliePlex FeatherWing
Cirkit Designer LogoDesign with Adafruit Yellow 15x7 CharliePlex FeatherWing in Cirkit Designer

Introduction

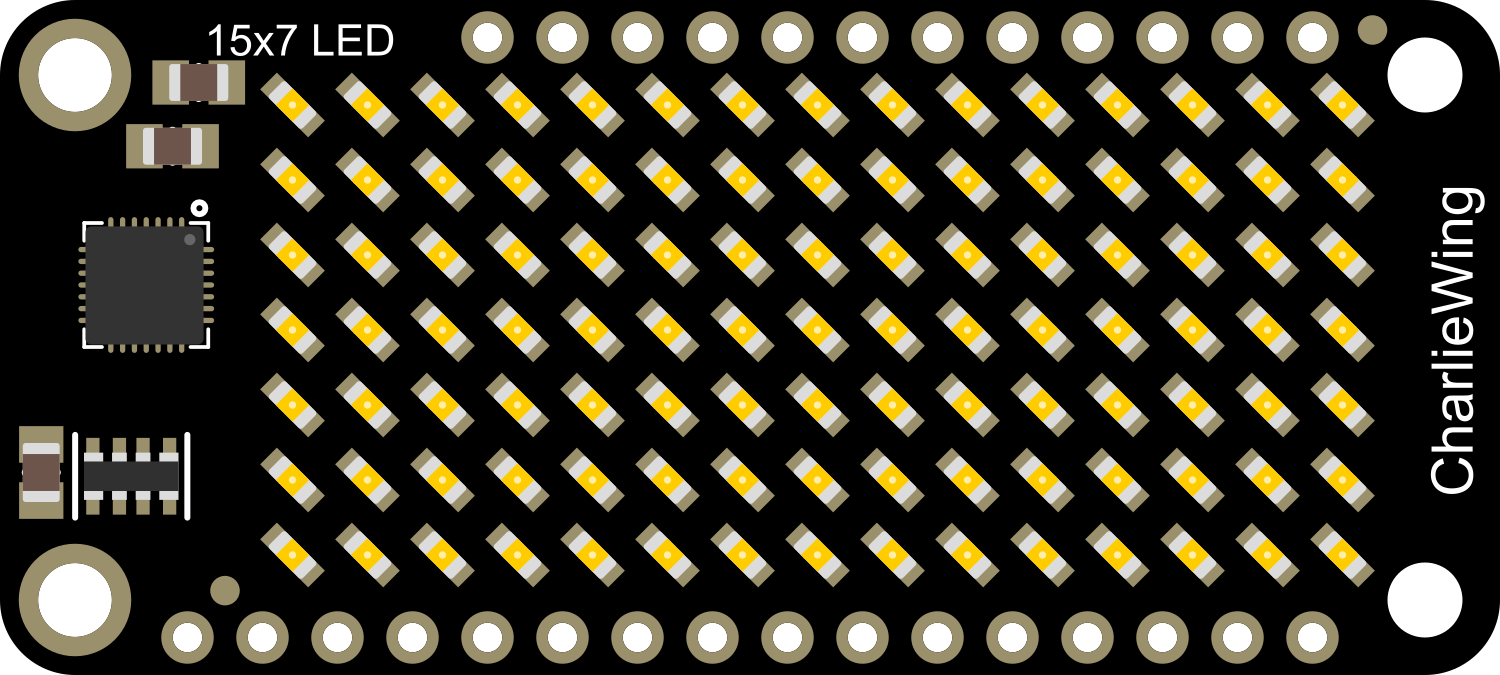
The Adafruit Yellow 15x7 CharliePlex FeatherWing is an add-on board designed for the Feather ecosystem. It features a matrix of 105 yellow LEDs arranged in a 15x7 grid. This LED matrix utilizes Charlieplexing, a technique for driving multiple LEDs with fewer I/O pins, making it an efficient solution for adding a compact display to your projects. Common applications include creating scrolling text displays, simple animations, and status indicators.

Explore Projects Built with Adafruit Yellow 15x7 CharliePlex FeatherWing

Use Cirkit Designer to design, explore, and prototype these projects online. Some projects support real-time simulation. Click "Open Project" to start designing instantly!
ESP32-Based Vibration Feedback System with Quad Alphanumeric Display and ADXL343 Accelerometer
Image of EC444 - Quest 3: A project utilizing Adafruit Yellow 15x7 CharliePlex FeatherWing in a practical application
This circuit features an Adafruit HUZZAH32 ESP32 Feather board as the central microcontroller, which is connected to an Adafruit Quad AlphaNumeric Featherwing display and an Adafruit ADXL343 accelerometer via I2C communication (SCL and SDA lines). The ESP32 controls a vibration motor connected to one of its GPIO pins (A5_IO4) and shares a common power supply (3.3V) and ground (GND) with the other components. The purpose of this circuit is likely to read acceleration data, display information on the alphanumeric display, and provide haptic feedback through the vibration motor.
Cirkit Designer LogoOpen Project in Cirkit Designer
Arduino UNO and OLED FeatherWing Display: Battery-Powered Hello World Project
Image of ARDUINO_SSD1306: A project utilizing Adafruit Yellow 15x7 CharliePlex FeatherWing in a practical application
This circuit consists of an Arduino UNO connected to an Adafruit OLED FeatherWing display via I2C communication (SDA and SCL lines). The Arduino is powered through a Vcc source and provides 3.3V and GND connections to the OLED display. The Arduino runs a program to display 'Hello, World!' on the OLED screen.
Cirkit Designer LogoOpen Project in Cirkit Designer
Touch-Sensitive Interface with Adafruit MPR121 and Feather 32u4 Bluefruit
Image of MPR121: A project utilizing Adafruit Yellow 15x7 CharliePlex FeatherWing in a practical application
This circuit integrates an Adafruit MPR121 capacitive touch sensor with an Adafruit Feather 32u4 Bluefruit microcontroller. The MPR121 is powered by the Feather and communicates via I2C (SCL and SDA) to detect touch inputs, which can be processed or transmitted wirelessly by the Feather.
Cirkit Designer LogoOpen Project in Cirkit Designer
Solar-Powered Environmental Data Logger with Adafruit Feather M0 Express
Image of Lake Thoreau Monitoring Station: A project utilizing Adafruit Yellow 15x7 CharliePlex FeatherWing in a practical application
This circuit is designed for environmental data collection and logging, utilizing an Adafruit Feather M0 Express microcontroller as the central processing unit. It interfaces with a BME280 sensor for atmospheric temperature, humidity, and pressure measurements, an SGP30 sensor for monitoring air quality (eCO2 and TVOC), and a STEMMA soil sensor for detecting soil moisture and temperature. The system is powered by a solar panel and a 3.7v LiPo battery, managed by an Adafruit BQ24074 Solar-DC-USB Lipo Charger, and provides easy access to the microcontroller's connections through an Adafruit Terminal Breakout FeatherWing.
Cirkit Designer LogoOpen Project in Cirkit Designer

Explore Projects Built with Adafruit Yellow 15x7 CharliePlex FeatherWing

Use Cirkit Designer to design, explore, and prototype these projects online. Some projects support real-time simulation. Click "Open Project" to start designing instantly!
Image of EC444 - Quest 3: A project utilizing Adafruit Yellow 15x7 CharliePlex FeatherWing in a practical application
ESP32-Based Vibration Feedback System with Quad Alphanumeric Display and ADXL343 Accelerometer
This circuit features an Adafruit HUZZAH32 ESP32 Feather board as the central microcontroller, which is connected to an Adafruit Quad AlphaNumeric Featherwing display and an Adafruit ADXL343 accelerometer via I2C communication (SCL and SDA lines). The ESP32 controls a vibration motor connected to one of its GPIO pins (A5_IO4) and shares a common power supply (3.3V) and ground (GND) with the other components. The purpose of this circuit is likely to read acceleration data, display information on the alphanumeric display, and provide haptic feedback through the vibration motor.
Cirkit Designer LogoOpen Project in Cirkit Designer
Image of ARDUINO_SSD1306: A project utilizing Adafruit Yellow 15x7 CharliePlex FeatherWing in a practical application
Arduino UNO and OLED FeatherWing Display: Battery-Powered Hello World Project
This circuit consists of an Arduino UNO connected to an Adafruit OLED FeatherWing display via I2C communication (SDA and SCL lines). The Arduino is powered through a Vcc source and provides 3.3V and GND connections to the OLED display. The Arduino runs a program to display 'Hello, World!' on the OLED screen.
Cirkit Designer LogoOpen Project in Cirkit Designer
Image of MPR121: A project utilizing Adafruit Yellow 15x7 CharliePlex FeatherWing in a practical application
Touch-Sensitive Interface with Adafruit MPR121 and Feather 32u4 Bluefruit
This circuit integrates an Adafruit MPR121 capacitive touch sensor with an Adafruit Feather 32u4 Bluefruit microcontroller. The MPR121 is powered by the Feather and communicates via I2C (SCL and SDA) to detect touch inputs, which can be processed or transmitted wirelessly by the Feather.
Cirkit Designer LogoOpen Project in Cirkit Designer
Image of Lake Thoreau Monitoring Station: A project utilizing Adafruit Yellow 15x7 CharliePlex FeatherWing in a practical application
Solar-Powered Environmental Data Logger with Adafruit Feather M0 Express
This circuit is designed for environmental data collection and logging, utilizing an Adafruit Feather M0 Express microcontroller as the central processing unit. It interfaces with a BME280 sensor for atmospheric temperature, humidity, and pressure measurements, an SGP30 sensor for monitoring air quality (eCO2 and TVOC), and a STEMMA soil sensor for detecting soil moisture and temperature. The system is powered by a solar panel and a 3.7v LiPo battery, managed by an Adafruit BQ24074 Solar-DC-USB Lipo Charger, and provides easy access to the microcontroller's connections through an Adafruit Terminal Breakout FeatherWing.
Cirkit Designer LogoOpen Project in Cirkit Designer

Technical Specifications

Key Technical Details

  • LED Color: Yellow
  • Matrix Layout: 15 columns x 7 rows
  • Dimensions: 50mm x 23mm x 4mm
  • Weight: 4.8 grams
  • Operating Voltage: 3.3V to 5V DC
  • Interface: I2C
  • I2C Addresses: 0x70 (default), selectable with solder jumpers

Pin Configuration and Descriptions

Pin Name Description
GND Ground, common reference for power and signals
3V 3.3V power supply input
SDA I2C Data line
SCL I2C Clock line
RST Reset pin, active low
A0-A2 Address selection pins for I2C (solder jumpers)

Usage Instructions

Connecting to a Feather Board

  1. Align the headers on the CharliePlex FeatherWing with the corresponding sockets on your Feather board.
  2. Solder the headers to ensure a secure and reliable connection.
  3. Ensure that the Feather board is powered off before making the connection.

Programming with Arduino

To control the CharliePlex FeatherWing with an Arduino (such as the Feather M0 or M4), you will need to install the Adafruit LED Backpack library. This library provides functions to easily control the LED matrix.

  1. Install the Adafruit LED Backpack library via the Arduino Library Manager.
  2. Include the library in your sketch and initialize the display as shown in the example code below.
#include <Wire.h>
#include <Adafruit_GFX.h>
#include <Adafruit_LEDBackpack.h>

Adafruit_7x15matrix matrix = Adafruit_7x15matrix();

void setup() {
  matrix.begin(0x70); // Initialize the display with the I2C address
  matrix.setBrightness(10); // Set the brightness level (0 is dim, 15 is bright)
}

void loop() {
  matrix.clear(); // Clear the display buffer
  matrix.setCursor(0, 0); // Set the cursor position (top-left corner)
  matrix.print("Hello"); // Print a message to the display
  matrix.writeDisplay(); // Update the display with the buffer content
  delay(500); // Wait for half a second
}

Important Considerations and Best Practices

  • Always power off the Feather board before attaching or detaching the CharliePlex FeatherWing.
  • Avoid touching the LED surface to prevent oils from your skin from affecting the brightness and longevity of the LEDs.
  • Use the setBrightness function judiciously, as higher brightness levels will consume more power.

Troubleshooting and FAQs

Common Issues

  • LEDs are not lighting up: Ensure that the FeatherWing is properly seated on the Feather board and that all solder joints are solid. Also, check that the correct I2C address is being used in your code.
  • Display is dim: Increase the brightness using the setBrightness function, and ensure that the power supply is adequate.
  • Garbled or incorrect display: Make sure the library is correctly installed and that the I2C lines are not experiencing interference.

Solutions and Tips for Troubleshooting

  • Double-check the wiring and solder joints if you encounter connectivity issues.
  • If you're experiencing I2C communication problems, use an I2C scanner sketch to confirm the device address.
  • For any library-related issues, ensure that you have the latest version of the Adafruit LED Backpack library.

FAQs

Q: Can I change the I2C address? A: Yes, you can change the I2C address by soldering the A0, A1, and A2 jumpers on the back of the board.

Q: How many CharliePlex FeatherWings can I chain together? A: You can chain multiple boards together by connecting them side-by-side and ensuring each has a unique I2C address.

Q: Is it possible to use this FeatherWing with boards other than Feather? A: While designed for the Feather series, it can be used with any microcontroller that supports I2C, provided you can match the pinout and voltage levels.

For further assistance, visit the Adafruit support forums or the product's FAQ page on the Adafruit website.