Cirkit Designer Logo
Cirkit Designer
Your all-in-one circuit design IDE
Home / 
Component Documentation

How to Use HAfiHA JDM11-6H: Examples, Pinouts, and Specs

Image of HAfiHA JDM11-6H
Cirkit Designer LogoDesign with HAfiHA JDM11-6H in Cirkit Designer

Introduction

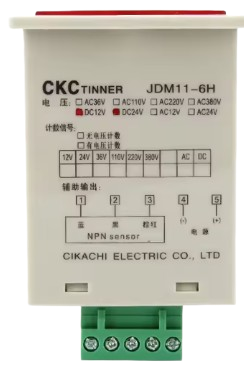
The HAfiHA JDM11-6H, manufactured by Cikachi, is a high-performance relay designed for switching applications. It features low power consumption, high reliability, and a compact design, making it ideal for use in a wide range of electronic circuits and automation systems. This relay is particularly suited for applications requiring precise control and durability, such as industrial automation, home appliances, and control panels.

Explore Projects Built with HAfiHA JDM11-6H

Use Cirkit Designer to design, explore, and prototype these projects online. Some projects support real-time simulation. Click "Open Project" to start designing instantly!
Arduino-Controlled Bluetooth Robotic Vehicle with Ultrasonic Navigation
Image of BOAT 2: A project utilizing HAfiHA JDM11-6H in a practical application
This circuit is designed to remotely control two DC gearmotors using an Arduino UNO and an L298N motor driver, with an HC-05 Bluetooth module for wireless communication. It includes a JSN-SR04T ultrasonic sensor for distance measurement and a TM1637 display for output. Power management is handled by an 18650 Li-Ion battery and rocker switches.
Cirkit Designer LogoOpen Project in Cirkit Designer
Battery-Powered Sumo Robot with IR Sensors and DC Motors
Image of MASSIVE SUMO AUTO BOARD: A project utilizing HAfiHA JDM11-6H in a practical application
This circuit is designed for a robotic system, featuring a Massive Sumo Board as the central controller. It integrates multiple FS-80NK diffuse IR sensors and IR line sensors for obstacle detection and line following, respectively, and controls two GM25 DC motors via MD13s motor drivers for movement. Power is supplied by an 11.1V LiPo battery.
Cirkit Designer LogoOpen Project in Cirkit Designer
Arduino UNO Controlled Bluetooth Interface for Motorized Window and Environmental Sensing
Image of smart trolly: A project utilizing HAfiHA JDM11-6H in a practical application
This circuit features an Arduino UNO microcontroller interfacing with an HC-05 Bluetooth module for wireless control, an I2C LCD for display, and dual BTS7960 motor drivers to operate a high-power DC motor and a car power window motor. It includes a solar-powered charging system for the 12V battery, with power regulation and distribution managed by relays, fuses, and a buck converter. The system is designed for remote monitoring and control, with visual feedback provided by LEDs.
Cirkit Designer LogoOpen Project in Cirkit Designer
Battery-Powered RC Car with Massive RC MDEx and MDD10A Motor Driver
Image of Massive RC MDEx: A project utilizing HAfiHA JDM11-6H in a practical application
This circuit is a remote-controlled motor driver system powered by a LiPo battery. It uses a Massive RC MDEx microcontroller to control an MDD10A dual motor driver, which in turn drives two GM25 DC motors. The R6FG receiver receives remote control signals to manage the motor directions and speeds.
Cirkit Designer LogoOpen Project in Cirkit Designer

Explore Projects Built with HAfiHA JDM11-6H

Use Cirkit Designer to design, explore, and prototype these projects online. Some projects support real-time simulation. Click "Open Project" to start designing instantly!
Image of BOAT 2: A project utilizing HAfiHA JDM11-6H in a practical application
Arduino-Controlled Bluetooth Robotic Vehicle with Ultrasonic Navigation
This circuit is designed to remotely control two DC gearmotors using an Arduino UNO and an L298N motor driver, with an HC-05 Bluetooth module for wireless communication. It includes a JSN-SR04T ultrasonic sensor for distance measurement and a TM1637 display for output. Power management is handled by an 18650 Li-Ion battery and rocker switches.
Cirkit Designer LogoOpen Project in Cirkit Designer
Image of MASSIVE SUMO AUTO BOARD: A project utilizing HAfiHA JDM11-6H in a practical application
Battery-Powered Sumo Robot with IR Sensors and DC Motors
This circuit is designed for a robotic system, featuring a Massive Sumo Board as the central controller. It integrates multiple FS-80NK diffuse IR sensors and IR line sensors for obstacle detection and line following, respectively, and controls two GM25 DC motors via MD13s motor drivers for movement. Power is supplied by an 11.1V LiPo battery.
Cirkit Designer LogoOpen Project in Cirkit Designer
Image of smart trolly: A project utilizing HAfiHA JDM11-6H in a practical application
Arduino UNO Controlled Bluetooth Interface for Motorized Window and Environmental Sensing
This circuit features an Arduino UNO microcontroller interfacing with an HC-05 Bluetooth module for wireless control, an I2C LCD for display, and dual BTS7960 motor drivers to operate a high-power DC motor and a car power window motor. It includes a solar-powered charging system for the 12V battery, with power regulation and distribution managed by relays, fuses, and a buck converter. The system is designed for remote monitoring and control, with visual feedback provided by LEDs.
Cirkit Designer LogoOpen Project in Cirkit Designer
Image of Massive RC MDEx: A project utilizing HAfiHA JDM11-6H in a practical application
Battery-Powered RC Car with Massive RC MDEx and MDD10A Motor Driver
This circuit is a remote-controlled motor driver system powered by a LiPo battery. It uses a Massive RC MDEx microcontroller to control an MDD10A dual motor driver, which in turn drives two GM25 DC motors. The R6FG receiver receives remote control signals to manage the motor directions and speeds.
Cirkit Designer LogoOpen Project in Cirkit Designer

Common Applications:

  • Industrial automation systems
  • Home appliances (e.g., washing machines, HVAC systems)
  • Control panels and circuit switching
  • Timing and sequencing circuits
  • Motor control and protection systems

Technical Specifications

Key Technical Details:

Parameter Value
Manufacturer Cikachi
Part Number JDM11-6H
Operating Voltage 12V DC / 24V DC / 220V AC
Contact Configuration SPDT (Single Pole Double Throw)
Contact Rating 5A at 250V AC / 30V DC
Coil Power Consumption 0.9W
Insulation Resistance ≥ 100MΩ at 500V DC
Dielectric Strength 1500V AC for 1 minute
Operating Temperature -10°C to +55°C
Dimensions 28mm x 12mm x 15mm
Weight 15g

Pin Configuration and Descriptions:

The HAfiHA JDM11-6H relay has a standard pinout for SPDT relays. Below is the pin configuration:

Pin Number Name Description
1 Coil (+) Positive terminal of the relay coil
2 Coil (-) Negative terminal of the relay coil
3 Common (COM) Common terminal for the switching contacts
4 Normally Open (NO) Contact that is open when the relay is inactive
5 Normally Closed (NC) Contact that is closed when the relay is inactive

Usage Instructions

How to Use the HAfiHA JDM11-6H in a Circuit:

  1. Power the Relay Coil: Connect the coil terminals (Pin 1 and Pin 2) to the appropriate voltage source (e.g., 12V DC, 24V DC, or 220V AC, depending on the relay variant). Ensure the voltage matches the relay's rated operating voltage.
  2. Connect the Load:
    • Connect the load to the Common (COM) terminal (Pin 3).
    • Use the Normally Open (NO) terminal (Pin 4) if you want the load to be powered only when the relay is activated.
    • Use the Normally Closed (NC) terminal (Pin 5) if you want the load to be powered when the relay is inactive.
  3. Control the Relay: Use a microcontroller, switch, or other control circuit to energize the relay coil. When the coil is energized, the relay switches from NC to NO.

Important Considerations and Best Practices:

  • Voltage Matching: Ensure the relay's coil voltage matches the control circuit's output voltage.
  • Current Rating: Do not exceed the relay's contact current rating (5A at 250V AC or 30V DC).
  • Flyback Diode: When using the relay with a DC coil, add a flyback diode across the coil terminals to protect the control circuit from voltage spikes.
  • Mounting: Secure the relay in a stable position to prevent mechanical stress or vibration.

Example: Connecting the HAfiHA JDM11-6H to an Arduino UNO

Below is an example of how to control the relay using an Arduino UNO:

// Define the pin connected to the relay's coil
const int relayPin = 7;

void setup() {
  // Set the relay pin as an output
  pinMode(relayPin, OUTPUT);
}

void loop() {
  // Activate the relay (coil energized)
  digitalWrite(relayPin, HIGH);
  delay(1000); // Keep the relay on for 1 second

  // Deactivate the relay (coil de-energized)
  digitalWrite(relayPin, LOW);
  delay(1000); // Keep the relay off for 1 second
}

Note: Use a transistor or relay driver circuit to interface the Arduino with the relay, as the Arduino's GPIO pins cannot directly supply enough current to energize the relay coil.

Troubleshooting and FAQs

Common Issues and Solutions:

  1. Relay Not Switching:

    • Cause: Insufficient voltage or current to the coil.
    • Solution: Verify the coil voltage and ensure the power supply can provide sufficient current.
  2. Load Not Powered:

    • Cause: Incorrect wiring of the load to the relay terminals.
    • Solution: Double-check the connections to the COM, NO, and NC terminals.
  3. Relay Buzzing Noise:

    • Cause: Unstable or insufficient power supply to the coil.
    • Solution: Use a stable power source and ensure the voltage matches the relay's rated voltage.
  4. Overheating:

    • Cause: Exceeding the relay's contact current rating.
    • Solution: Ensure the load current does not exceed 5A.

FAQs:

  • Q: Can I use the HAfiHA JDM11-6H with an AC load?

    • A: Yes, the relay supports AC loads up to 250V at 5A.
  • Q: Do I need a flyback diode for an AC coil?

    • A: No, flyback diodes are only required for DC coils to suppress voltage spikes.
  • Q: Can I use this relay for high-frequency switching?

    • A: The relay is not designed for high-frequency switching. For such applications, consider using a solid-state relay (SSR).
  • Q: How do I identify the coil voltage variant of my relay?

    • A: The coil voltage is typically printed on the relay's casing. Ensure it matches your circuit's requirements.