How to Use Power Ultrasonik Generator: Examples, Pinouts, and Specs
Introduction
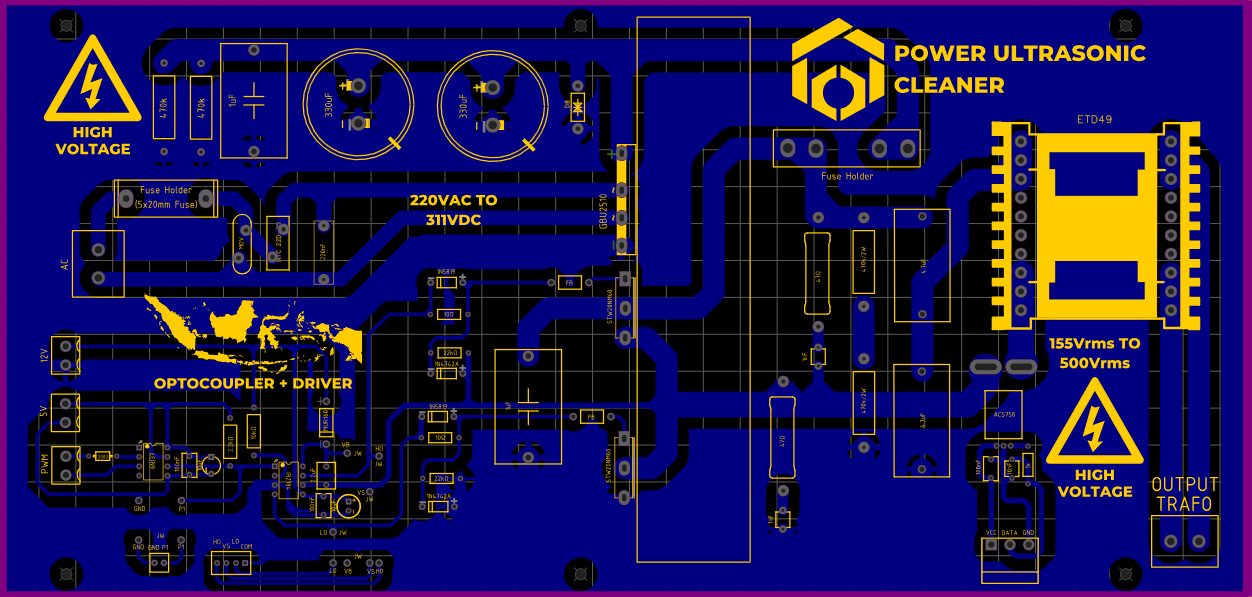
The Power Ultrasonik Generator is a specialized electronic device designed to convert electrical energy into ultrasonic waves. These high-frequency sound waves are commonly used in applications such as ultrasonic cleaning, material processing, and mixing. By generating ultrasonic vibrations, the device enables precise and efficient operations in industrial, medical, and laboratory environments.
Explore Projects Built with Power Ultrasonik Generator
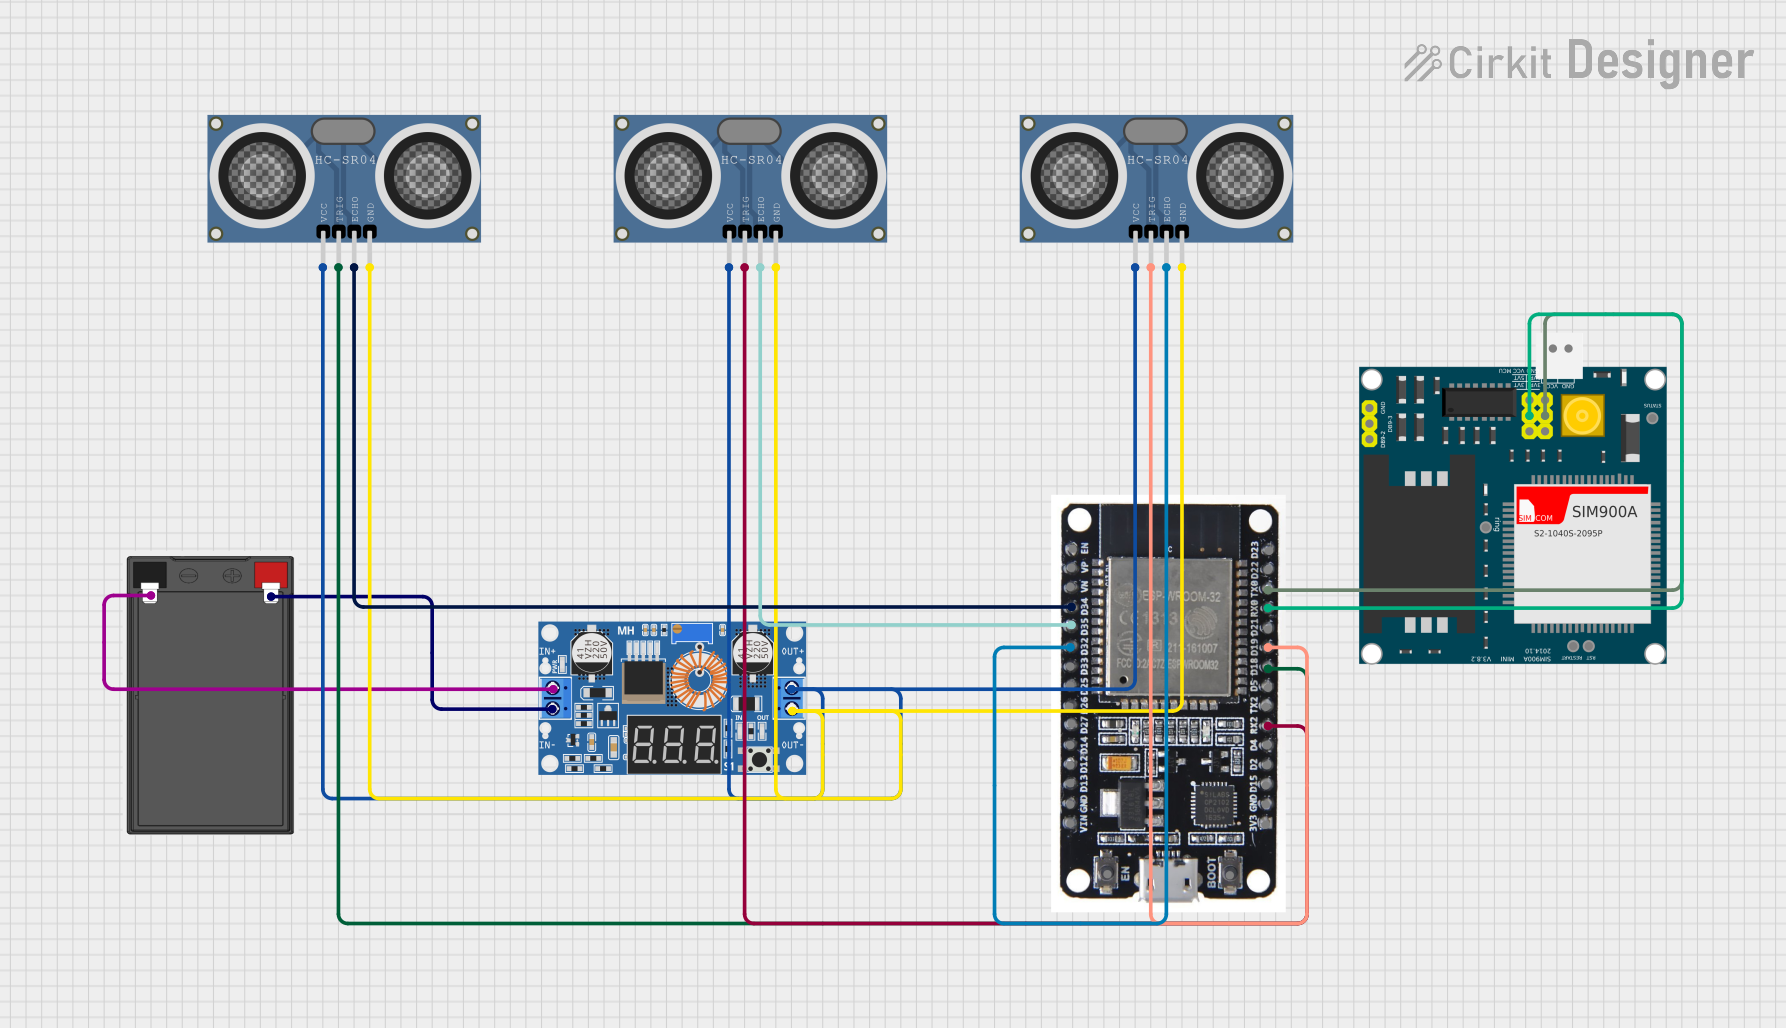
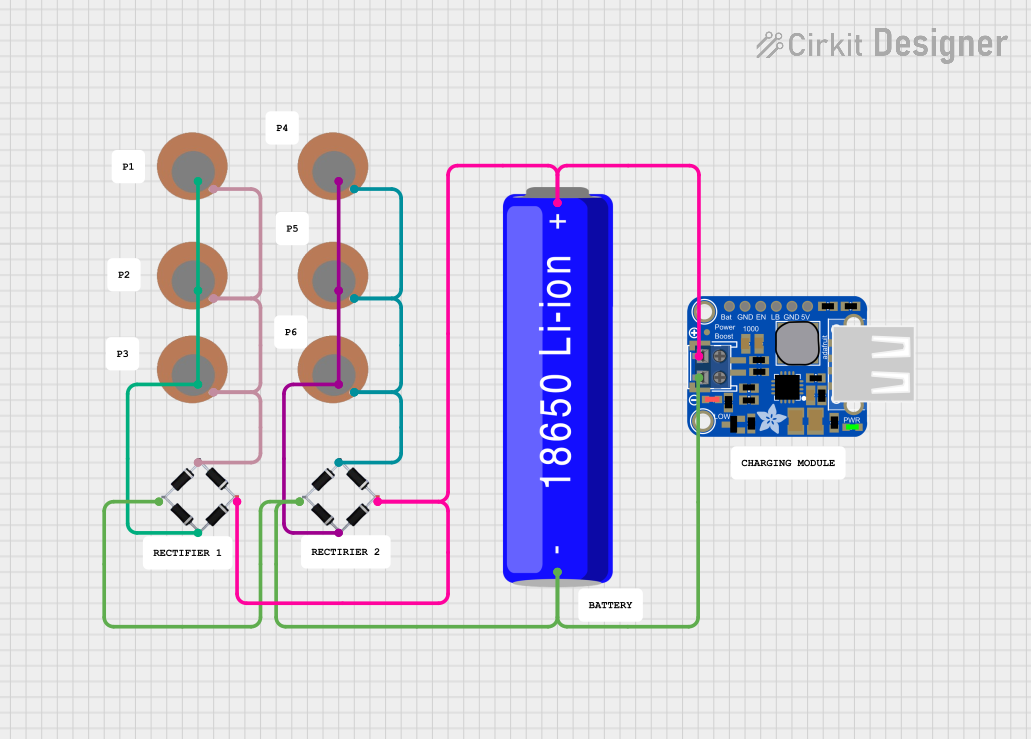
Explore Projects Built with Power Ultrasonik Generator
Common Applications and Use Cases
- Ultrasonic Cleaning: Removing dirt, grease, and contaminants from delicate or intricate objects.
- Material Processing: Assisting in welding, cutting, or bonding materials using ultrasonic energy.
- Mixing and Homogenization: Achieving uniform mixtures in chemical and pharmaceutical industries.
- Medical Applications: Supporting ultrasonic imaging and therapeutic devices.
- Sonochemistry: Enhancing chemical reactions through ultrasonic agitation.
Technical Specifications
The Power Ultrasonik Generator is designed to operate efficiently in a variety of environments. Below are its key technical details:
General Specifications
| Parameter | Value |
|---|---|
| Input Voltage | 110V/220V AC (±10%) |
| Output Frequency | 20 kHz – 40 kHz |
| Output Power | 100W – 2000W |
| Efficiency | ≥90% |
| Operating Temperature | 0°C to 50°C |
| Storage Temperature | -20°C to 70°C |
| Dimensions | Varies by model (e.g., 200x150x100 mm) |
| Weight | Approx. 2 kg |
Pin Configuration and Descriptions
The Power Ultrasonik Generator typically includes the following input/output connections:
| Pin Number | Pin Name | Description |
|---|---|---|
| 1 | AC Input (L) | Live wire connection for AC power input. |
| 2 | AC Input (N) | Neutral wire connection for AC power input. |
| 3 | Ground (GND) | Ground connection for safety and noise reduction. |
| 4 | Ultrasonic Out | Output connection to the ultrasonic transducer. |
| 5 | Control Signal | Input for external control signals (e.g., PWM or analog). |
| 6 | Status Output | Provides feedback on the generator's operational status. |
Usage Instructions
How to Use the Component in a Circuit
- Power Connection: Connect the AC input pins (L and N) to a suitable power source (110V or 220V AC). Ensure proper grounding by connecting the GND pin to a reliable earth ground.
- Transducer Connection: Attach the ultrasonic transducer to the Ultrasonic Out pin. Ensure the transducer's specifications match the generator's output frequency and power.
- Control Signal: If external control is required, connect a PWM or analog signal to the Control Signal pin. This allows you to adjust the output power or frequency dynamically.
- Status Monitoring: Use the Status Output pin to monitor the generator's operational state. This can be connected to an LED or a microcontroller for real-time feedback.
Important Considerations and Best Practices
- Match the Transducer: Always use a transducer that matches the generator's output frequency and power rating to avoid damage.
- Cooling: Ensure adequate ventilation or cooling for the generator, especially during prolonged use at high power levels.
- Safety: Avoid direct contact with the ultrasonic transducer during operation, as high-frequency vibrations can cause harm.
- Noise Suppression: Use proper shielding and grounding to minimize electromagnetic interference (EMI) in sensitive environments.
- Testing: Before full-scale operation, test the generator with a low-power setting to ensure proper functionality.
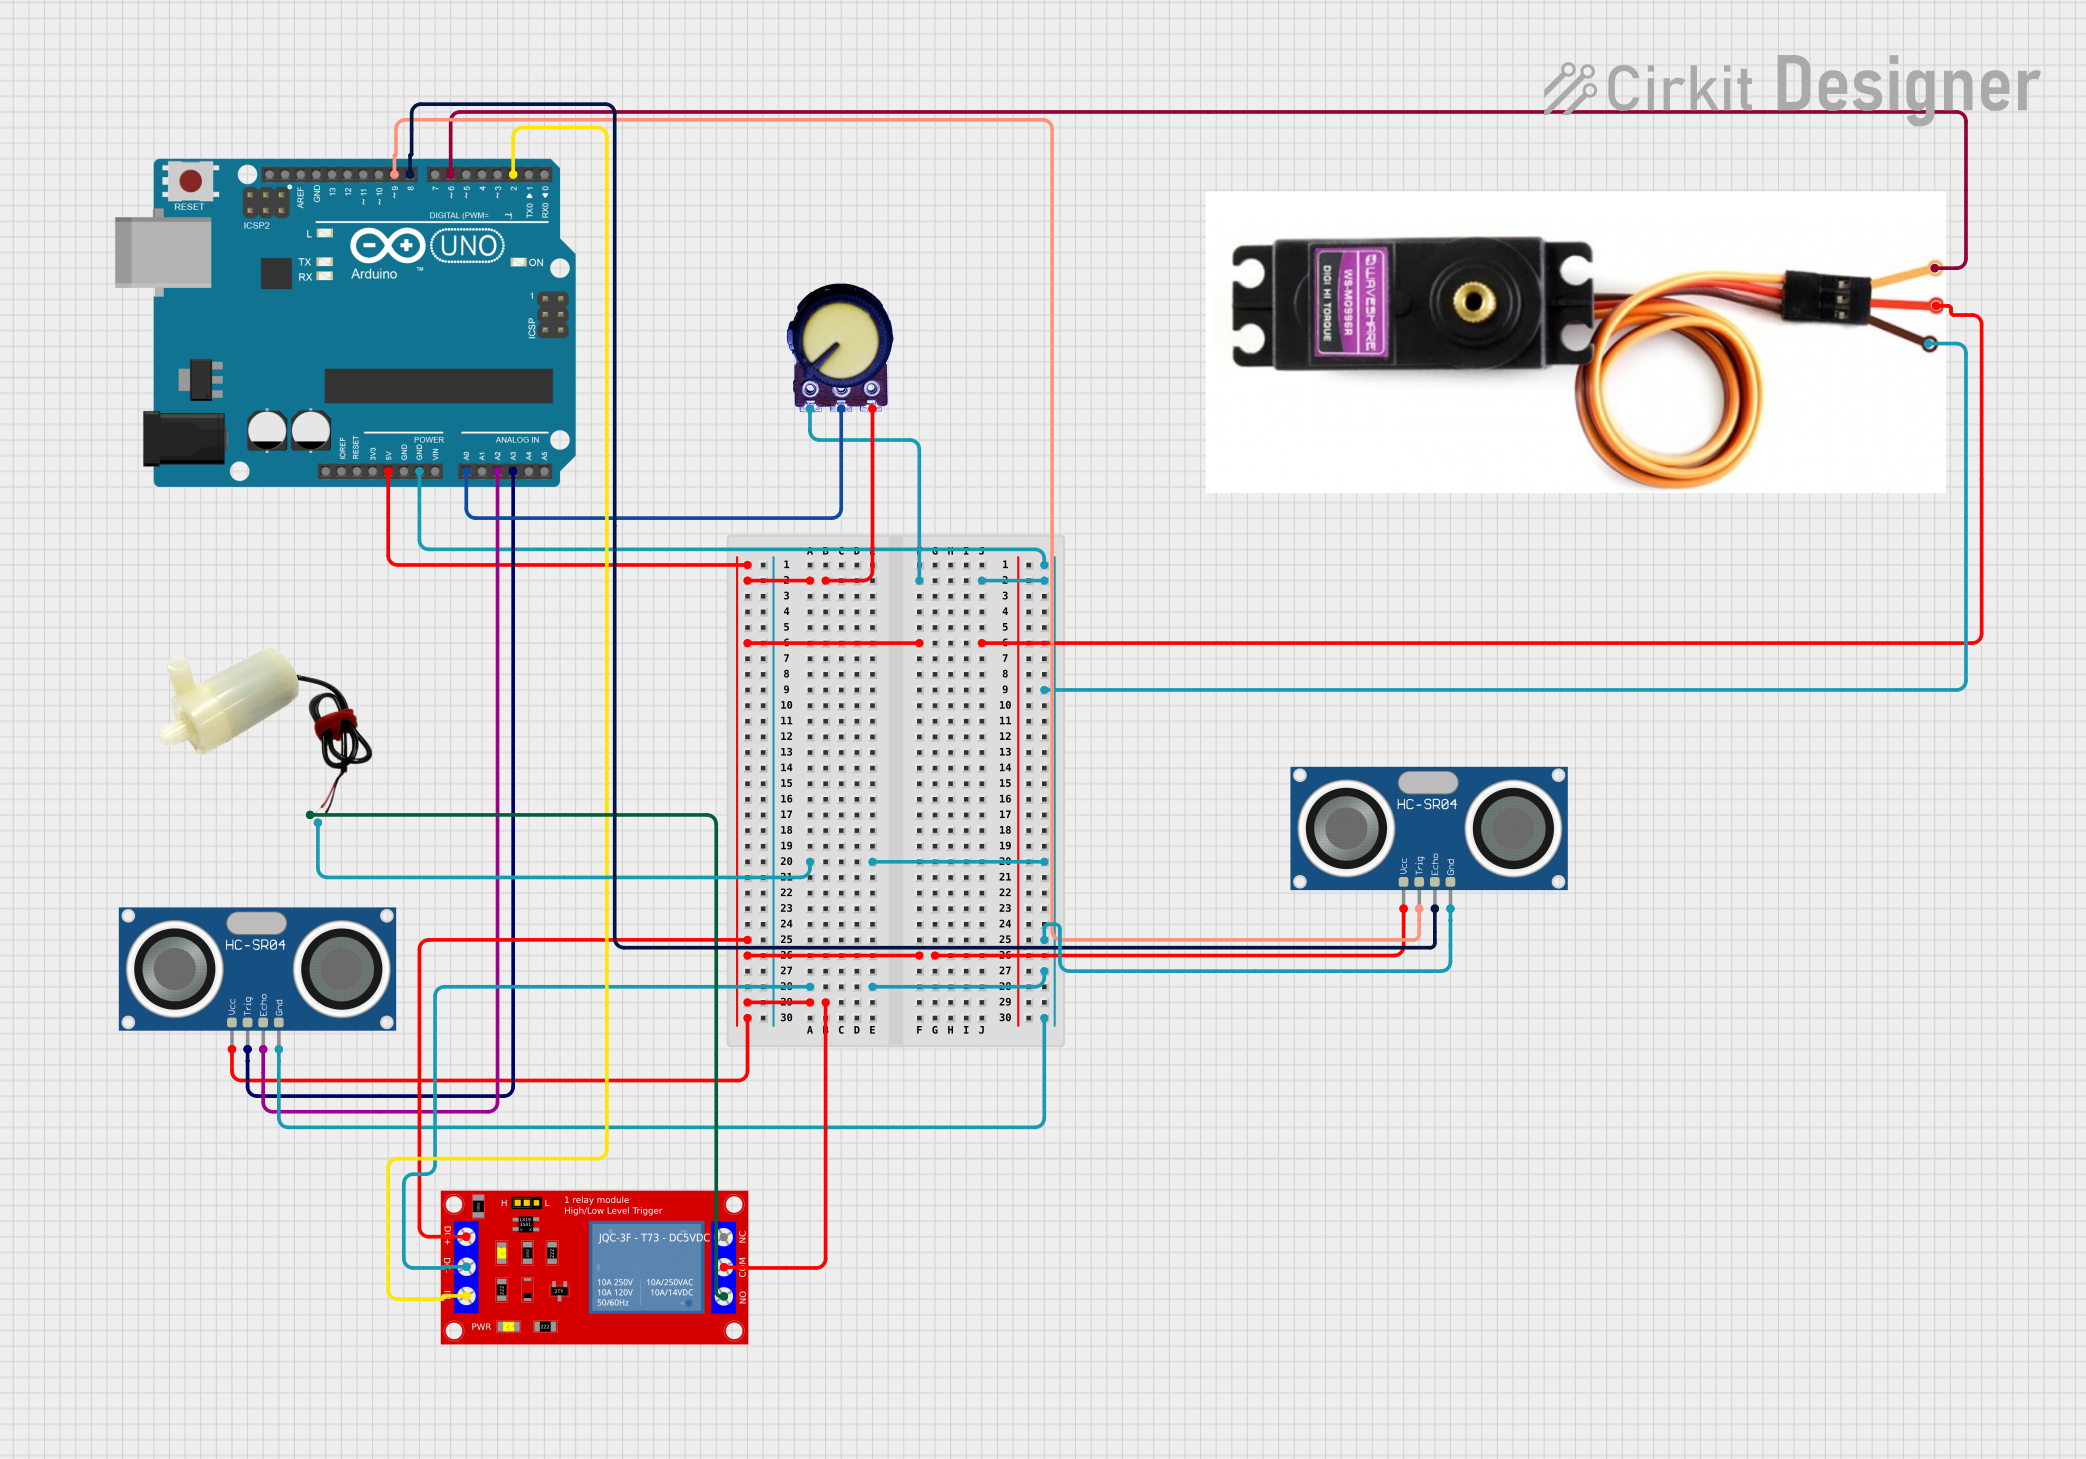
Example: Connecting to an Arduino UNO
The Power Ultrasonik Generator can be controlled using an Arduino UNO to adjust its output power via PWM. Below is an example code snippet:
// Example code to control Power Ultrasonik Generator using Arduino UNO
// This code generates a PWM signal on pin 9 to control the generator's power level.

const int pwmPin = 9; // PWM output pin connected to Control Signal pin of the generator
int powerLevel = 128; // Initial power level (0-255, where 255 is maximum power)

void setup() {
  pinMode(pwmPin, OUTPUT); // Set the PWM pin as an output
}

void loop() {
  analogWrite(pwmPin, powerLevel); // Send PWM signal to control power level
  delay(1000); // Maintain the power level for 1 second

  // Example: Gradually increase power level
  powerLevel += 10; // Increment power level
  if (powerLevel > 255) {
    powerLevel = 0; // Reset power level if it exceeds maximum
  }
}
Troubleshooting and FAQs
Common Issues and Solutions
No Output from the Generator
- Cause: Incorrect power connection or faulty transducer.
- Solution: Verify the AC input connections and ensure the transducer is properly connected and functional.
Overheating
- Cause: Insufficient cooling or prolonged operation at maximum power.
- Solution: Improve ventilation or use an external cooling system.
Intermittent Operation
- Cause: Loose connections or incompatible control signals.
- Solution: Check all connections and ensure the control signal matches the generator's specifications.
High Noise or EMI
- Cause: Poor grounding or lack of shielding.
- Solution: Ensure proper grounding and use shielded cables for connections.
FAQs
Q: Can I use the generator with any ultrasonic transducer?
A: No, the transducer must match the generator's output frequency and power rating.Q: Is it safe to operate the generator continuously?
A: Yes, but ensure adequate cooling to prevent overheating during prolonged use.Q: Can I control the generator with a microcontroller other than Arduino?
A: Yes, any microcontroller capable of generating PWM or analog signals can be used.Q: What happens if the input voltage fluctuates?
A: The generator is designed to handle minor fluctuations (±10%), but significant deviations may cause malfunction or damage.
This concludes the documentation for the Power Ultrasonik Generator. For further assistance, refer to the manufacturer's support resources.