How to Use Seeed Studio Round Display for XIAO: Examples, Pinouts, and Specs
Introduction
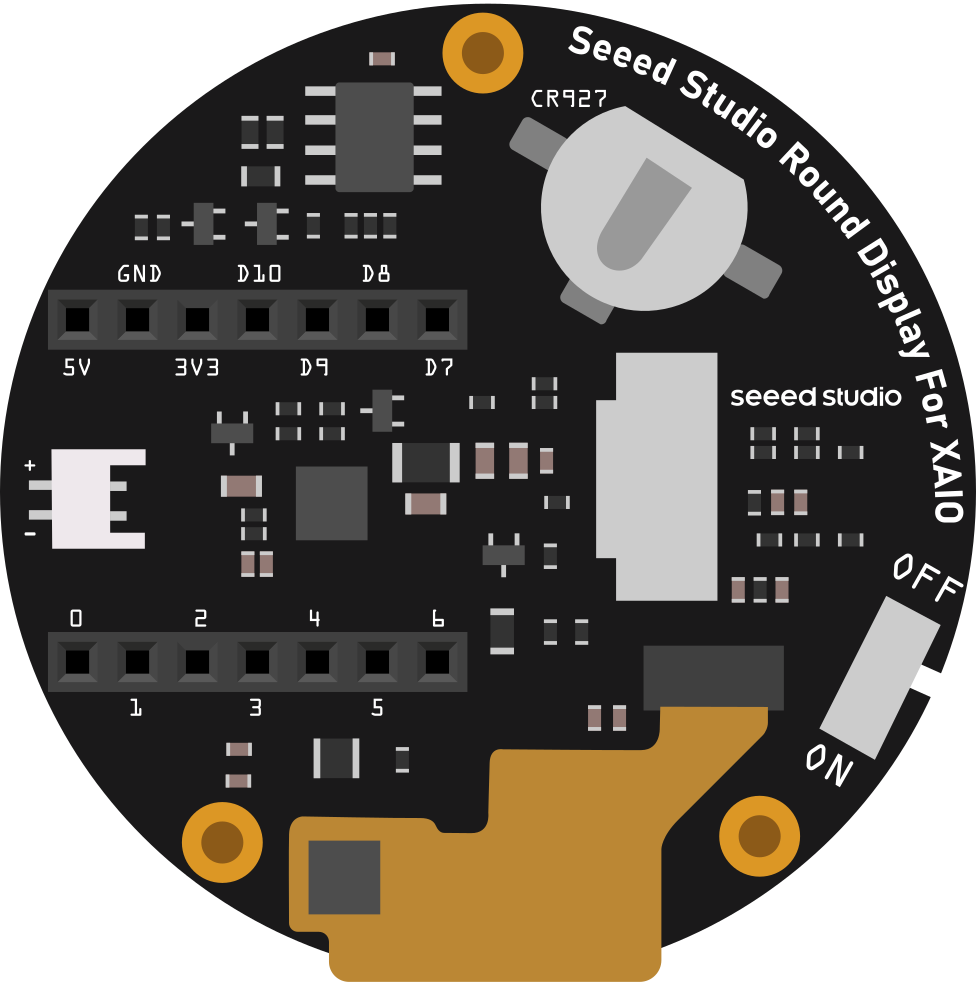
The Seeed Studio Round Display for XIAO is a compact, circular display module designed specifically for use with the Seeed Studio XIAO series of microcontrollers. Featuring a high-resolution screen, this display is ideal for creating visually appealing projects, such as wearable devices, dashboards, and compact user interfaces. Its small form factor and compatibility with the XIAO ecosystem make it a versatile choice for hobbyists and professionals alike.
Explore Projects Built with Seeed Studio Round Display for XIAO


Explore Projects Built with Seeed Studio Round Display for XIAO
Common Applications and Use Cases
- Wearable devices (e.g., smartwatches, fitness trackers)
- Compact graphical user interfaces
- IoT dashboards and data visualization
- Gaming and interactive projects
- Educational and prototyping purposes
Technical Specifications
The following table outlines the key technical details of the Seeed Studio Round Display for XIAO:
| Specification | Details |
|---|---|
| Display Type | Circular TFT LCD |
| Resolution | 240 x 240 pixels |
| Screen Diameter | 1.28 inches |
| Interface | SPI (Serial Peripheral Interface) |
| Operating Voltage | 3.3V |
| Backlight | Integrated |
| Driver IC | GC9A01 |
| Dimensions | 40mm (diameter) x 7.2mm (thickness) |
| Weight | ~5g |
Pin Configuration and Descriptions
The display module connects to the XIAO microcontroller via the following pins:
| Pin Name | Description | XIAO Pin |
|---|---|---|
| VCC | Power supply (3.3V) | 3.3V |
| GND | Ground | GND |
| SCL | SPI Clock | D5 |
| SDA | SPI Data (MOSI) | D4 |
| RES | Reset | D3 |
| DC | Data/Command Control | D2 |
| CS | Chip Select | D1 |
| BLK | Backlight Control (optional) | D0 |
Usage Instructions
How to Use the Component in a Circuit
Wiring the Display to the XIAO Microcontroller:
- Connect the
VCCpin of the display to the3.3Vpin on the XIAO. - Connect the
GNDpin of the display to theGNDpin on the XIAO. - Connect the SPI pins (
SCL,SDA,RES,DC,CS, andBLK) to the corresponding digital pins on the XIAO as per the pin configuration table above.
- Connect the
Install Required Libraries:
- To use the display, you need to install the
Adafruit_GFXandAdafruit_GC9A01libraries in the Arduino IDE. These libraries provide the necessary functions to control the display.
- To use the display, you need to install the
Upload Example Code:
- Use the following example code to test the display:
#include <Adafruit_GFX.h>       // Graphics library for displays
#include <Adafruit_GC9A01.h>    // Driver library for GC9A01 display

// Define pin connections
#define TFT_CS   D1  // Chip Select
#define TFT_DC   D2  // Data/Command
#define TFT_RST  D3  // Reset
#define TFT_BL   D0  // Backlight (optional)

// Initialize the display
Adafruit_GC9A01 tft = Adafruit_GC9A01(TFT_CS, TFT_DC, TFT_RST);

void setup() {
  // Initialize serial communication for debugging
  Serial.begin(115200);
  Serial.println("Initializing display...");

  // Initialize the display
  tft.begin();
  tft.setRotation(0);  // Set display orientation
  tft.fillScreen(0x0000);  // Clear the screen (black)

  // Turn on the backlight (if connected)
  pinMode(TFT_BL, OUTPUT);
  digitalWrite(TFT_BL, HIGH);

  // Display a test message
  tft.setTextColor(0xFFFF);  // White text
  tft.setTextSize(2);        // Text size
  tft.setCursor(20, 60);     // Set cursor position
  tft.println("Hello, XIAO!");
}

void loop() {
  // Add your custom code here
}
Important Considerations and Best Practices
- Power Supply: Ensure the XIAO microcontroller is powered via a stable 3.3V source to avoid damage to the display.
- Backlight Control: The
BLKpin can be connected to a PWM-capable pin on the XIAO for dimming the backlight. - SPI Speed: The SPI communication speed can be adjusted in the library settings if you encounter display glitches.
- Library Compatibility: Always use the latest versions of the
Adafruit_GFXandAdafruit_GC9A01libraries for optimal performance.
Troubleshooting and FAQs
Common Issues and Solutions
Display Not Turning On:
- Verify all connections, especially
VCCandGND. - Ensure the backlight pin (
BLK) is connected toHIGHor left unconnected.
- Verify all connections, especially
No Output or Garbled Display:
- Check the SPI connections (
SCL,SDA,CS,DC,RES). - Ensure the correct pins are defined in the code.
- Reduce the SPI speed in the library settings if necessary.
- Check the SPI connections (
Backlight Not Working:
- Confirm that the
BLKpin is connected to a digital pin set toHIGH. - If dimming is required, ensure the pin supports PWM.
- Confirm that the
Library Errors During Compilation:
- Ensure the
Adafruit_GFXandAdafruit_GC9A01libraries are installed and up to date. - Restart the Arduino IDE after installing the libraries.
- Ensure the
FAQs
Q: Can I use this display with other microcontrollers?
A: Yes, the display can be used with other microcontrollers that support SPI communication, but you may need to adjust the pin definitions and ensure compatibility with the GC9A01 driver.
Q: What is the maximum SPI speed supported by the display?
A: The GC9A01 driver typically supports SPI speeds up to 40MHz, but lower speeds may be required for stable operation depending on your setup.
Q: Can I use the display in low-power applications?
A: Yes, you can reduce power consumption by dimming the backlight or turning it off when not needed.
Q: Is the display sunlight-readable?
A: The display is not optimized for direct sunlight readability but performs well in indoor and shaded environments.