
How to Use LilyPad Coin Cell Battery Holder: Examples, Pinouts, and Specs
 Design with LilyPad Coin Cell Battery Holder in Cirkit Designer
Introduction
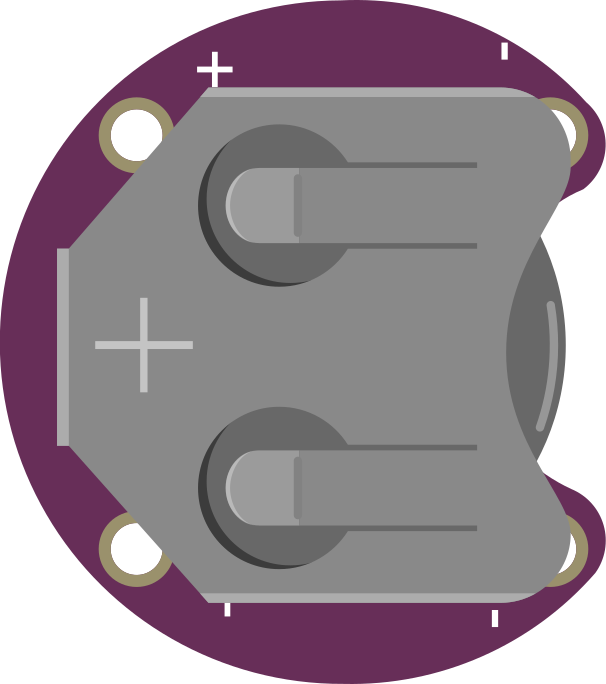
The LilyPad Coin Cell Battery Holder (Manufacturer Part ID: DEV-10730) by SparkFun Electronics is a compact and lightweight battery holder designed to securely fit a coin cell battery. It is specifically tailored for wearable electronics and projects using the LilyPad Arduino platform. This holder allows for easy battery replacement and provides a reliable power source for low-power electronic circuits.
Explore Projects Built with LilyPad Coin Cell Battery Holder
 Open Project in Cirkit Designer
 Open Project in Cirkit Designer
 Open Project in Cirkit Designer
 Open Project in Cirkit Designer
Explore Projects Built with LilyPad Coin Cell Battery Holder
Open Project in Cirkit DesignerOpen Project in Cirkit DesignerOpen Project in Cirkit DesignerOpen Project in Cirkit DesignerCommon Applications and Use Cases
- Wearable electronics and e-textiles
- Powering LilyPad Arduino boards and modules
- Small, portable, and low-power projects
- Prototyping and educational projects involving coin cell batteries
Technical Specifications
The following table outlines the key technical details of the LilyPad Coin Cell Battery Holder:
| Specification | Details |
|---|---|
| Manufacturer | SparkFun Electronics |
| Part Number | DEV-10730 |
| Supported Battery Type | CR2032 (3V coin cell battery) |
| Dimensions | 20mm x 32mm |
| Weight | 1.5g |
| Operating Voltage | 3V (nominal, based on battery used) |
| Current Rating | Dependent on the connected circuit |
| Mounting Style | Sewable pads for e-textiles |
| Material | PCB with conductive sewable pads |
Pin Configuration and Descriptions
The LilyPad Coin Cell Battery Holder has two sewable connection pads:
| Pad Name | Description |
|---|---|
| + (Positive) | Positive terminal of the battery (3V output) |
| - (Negative) | Negative terminal of the battery (ground/GND) |
These pads are designed to be sewn into fabric using conductive thread or connected to other components via soldering.
Usage Instructions
How to Use the Component in a Circuit
- Insert the Battery: Place a CR2032 coin cell battery into the holder, ensuring the positive side of the battery faces up.
- Connect to Circuit:
- Use conductive thread to sew the + and - pads to your circuit.
- Alternatively, solder wires to the pads for a more permanent connection.
- Power Your Circuit: Once connected, the holder will supply 3V to your circuit.
Important Considerations and Best Practices
- Battery Orientation: Ensure the battery is inserted with the correct polarity. The positive side of the battery should align with the "+" marking on the holder.
- Avoid Short Circuits: When sewing with conductive thread, ensure the threads connected to the + and - pads do not touch each other.
- Current Limitations: The CR2032 battery is suitable for low-power applications. Avoid using it with components that require high current.
- Secure Connections: If using conductive thread, tie knots securely to maintain good electrical contact.
- Battery Replacement: The holder is designed for easy battery replacement. Simply slide out the old battery and insert a new one.
Example: Connecting to an Arduino UNO
Although the LilyPad Coin Cell Battery Holder is primarily used with LilyPad Arduino boards, it can also power small circuits connected to an Arduino UNO. Below is an example of using the holder to power an LED:
Circuit Diagram
- Connect the + pad of the holder to the positive leg of the LED (via a 220-ohm resistor).
- Connect the - pad of the holder to the negative leg of the LED.
Sample Code
The following code demonstrates how to blink an LED powered by the LilyPad Coin Cell Battery Holder:
// Simple LED Blink Example
// This code assumes the LED is connected to pin 13 of the Arduino UNO.

void setup() {
  pinMode(13, OUTPUT); // Set pin 13 as an output
}

void loop() {
  digitalWrite(13, HIGH); // Turn the LED on
  delay(1000);            // Wait for 1 second
  digitalWrite(13, LOW);  // Turn the LED off
  delay(1000);            // Wait for 1 second
}
Note: The Arduino UNO cannot be powered directly by the LilyPad Coin Cell Battery Holder due to its higher current requirements. Use this holder only for low-power components like LEDs or sensors.
Troubleshooting and FAQs
Common Issues and Solutions
Battery Not Fitting Properly:
- Ensure you are using a CR2032 coin cell battery.
- Check for any obstructions in the holder.
No Power Output:
- Verify the battery is inserted with the correct polarity.
- Check the connections to the + and - pads for continuity.
Short Circuit in Sewn Connections:
- Inspect the conductive thread to ensure the + and - threads are not touching.
- Use insulating fabric or tape to separate overlapping threads.
Low Battery Life:
- Ensure the connected circuit is low-power and does not exceed the current capacity of the CR2032 battery.
- Replace the battery if it is depleted.
Frequently Asked Questions
Q: Can I use a different coin cell battery with this holder?
A: The holder is specifically designed for CR2032 batteries. Other coin cell batteries may not fit securely or provide the correct voltage.
Q: Is the holder washable?
A: The holder itself is not waterproof or washable. If used in wearable electronics, ensure it is removed before washing the fabric.
Q: Can I solder wires to the pads instead of sewing?
A: Yes, the pads are compatible with soldering for more permanent connections.
Q: What is the maximum current the holder can handle?
A: The current is limited by the CR2032 battery, which typically provides a maximum of 3-4mA for continuous use and up to 20mA for short bursts.
By following this documentation, you can effectively integrate the LilyPad Coin Cell Battery Holder into your projects and ensure reliable performance.