Cirkit Designer Logo
Cirkit Designer
Your all-in-one circuit design IDE
Home / 
Component Documentation

How to Use KY 038: Examples, Pinouts, and Specs

Image of KY 038
Cirkit Designer LogoDesign with KY 038 in Cirkit Designer

Introduction

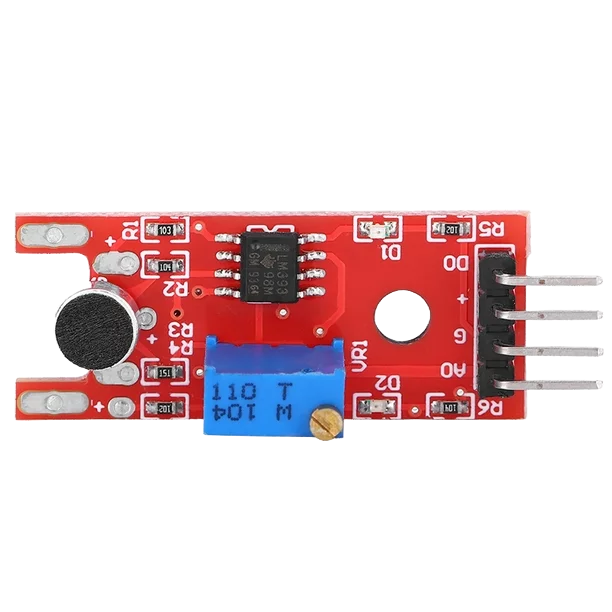
The KY-038 Sound Sensor Module is a compact and sensitive module designed for detecting sound levels in the environment. It is equipped with a microphone and an onboard amplifier circuit, making it capable of converting acoustic sound into an electrical signal. This module is commonly used in noise detection, voice-activated systems, and simple audio monitoring applications.

Explore Projects Built with KY 038

Use Cirkit Designer to design, explore, and prototype these projects online. Some projects support real-time simulation. Click "Open Project" to start designing instantly!
ESP32-Based Smart Sensor System with Ultrasonic and Sound Detection
Image of 858: A project utilizing KY 038 in a practical application
This circuit features an ESP32 microcontroller interfaced with a KY 038 sound sensor and an ultrasonic sensor. The ESP32 reads analog sound levels from the KY 038 and distance measurements from the ultrasonic sensor, enabling it to process and respond to environmental audio and proximity data.
Cirkit Designer LogoOpen Project in Cirkit Designer
Arduino UNO Controlled RGB LED Light Show with Sound Detection
Image of Voice Sensor with RGB: A project utilizing KY 038 in a practical application
This circuit features an Arduino UNO microcontroller connected to a KY-038 sound sensor module and an RGB LED with individual resistors on each color channel. The Arduino is programmed to sequentially turn on the red, green, and blue channels of the RGB LED, each for a duration of 2 seconds. The sound sensor is powered by the Arduino and its analog and digital outputs are connected to the Arduino's analog and digital pins, respectively, for sound detection and processing.
Cirkit Designer LogoOpen Project in Cirkit Designer
ESP32-Based Security System with RFID and Laser Intrusion Detection
Image of CPE doorlock system upgrade: A project utilizing KY 038 in a practical application
This circuit is a security and access control system featuring motion detection, laser beam-break sensing, and RFID scanning, interfaced with a keypad and visual/audible indicators, powered by a solar-charged battery, and capable of controlling an electric lock via a relay.
Cirkit Designer LogoOpen Project in Cirkit Designer
ESP32-Based Security System with RFID and Laser Tripwire
Image of CPE doorlock system: A project utilizing KY 038 in a practical application
This circuit is designed for a comprehensive security and access control system with motion detection, access via RFID, and a break-beam sensor. It includes a solenoid lock controlled by a relay, visual and audible alerts, and a robust power management system with solar and battery backup to ensure uninterrupted operation.
Cirkit Designer LogoOpen Project in Cirkit Designer

Explore Projects Built with KY 038

Use Cirkit Designer to design, explore, and prototype these projects online. Some projects support real-time simulation. Click "Open Project" to start designing instantly!
Image of 858: A project utilizing KY 038 in a practical application
ESP32-Based Smart Sensor System with Ultrasonic and Sound Detection
This circuit features an ESP32 microcontroller interfaced with a KY 038 sound sensor and an ultrasonic sensor. The ESP32 reads analog sound levels from the KY 038 and distance measurements from the ultrasonic sensor, enabling it to process and respond to environmental audio and proximity data.
Cirkit Designer LogoOpen Project in Cirkit Designer
Image of Voice Sensor with RGB: A project utilizing KY 038 in a practical application
Arduino UNO Controlled RGB LED Light Show with Sound Detection
This circuit features an Arduino UNO microcontroller connected to a KY-038 sound sensor module and an RGB LED with individual resistors on each color channel. The Arduino is programmed to sequentially turn on the red, green, and blue channels of the RGB LED, each for a duration of 2 seconds. The sound sensor is powered by the Arduino and its analog and digital outputs are connected to the Arduino's analog and digital pins, respectively, for sound detection and processing.
Cirkit Designer LogoOpen Project in Cirkit Designer
Image of CPE doorlock system upgrade: A project utilizing KY 038 in a practical application
ESP32-Based Security System with RFID and Laser Intrusion Detection
This circuit is a security and access control system featuring motion detection, laser beam-break sensing, and RFID scanning, interfaced with a keypad and visual/audible indicators, powered by a solar-charged battery, and capable of controlling an electric lock via a relay.
Cirkit Designer LogoOpen Project in Cirkit Designer
Image of CPE doorlock system: A project utilizing KY 038 in a practical application
ESP32-Based Security System with RFID and Laser Tripwire
This circuit is designed for a comprehensive security and access control system with motion detection, access via RFID, and a break-beam sensor. It includes a solenoid lock controlled by a relay, visual and audible alerts, and a robust power management system with solar and battery backup to ensure uninterrupted operation.
Cirkit Designer LogoOpen Project in Cirkit Designer

Common Applications and Use Cases

  • Sound level measurement
  • Security systems (e.g., voice recognition to trigger an alarm)
  • Interactive voice-controlled devices
  • Environmental monitoring (e.g., monitoring noise pollution)
  • Hobbyist projects involving sound detection, such as clap switches

Technical Specifications

Key Technical Details

  • Operating Voltage: 3.3V to 5V DC
  • Output: Analog and Digital
  • Sensitivity: Adjustable via onboard potentiometer
  • Frequency Response: Approximately 50Hz to 20kHz

Pin Configuration and Descriptions

Pin Description
VCC Connect to 3.3V to 5V power supply
GND Connect to ground
AO Analog output, provides a real-time output voltage signal of the microphone
DO Digital output, outputs high and low signals based on the threshold set by the onboard potentiometer

Usage Instructions

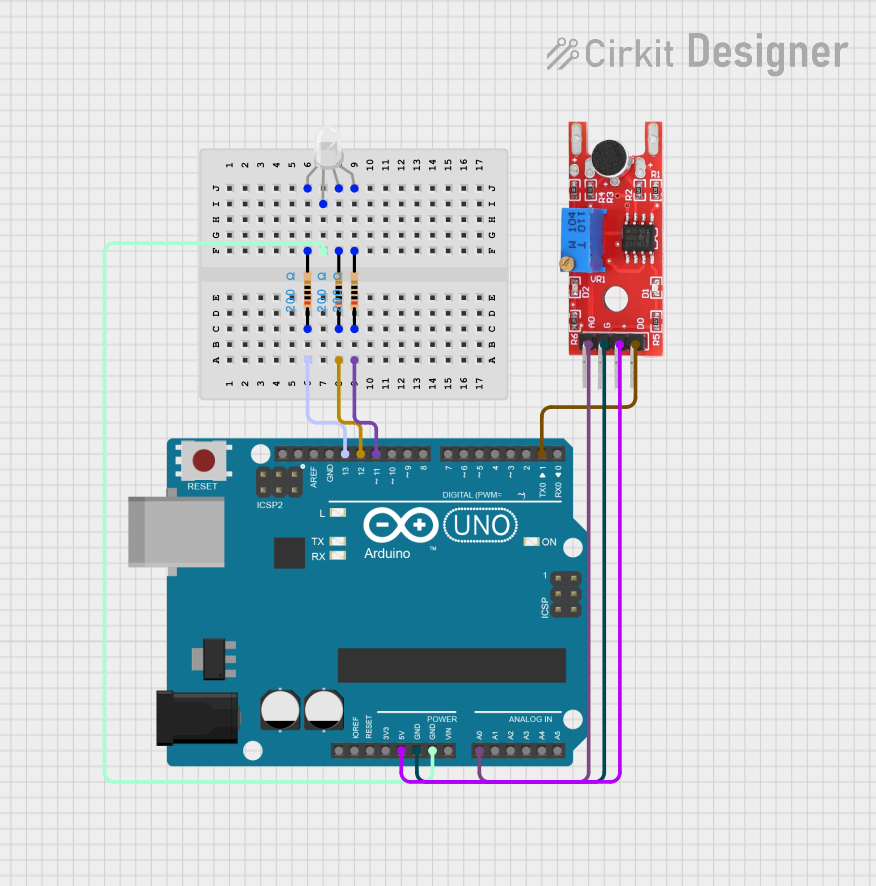
How to Use the Component in a Circuit

  1. Connect the VCC pin to a 3.3V to 5V power supply.
  2. Connect the GND pin to the ground of the power supply.
  3. Connect the AO pin to an analog input pin on your microcontroller if you need to measure the intensity of the sound.
  4. Connect the DO pin to a digital input pin on your microcontroller if you want to detect sound presence above a certain threshold.

Important Considerations and Best Practices

  • Ensure that the power supply voltage matches the module's requirements (3.3V to 5V).
  • Adjust the sensitivity of the module using the onboard potentiometer to set the threshold for the digital output.
  • Place the module away from noise sources like motors or high-frequency electronics to avoid interference.
  • Use shielded cables for connections, especially in environments with high electromagnetic interference.

Example Code for Arduino UNO

// KY-038 Sound Sensor example with Arduino UNO

const int analogPin = A0; // Analog output from the KY-038
const int digitalPin = 2; // Digital output from the KY-038

void setup() {
  Serial.begin(9600);
  pinMode(digitalPin, INPUT);
}

void loop() {
  int analogValue = analogRead(analogPin); // Read the analog value
  int digitalValue = digitalRead(digitalPin); // Read the digital value

  // Print the results to the Serial Monitor
  Serial.print("Analog Value: ");
  Serial.print(analogValue);
  Serial.print(" | Digital Value: ");
  Serial.println(digitalValue);

  delay(100); // Delay for a short period to avoid overwhelming the Serial Monitor
}

Troubleshooting and FAQs

Common Issues Users Might Face

  • Inconsistent Readings: If the sensor provides inconsistent readings, check for loose connections and ensure the potentiometer is correctly adjusted.
  • No Output Signal: Verify that the power supply is within the specified range and that all connections are secure.
  • High Noise Levels: Electromagnetic interference or nearby noise sources can affect readings. Relocate the sensor or use shielded cables.

Solutions and Tips for Troubleshooting

  • Adjust the sensitivity using the onboard potentiometer to fine-tune the threshold for the digital output.
  • Ensure that the module is mounted securely to prevent vibrations from affecting the readings.
  • Use a decoupling capacitor across the power supply pins to minimize power supply noise.

FAQs

Q: Can the KY-038 detect the direction of sound? A: No, the KY-038 can only detect the presence and intensity of sound, not its direction.

Q: What is the difference between AO and DO? A: AO provides a continuous analog signal based on the sound intensity, while DO provides a digital signal when the sound intensity exceeds a certain threshold.

Q: How do I adjust the sensitivity of the module? A: Turn the onboard potentiometer clockwise to increase sensitivity and counterclockwise to decrease it.

Q: Can the KY-038 be used with a 3.3V system? A: Yes, the KY-038 can operate at 3.3V, making it compatible with both 5V and 3.3V microcontrollers.