Cirkit Designer Logo
Cirkit Designer
Your all-in-one circuit design IDE
Home / 
Component Documentation

How to Use Adafruit TFP401 to 40 pin TFT with Touch: Examples, Pinouts, and Specs

Image of Adafruit TFP401 to 40 pin TFT with Touch
Cirkit Designer LogoDesign with Adafruit TFP401 to 40 pin TFT with Touch in Cirkit Designer

Introduction

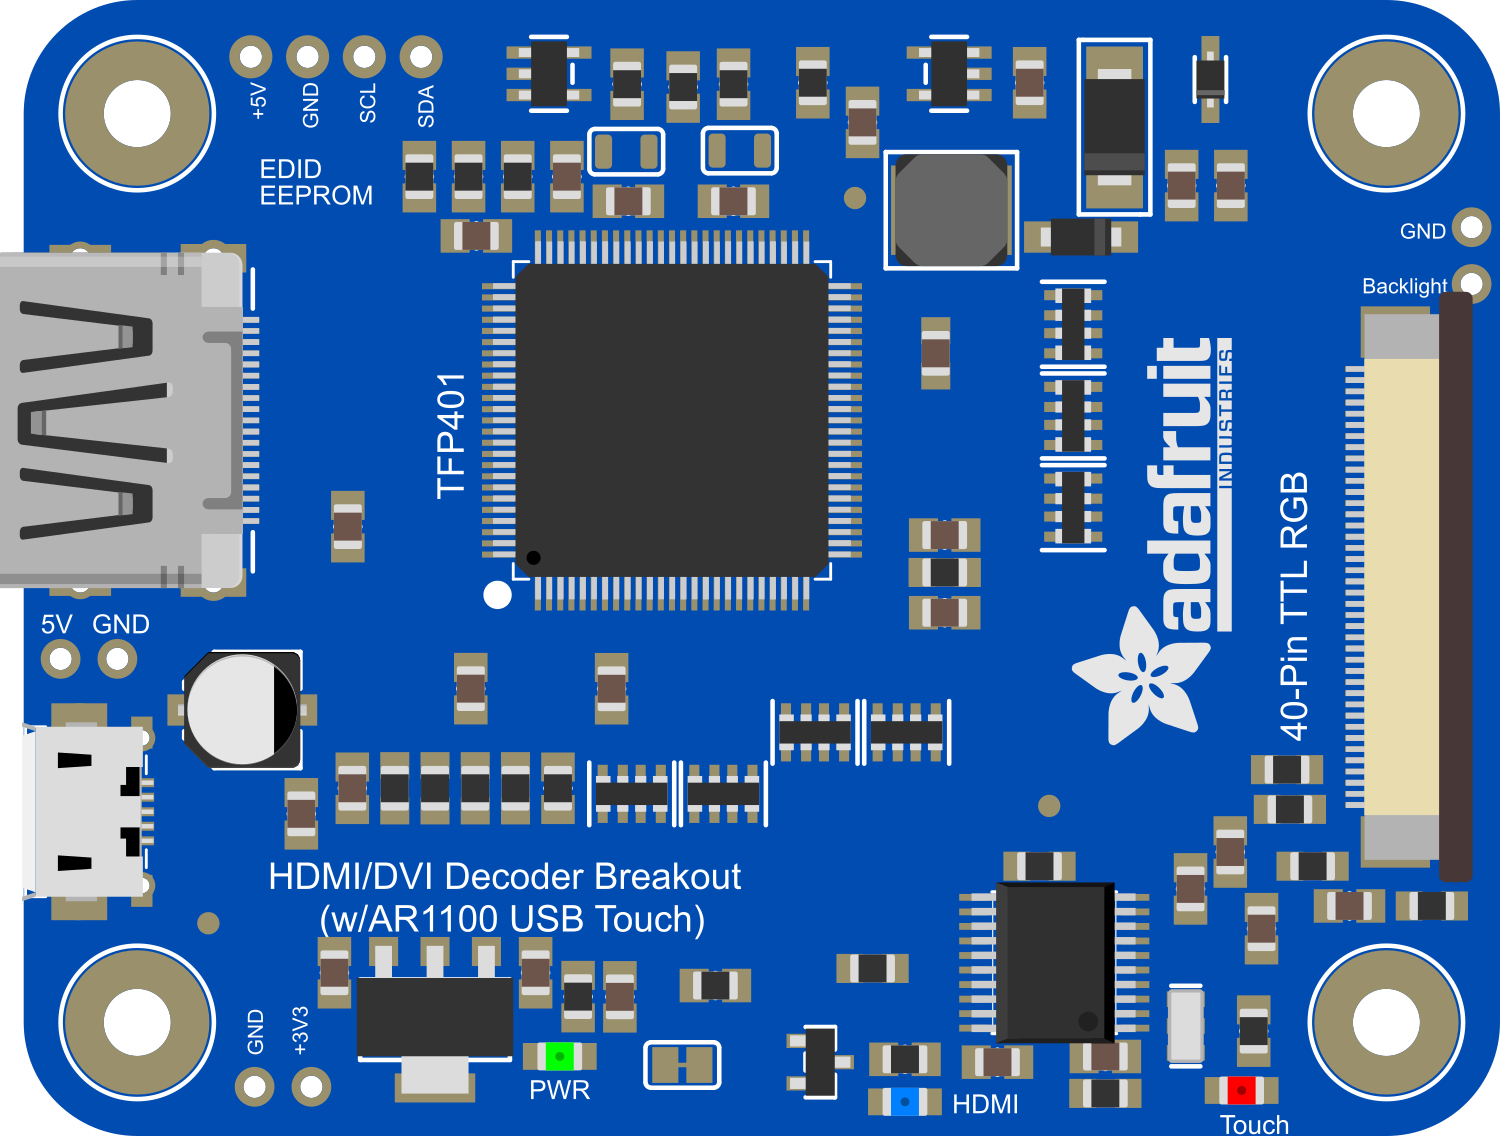
The Adafruit TFP401 is a versatile display controller designed to interface with 40-pin TFT displays, providing a simple solution for adding a high-resolution display to your project. With capacitive touch support, it allows for interactive applications. The controller accepts HDMI and VGA inputs, making it compatible with modern and legacy video sources. This makes it ideal for use in DIY electronics, embedded systems, and interactive kiosks.

Explore Projects Built with Adafruit TFP401 to 40 pin TFT with Touch

Use Cirkit Designer to design, explore, and prototype these projects online. Some projects support real-time simulation. Click "Open Project" to start designing instantly!
ESP32-Controlled Multi-Display Interface with Pushbutton Interaction
Image of Info-Orbs: A project utilizing Adafruit TFP401 to 40 pin TFT with Touch in a practical application
This circuit features an ESP32 microcontroller interfaced with multiple round TFT displays, controlled via shared serial communication lines, and several pushbuttons connected to individual GPIOs for input. The ESP32 coordinates the display of information and responds to user inputs from the pushbuttons.
Cirkit Designer LogoOpen Project in Cirkit Designer
ESP32-Powered 1.3 inch TFT Display Module for Visual Data Output
Image of ESP32+ST7789: A project utilizing Adafruit TFP401 to 40 pin TFT with Touch in a practical application
This circuit connects an ESP32 microcontroller to a 1.3 inch TFT display module (ST7789). The ESP32 provides power and control signals to the display, enabling it to show graphical data.
Cirkit Designer LogoOpen Project in Cirkit Designer
Arduino Mega 2560 Controlled TFT Touchscreen Interface
Image of Tablero Moto: A project utilizing Adafruit TFP401 to 40 pin TFT with Touch in a practical application
This circuit connects an Arduino Mega 2560 microcontroller to a 3.5-inch 480x320 TFT LCD display. The Arduino provides power, ground, and digital signals to control the display, including data lines for pixel information and control lines for reset, write, and command/data selection. The embedded code initializes the display and configures the Arduino's pins for communication, likely to create a user interface or visual output for a project.
Cirkit Designer LogoOpen Project in Cirkit Designer
Arduino Mega 2560 Controlled TFT Touchscreen Interface with 4-Channel Relay Automation
Image of Display relay: A project utilizing Adafruit TFP401 to 40 pin TFT with Touch in a practical application
This circuit features an Arduino Mega 2560 microcontroller connected to an ILI9488 HD TFT LCD screen and a 4-channel relay module, powered by a 5V battery. The Arduino controls the LCD to display interactive buttons and uses digital output pins to toggle the state of the relays based on touch input. The code provided facilitates a user interface on the LCD for controlling devices connected to the relays, making it suitable for home automation or similar applications.
Cirkit Designer LogoOpen Project in Cirkit Designer

Explore Projects Built with Adafruit TFP401 to 40 pin TFT with Touch

Use Cirkit Designer to design, explore, and prototype these projects online. Some projects support real-time simulation. Click "Open Project" to start designing instantly!
Image of Info-Orbs: A project utilizing Adafruit TFP401 to 40 pin TFT with Touch in a practical application
ESP32-Controlled Multi-Display Interface with Pushbutton Interaction
This circuit features an ESP32 microcontroller interfaced with multiple round TFT displays, controlled via shared serial communication lines, and several pushbuttons connected to individual GPIOs for input. The ESP32 coordinates the display of information and responds to user inputs from the pushbuttons.
Cirkit Designer LogoOpen Project in Cirkit Designer
Image of ESP32+ST7789: A project utilizing Adafruit TFP401 to 40 pin TFT with Touch in a practical application
ESP32-Powered 1.3 inch TFT Display Module for Visual Data Output
This circuit connects an ESP32 microcontroller to a 1.3 inch TFT display module (ST7789). The ESP32 provides power and control signals to the display, enabling it to show graphical data.
Cirkit Designer LogoOpen Project in Cirkit Designer
Image of Tablero Moto: A project utilizing Adafruit TFP401 to 40 pin TFT with Touch in a practical application
Arduino Mega 2560 Controlled TFT Touchscreen Interface
This circuit connects an Arduino Mega 2560 microcontroller to a 3.5-inch 480x320 TFT LCD display. The Arduino provides power, ground, and digital signals to control the display, including data lines for pixel information and control lines for reset, write, and command/data selection. The embedded code initializes the display and configures the Arduino's pins for communication, likely to create a user interface or visual output for a project.
Cirkit Designer LogoOpen Project in Cirkit Designer
Image of Display relay: A project utilizing Adafruit TFP401 to 40 pin TFT with Touch in a practical application
Arduino Mega 2560 Controlled TFT Touchscreen Interface with 4-Channel Relay Automation
This circuit features an Arduino Mega 2560 microcontroller connected to an ILI9488 HD TFT LCD screen and a 4-channel relay module, powered by a 5V battery. The Arduino controls the LCD to display interactive buttons and uses digital output pins to toggle the state of the relays based on touch input. The code provided facilitates a user interface on the LCD for controlling devices connected to the relays, making it suitable for home automation or similar applications.
Cirkit Designer LogoOpen Project in Cirkit Designer

Common Applications and Use Cases

  • DIY multimedia projects
  • Interactive displays for embedded systems
  • Touch-enabled control panels
  • Educational tools and demonstrations
  • Prototyping for commercial products

Technical Specifications

Key Technical Details

  • Input Voltage: 5V (via Micro USB or pin)
  • Power Consumption: Typically 500mA (max 700mA)
  • Resolution Support: Up to 1280x800
  • Input Signal: HDMI or VGA
  • Touch Interface: USB
  • Dimensions: 75mm x 52mm x 6mm

Pin Configuration and Descriptions

Pin Number Name Description
1 GND Ground
2 5V Power supply (5V input)
3-21 NC Not connected (reserved for future use)
22-39 TFT TFT display signals
40 USB USB touch output

Usage Instructions

How to Use the Component in a Circuit

  1. Powering the Device:

    • Connect the 5V and GND pins to a suitable 5V power supply.
    • Ensure that the power supply can handle the maximum current draw of 700mA.
  2. Connecting the Display:

    • Attach a compatible 40-pin TFT display to the TFP401's display connector.
    • Make sure the display's pinout matches the TFP401's pin configuration.
  3. Video Input:

    • Connect an HDMI or VGA source to the TFP401's input port.
    • The controller will automatically detect and configure the input signal.
  4. Touch Interface:

    • Connect the USB touch output to a USB host (like a computer or Raspberry Pi).
    • Install necessary drivers or touch libraries if required by the host system.

Important Considerations and Best Practices

  • Always disconnect power before making or changing connections.
  • Use ESD precautions when handling the TFP401 and TFT display.
  • Ensure that the TFT display's specifications are compatible with the TFP401.
  • For best performance, use a shielded HDMI or VGA cable, especially in environments with high electromagnetic interference.

Troubleshooting and FAQs

Common Issues

  • Display Not Powering On:

    • Check the power supply and connections.
    • Ensure the power supply is rated for 5V and can provide up to 700mA.
  • No Video Signal:

    • Verify that the video source is on and functioning.
    • Check the HDMI or VGA connection for any loose cables or poor connections.
  • Touch Not Working:

    • Confirm that the USB touch output is connected to a host that supports capacitive touch.
    • Install any required drivers or software for the touch interface.

Solutions and Tips for Troubleshooting

  • If the display shows artifacts or noise, try using a shorter or higher-quality video cable.
  • For touch issues, try calibrating the touch interface using the host system's calibration tools.
  • If the display does not work with a new video source, check the source's resolution and refresh rate settings. The TFP401 supports up to 1280x800 resolution.

FAQs

Q: Can I use the TFP401 with any 40-pin TFT display? A: The TFP401 is designed to be compatible with most 40-pin TFT displays, but always check the display's datasheet to ensure compatibility.

Q: Does the TFP401 support audio output? A: No, the TFP401 is strictly a video and touch controller. Audio output will need to be handled separately.

Q: Can I connect multiple TFP401 controllers to a single host? A: Yes, as long as the host has sufficient USB ports and video outputs, you can connect multiple controllers.

Q: Is there a library or API for interacting with the touch controller? A: The touch controller typically appears as a standard HID device, so most operating systems have built-in support. For advanced features, refer to the manufacturer's documentation or community-contributed libraries.


This documentation provides a comprehensive overview of the Adafruit TFP401 to 40-pin TFT with Touch. For further assistance or technical support, please refer to the Adafruit support forums or contact technical support directly.