How to Use OLED 1.5": Examples, Pinouts, and Specs
Introduction
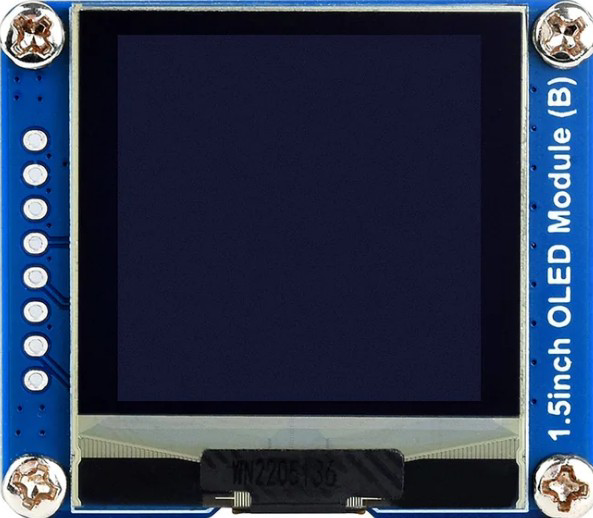
The Waveshare 128×128 1.5inch OLED is a compact, high-quality Organic Light Emitting Diode (OLED) display designed for small electronic devices. With its 128×128 resolution, this display delivers sharp, vibrant colors and wide viewing angles, making it ideal for applications requiring clear visual output in a small form factor. Its low power consumption and self-emissive technology make it a popular choice for portable devices, wearables, and DIY electronics projects.
Explore Projects Built with OLED 1.5"


Explore Projects Built with OLED 1.5"
Common Applications
- Wearable devices (e.g., smartwatches)
- Portable measurement tools
- IoT devices with visual feedback
- DIY electronics and prototyping
- Small-scale gaming consoles or displays
Technical Specifications
Below are the key technical details of the Waveshare 128×128 1.5inch OLED:
| Parameter | Value |
|---|---|
| Display Type | OLED (Organic Light Emitting Diode) |
| Resolution | 128×128 pixels |
| Display Size | 1.5 inches (diagonal) |
| Color Depth | 65K colors (16-bit RGB) |
| Interface | SPI |
| Operating Voltage | 3.3V / 5V |
| Power Consumption | Low |
| Viewing Angle | >160° |
| Dimensions | 33.5mm × 33.5mm |
| Manufacturer Part ID | 128×128 1.5inch OLED |
Pin Configuration
The OLED display uses an SPI interface for communication. Below is the pinout description:
| Pin | Name | Description |
|---|---|---|
| 1 | GND | Ground (0V reference) |
| 2 | VCC | Power supply (3.3V or 5V) |
| 3 | SCL | Serial Clock Line (SPI clock input) |
| 4 | SDA | Serial Data Line (SPI data input) |
| 5 | RES | Reset pin (active low) |
| 6 | DC | Data/Command control pin |
| 7 | CS | Chip Select (active low) |
| 8 | NC | Not connected |
Usage Instructions
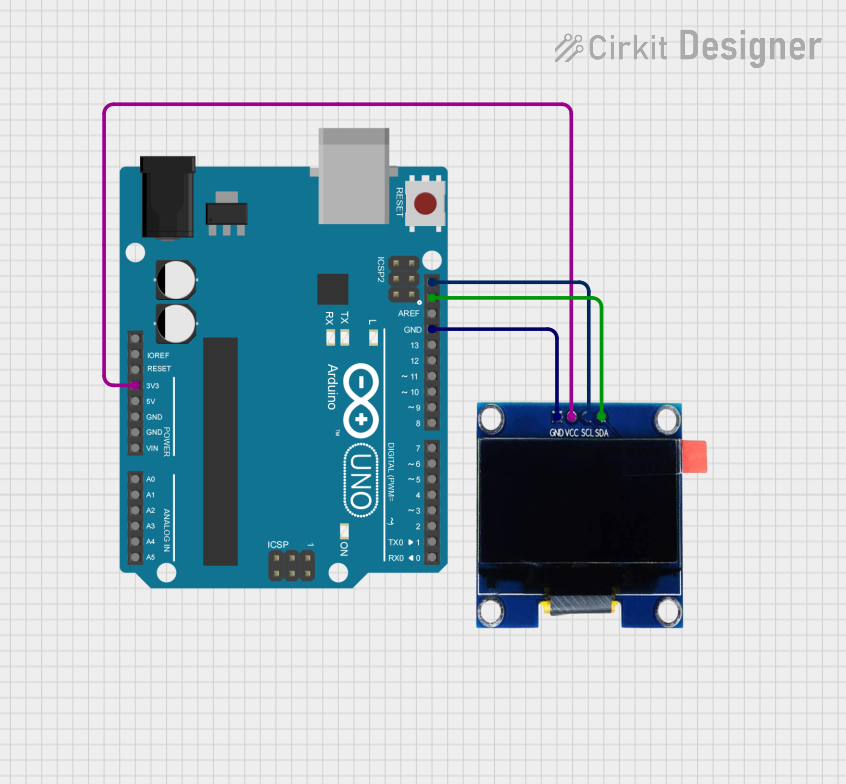
Connecting the OLED to an Arduino UNO
To use the Waveshare 128×128 1.5inch OLED with an Arduino UNO, follow these steps:
Wiring: Connect the OLED pins to the Arduino as shown below:
- GND → GND
- VCC → 5V
- SCL → Pin 13 (SPI Clock)
- SDA → Pin 11 (SPI MOSI)
- RES → Pin 8
- DC → Pin 9
- CS → Pin 10
Install Required Libraries:
- Install the
Adafruit_GFXandAdafruit_SSD1351libraries from the Arduino Library Manager.
- Install the
Upload Example Code: Use the following example code to display text and graphics on the OLED:
#include <Adafruit_GFX.h>       // Graphics library for OLED
#include <Adafruit_SSD1351.h>  // Driver for SSD1351 OLED

// Define OLED display dimensions
#define SCREEN_WIDTH 128
#define SCREEN_HEIGHT 128

// Define SPI pins for the OLED
#define OLED_CS   10  // Chip Select
#define OLED_DC    9  // Data/Command
#define OLED_RST   8  // Reset

// Create an instance of the display
Adafruit_SSD1351 display = Adafruit_SSD1351(SCREEN_WIDTH, SCREEN_HEIGHT,
                                            OLED_CS, OLED_DC, OLED_RST);

void setup() {
  // Initialize the display
  display.begin();
  display.fillScreen(SSD1351_BLACK);  // Clear the screen
  display.setTextColor(SSD1351_WHITE);  // Set text color to white
  display.setTextSize(1);  // Set text size to 1 (smallest)
  display.setCursor(0, 0);  // Set cursor to top-left corner
  display.println("Hello, OLED!");  // Print text
  display.display();  // Update the display
}

void loop() {
  // Add any additional functionality here
}
Important Considerations
- Voltage Compatibility: Ensure the OLED is powered with the correct voltage (3.3V or 5V). Incorrect voltage may damage the display.
- SPI Communication: Use the correct SPI pins on your microcontroller. For Arduino UNO, these are pins 11 (MOSI) and 13 (SCK).
- Reset Pin: The RES pin must be properly connected to ensure the display initializes correctly.
- Library Compatibility: Use the
Adafruit_SSD1351library, as it is specifically designed for this type of OLED.
Troubleshooting and FAQs
Common Issues
The display does not turn on:
- Verify the power connections (VCC and GND).
- Ensure the correct voltage (3.3V or 5V) is supplied.
- Check the SPI connections and ensure they match the pinout.
The display shows random or distorted output:
- Ensure the SPI clock and data lines (SCL and SDA) are properly connected.
- Verify that the
Adafruit_SSD1351library is installed and used correctly. - Check the initialization code for errors.
The display remains blank after uploading code:
- Confirm that the RES pin is connected and functioning.
- Ensure the
display.begin()function is called in the setup.
Tips for Troubleshooting
- Use a multimeter to check for continuity in the wiring.
- Test the OLED with example sketches from the
Adafruit_SSD1351library to rule out software issues. - Double-check the pin configuration and ensure no pins are left floating.
By following this documentation, you should be able to successfully integrate and use the Waveshare 128×128 1.5inch OLED in your projects.