How to Use F4 AIO Flight Controller Ver 2.0: Examples, Pinouts, and Specs

Introduction
The F4 AIO Flight Controller Ver 2.0 by Speedy Bee is a compact and versatile flight controller designed specifically for drones. It integrates multiple essential functions, including flight stabilization, sensor processing, and communication, into a single, high-performance unit. This all-in-one design simplifies drone assembly and enhances reliability, making it an excellent choice for both hobbyists and professional drone builders.
Explore Projects Built with F4 AIO Flight Controller Ver 2.0


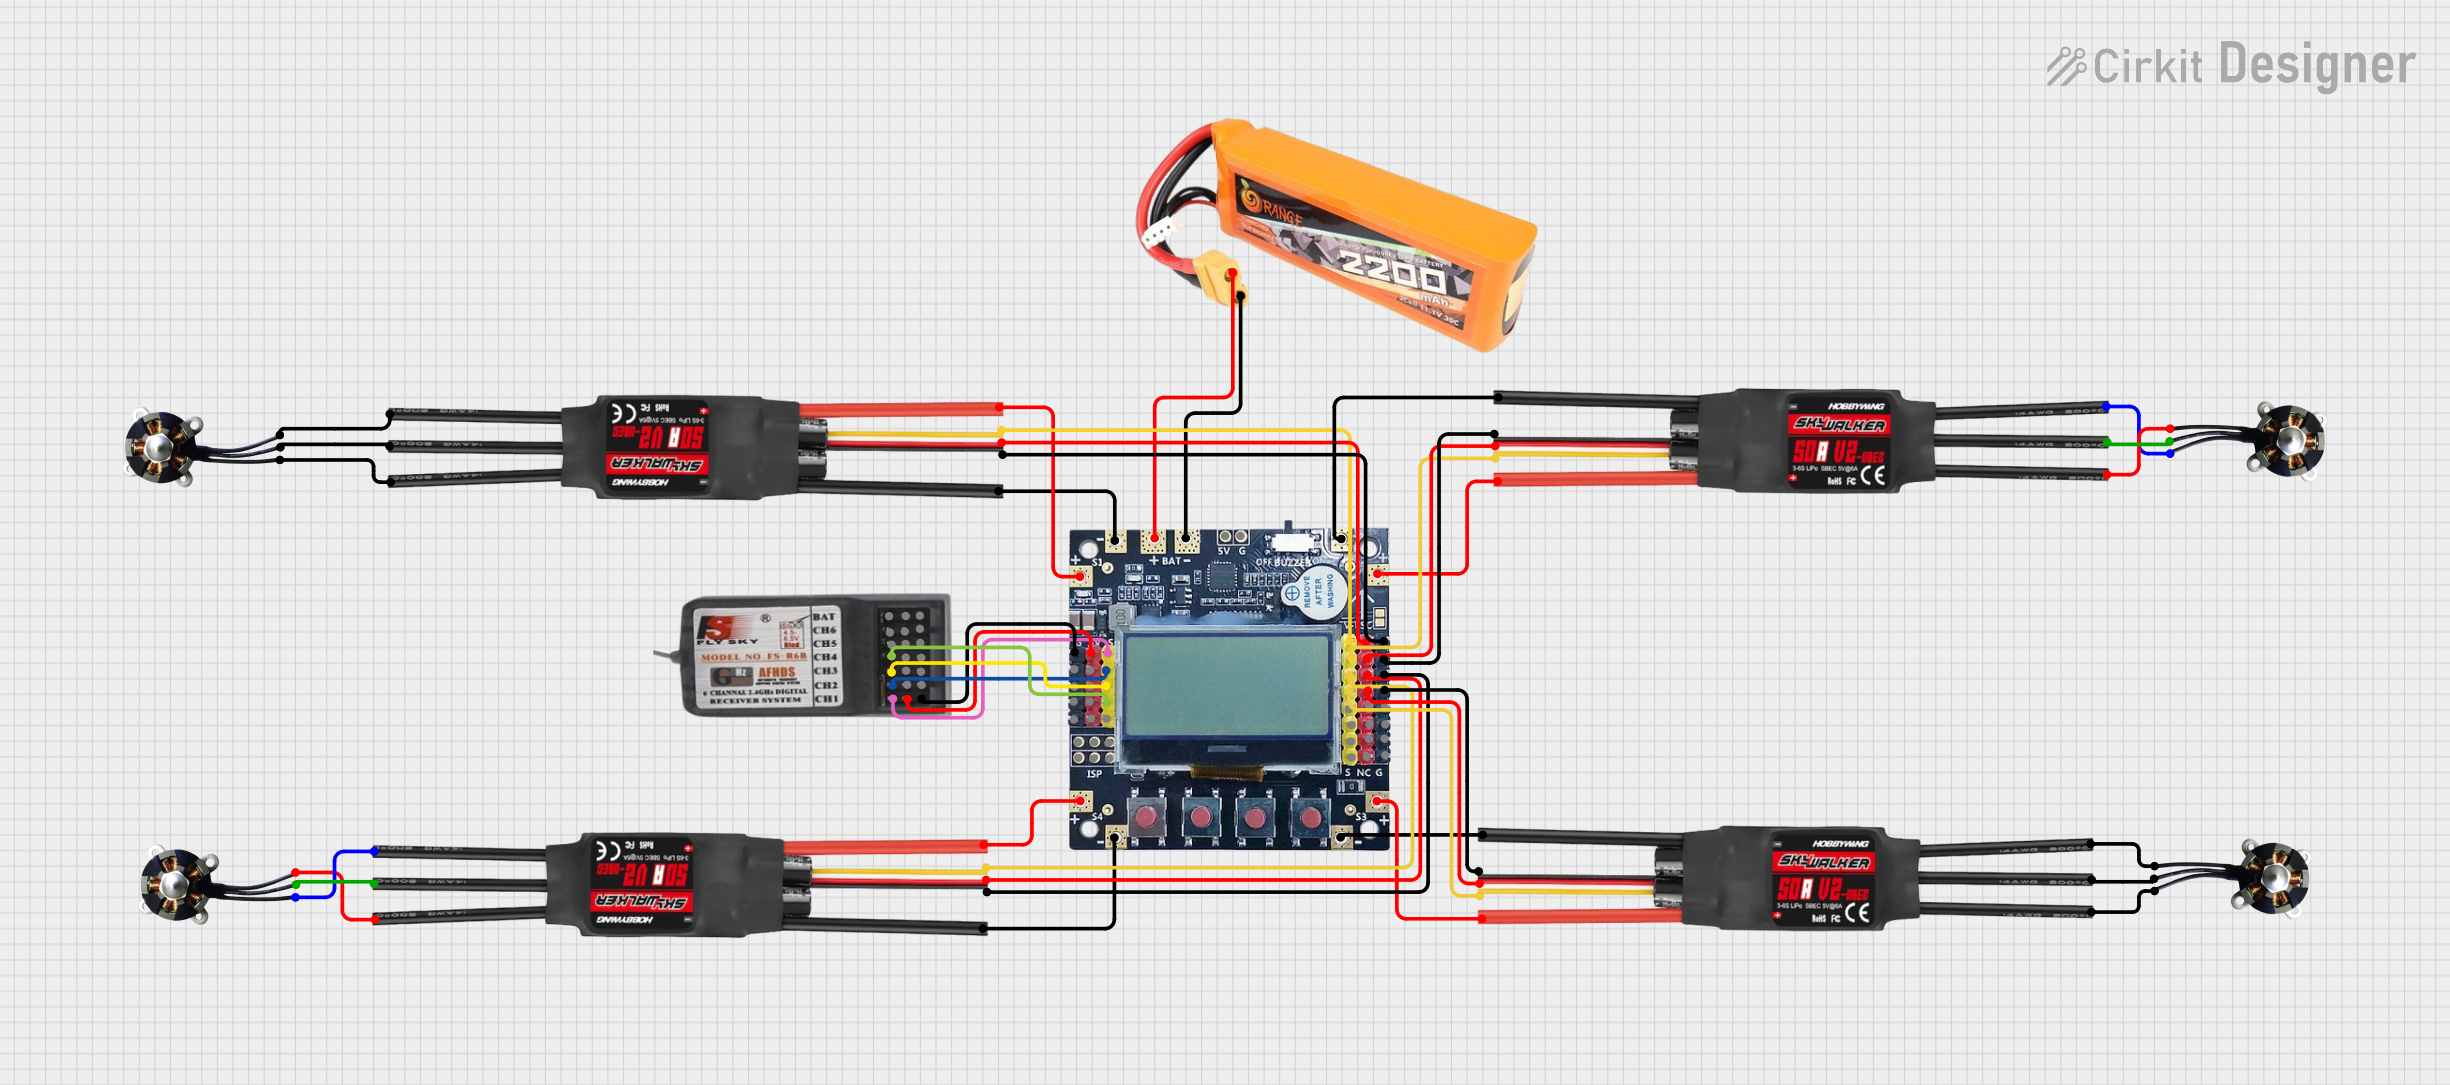
Explore Projects Built with F4 AIO Flight Controller Ver 2.0
Common Applications and Use Cases
- FPV Racing Drones: Provides fast and precise control for high-speed maneuvers.
- Cinematic Drones: Ensures smooth and stable flight for capturing high-quality video.
- Freestyle Drones: Offers responsive control for performing aerial tricks and stunts.
- Beginner Drones: Simplifies setup and reduces the number of components required.
Technical Specifications
The following table outlines the key technical details of the F4 AIO Flight Controller Ver 2.0:
| Specification | Details |
|---|---|
| Processor | STM32F405 (32-bit ARM Cortex-M4, 168 MHz) |
| Gyroscope/Accelerometer | MPU6000 (SPI interface) |
| Input Voltage Range | 2S-6S LiPo (7.4V - 25.2V) |
| Built-in ESC | 4-in-1 ESC, 35A continuous current per motor, 40A burst (10 seconds) |
| Firmware | Betaflight (pre-installed) |
| UART Ports | 5 UARTs for peripherals (e.g., GPS, receiver, VTX, etc.) |
| Motor Outputs | 4 motor outputs (DShot, PWM, OneShot, Multishot support) |
| BEC Output | 5V @ 2A and 9V @ 2A |
| Dimensions | 30.5mm x 30.5mm (standard mounting hole spacing) |
| Weight | 12g (without wires) |
Pin Configuration and Descriptions
The F4 AIO Flight Controller Ver 2.0 features a well-labeled pinout for easy connection. Below is a table describing the key pins:
| Pin Name | Description |
|---|---|
| GND | Ground connection for power and peripherals |
| VBAT | Battery voltage input (connect directly to LiPo battery) |
| M1-M4 | Motor signal outputs for ESCs |
| RX1-RX5 | UART receive pins for peripherals (e.g., receiver, GPS) |
| TX1-TX5 | UART transmit pins for peripherals (e.g., telemetry, VTX) |
| 5V | 5V power output for peripherals |
| 9V | 9V power output for peripherals (e.g., VTX) |
| LED | Addressable LED signal output (e.g., WS2812 LEDs) |
| Buzzer | Buzzer signal output for audible alerts |
| Boot | Bootloader mode pin for firmware flashing |
Usage Instructions
How to Use the F4 AIO Flight Controller in a Circuit
Power Connection:
- Connect the VBAT pin to the positive terminal of your LiPo battery.
- Connect the GND pin to the negative terminal of your LiPo battery.
- Ensure the input voltage is within the supported range (2S-6S LiPo).
Motor Connection:
- Connect the signal wires from your ESCs to the M1-M4 pins.
- Ensure the ESCs are properly calibrated and configured for DShot or PWM.
Receiver Connection:
- Connect your receiver's signal wire to one of the RX pins (e.g., RX1).
- Power the receiver using the 5V and GND pins.
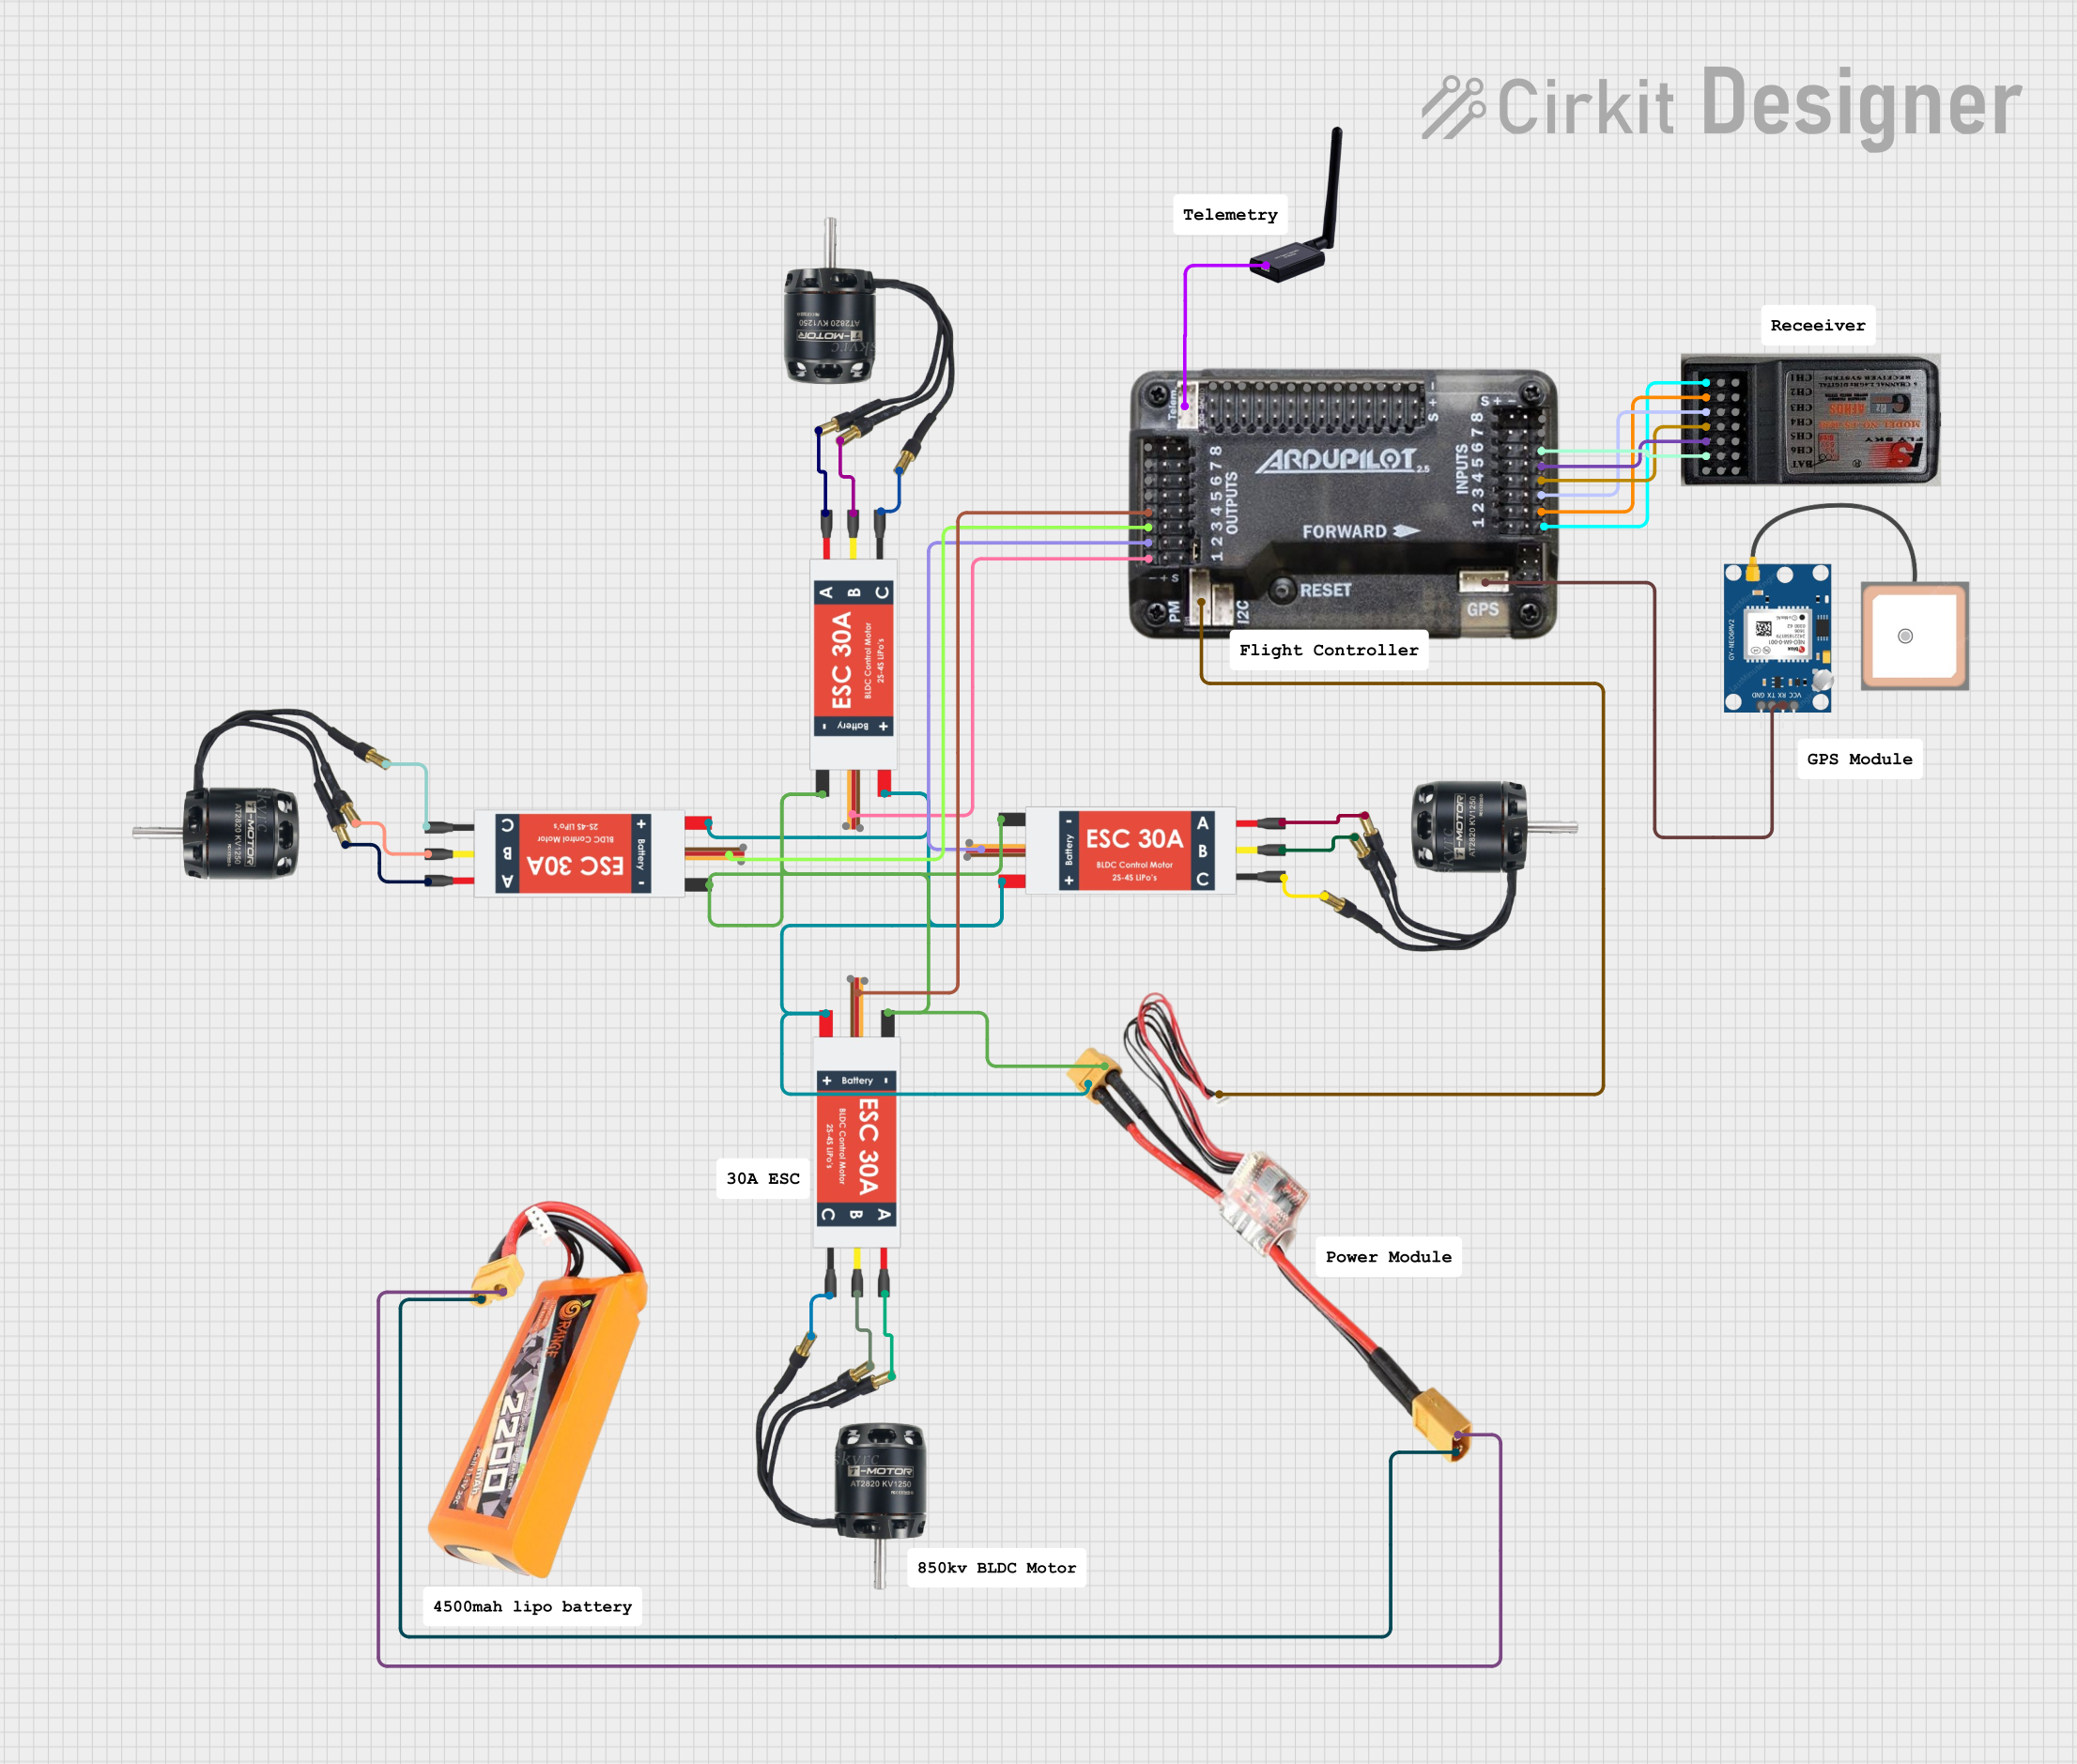
Peripheral Connection:
- Use the available UART ports (RX/TX pins) to connect peripherals like GPS, telemetry modules, or cameras.
- For video transmitters (VTX), use the 9V output for stable power.
LED and Buzzer:
- Connect addressable LEDs to the LED pin for customizable lighting effects.
- Connect a buzzer to the Buzzer pin for audible alerts.
Firmware Configuration:
- Use the Betaflight Configurator software to configure the flight controller.
- Connect the flight controller to your computer via USB and follow the on-screen instructions.
Important Considerations and Best Practices
- Voltage Compatibility: Always verify that your battery voltage is within the supported range (2S-6S).
- Cooling: Ensure adequate airflow over the flight controller and ESCs to prevent overheating.
- Firmware Updates: Regularly update the Betaflight firmware to access new features and bug fixes.
- Wiring: Double-check all connections before powering on the flight controller to avoid short circuits.
- Calibration: Calibrate the accelerometer and ESCs in Betaflight Configurator before your first flight.
Example Code for Arduino UNO Integration
While the F4 AIO Flight Controller is not typically used with an Arduino UNO, you can use an Arduino to control addressable LEDs connected to the flight controller. Below is an example:
#include <Adafruit_NeoPixel.h>

// Define the LED pin and number of LEDs
#define LED_PIN 6
#define NUM_LEDS 8

// Create a NeoPixel object
Adafruit_NeoPixel strip = Adafruit_NeoPixel(NUM_LEDS, LED_PIN, NEO_GRB + NEO_KHZ800);

void setup() {
  strip.begin();  // Initialize the LED strip
  strip.show();   // Turn off all LEDs initially
}

void loop() {
  // Example: Cycle through colors on the LED strip
  for (int i = 0; i < strip.numPixels(); i++) {
    strip.setPixelColor(i, strip.Color(255, 0, 0)); // Set LED to red
    strip.show();                                   // Update the strip
    delay(100);                                     // Wait 100ms
  }
}
Troubleshooting and FAQs
Common Issues and Solutions
Flight Controller Not Powering On:
- Cause: Incorrect wiring or insufficient battery voltage.
- Solution: Verify the battery voltage and ensure proper connection to the VBAT and GND pins.
Motors Not Spinning:
- Cause: ESCs not calibrated or incorrect motor mapping in Betaflight.
- Solution: Calibrate the ESCs and verify motor mapping in the Betaflight Configurator.
No Communication with Betaflight Configurator:
- Cause: USB driver issue or incorrect boot mode.
- Solution: Install the correct USB drivers and ensure the flight controller is not in bootloader mode.
Unstable Flight:
- Cause: Incorrect PID settings or uncalibrated sensors.
- Solution: Tune the PID settings in Betaflight and calibrate the accelerometer.
FAQs
Q: Can I use a 7S LiPo battery with this flight controller?
A: No, the maximum supported voltage is 6S (25.2V). Using a 7S battery may damage the flight controller.Q: Does the flight controller support GPS?
A: Yes, you can connect a GPS module to one of the UART ports.Q: How do I update the firmware?
A: Use the Betaflight Configurator to flash the latest firmware. Enter bootloader mode by holding the Boot pin while connecting the flight controller to your computer.Q: Can I use this flight controller for fixed-wing aircraft?
A: Yes, the F4 AIO Flight Controller supports fixed-wing configurations in Betaflight.
This concludes the documentation for the F4 AIO Flight Controller Ver 2.0. For further assistance, refer to the official Speedy Bee support resources.