Cirkit Designer Logo
Cirkit Designer
Your all-in-one circuit design IDE
Home / 
Component Documentation

How to Use OLED 1.3": Examples, Pinouts, and Specs

Image of OLED 1.3"
Cirkit Designer LogoDesign with OLED 1.3" in Cirkit Designer

Introduction

The OLED 1.3" display module by abc, part ID xyz, is a compact and high-contrast display unit that utilizes organic light-emitting diode technology. This technology allows for sharp and bright visuals even in low-light conditions. Common applications include wearable devices, small-screen consumer gadgets, and DIY projects with microcontrollers like the Arduino UNO.

Explore Projects Built with OLED 1.3"

Use Cirkit Designer to design, explore, and prototype these projects online. Some projects support real-time simulation. Click "Open Project" to start designing instantly!
Arduino UNO OLED Display Interface for Real-Time Data Visualization
Image of a2: A project utilizing OLED 1.3" in a practical application
This circuit consists of an Arduino UNO microcontroller connected to a 1.3" OLED display. The Arduino provides power and communicates with the OLED display via I2C protocol, utilizing the SCL and SDA pins for data transmission.
Cirkit Designer LogoOpen Project in Cirkit Designer
ESP32 Devkit V1 and OLED Display Bitmap Viewer
Image of Esp32_monochromeimage: A project utilizing OLED 1.3" in a practical application
This circuit consists of an ESP32 Devkit V1 microcontroller connected to a 1.3" OLED display via I2C communication. The ESP32 initializes the OLED display and renders a predefined bitmap image on it.
Cirkit Designer LogoOpen Project in Cirkit Designer
ESP8266 NodeMCU Controlled OLED Display
Image of OLED: A project utilizing OLED 1.3" in a practical application
This circuit connects an ESP8266 NodeMCU microcontroller to a 1.3" OLED display. The ESP8266's D1 and D2 pins are used for the SCL and SDA I2C communication lines, respectively, to interface with the OLED. The circuit is designed to display information or graphics on the OLED screen, controlled by the ESP8266.
Cirkit Designer LogoOpen Project in Cirkit Designer
ESP8266 NodeMCU OLED Display: Wi-Fi Enabled Hello World Project
Image of oled: A project utilizing OLED 1.3" in a practical application
This circuit features an ESP8266 NodeMCU microcontroller connected to a 1.3-inch OLED display via I2C communication. The microcontroller initializes the display and renders basic graphics and text, demonstrating a simple interface for visual output.
Cirkit Designer LogoOpen Project in Cirkit Designer

Explore Projects Built with OLED 1.3"

Use Cirkit Designer to design, explore, and prototype these projects online. Some projects support real-time simulation. Click "Open Project" to start designing instantly!
Image of a2: A project utilizing OLED 1.3" in a practical application
Arduino UNO OLED Display Interface for Real-Time Data Visualization
This circuit consists of an Arduino UNO microcontroller connected to a 1.3" OLED display. The Arduino provides power and communicates with the OLED display via I2C protocol, utilizing the SCL and SDA pins for data transmission.
Cirkit Designer LogoOpen Project in Cirkit Designer
Image of Esp32_monochromeimage: A project utilizing OLED 1.3" in a practical application
ESP32 Devkit V1 and OLED Display Bitmap Viewer
This circuit consists of an ESP32 Devkit V1 microcontroller connected to a 1.3" OLED display via I2C communication. The ESP32 initializes the OLED display and renders a predefined bitmap image on it.
Cirkit Designer LogoOpen Project in Cirkit Designer
Image of OLED: A project utilizing OLED 1.3" in a practical application
ESP8266 NodeMCU Controlled OLED Display
This circuit connects an ESP8266 NodeMCU microcontroller to a 1.3" OLED display. The ESP8266's D1 and D2 pins are used for the SCL and SDA I2C communication lines, respectively, to interface with the OLED. The circuit is designed to display information or graphics on the OLED screen, controlled by the ESP8266.
Cirkit Designer LogoOpen Project in Cirkit Designer
Image of oled: A project utilizing OLED 1.3" in a practical application
ESP8266 NodeMCU OLED Display: Wi-Fi Enabled Hello World Project
This circuit features an ESP8266 NodeMCU microcontroller connected to a 1.3-inch OLED display via I2C communication. The microcontroller initializes the display and renders basic graphics and text, demonstrating a simple interface for visual output.
Cirkit Designer LogoOpen Project in Cirkit Designer

Technical Specifications

General Features

  • Display Type: OLED (Organic Light Emitting Diode)
  • Screen Size: 1.3 inches diagonally
  • Resolution: 128x64 pixels
  • Color Depth: Monochrome (typically blue or white)
  • Viewing Angle: >160 degrees
  • Driver IC: Commonly SSD1306 or compatible

Electrical Characteristics

  • Operating Voltage: 3.3V to 5V DC
  • Maximum Current: 20mA (typical usage)
  • Logic Level: 3.3V (5V tolerant)
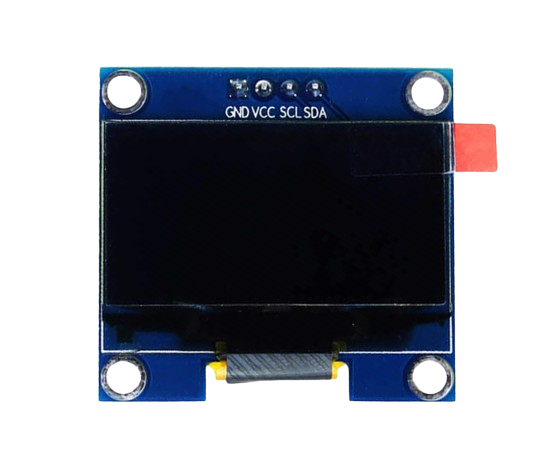
Pin Configuration

Pin Number Pin Name Description
1 GND Ground connection
2 VCC Power supply (3.3V - 5V)
3 SCL Serial Clock Line for I2C interface
4 SDA Serial Data Line for I2C interface
5 RES Reset pin (optional, active low)
6 DC Data/Command control pin (optional)

Usage Instructions

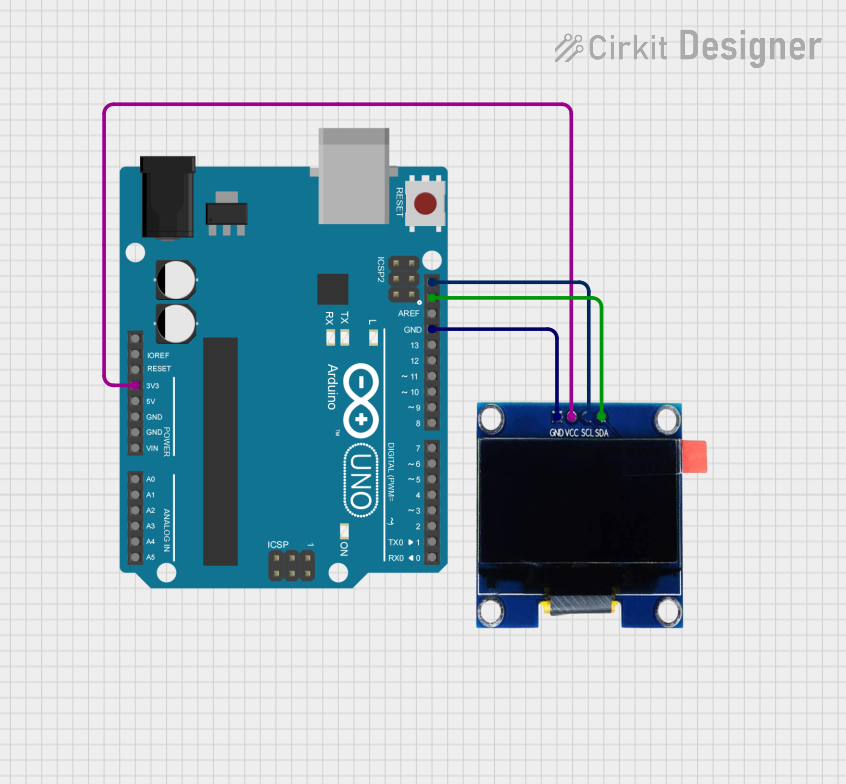
Connecting to an Arduino UNO

  1. Power Connections:

    • Connect the VCC pin to the 3.3V or 5V output on the Arduino UNO.
    • Connect the GND pin to one of the GND pins on the Arduino UNO.
  2. Data Connections:

    • Connect the SCL pin to the A5 pin (SCL) on the Arduino UNO.
    • Connect the SDA pin to the A4 pin (SDA) on the Arduino UNO.
  3. Optional Pins:

    • If available, connect the RES pin to a digital pin on the Arduino for manual reset control.
    • The DC pin is used in SPI mode, which is not covered in this documentation.

Programming the Arduino UNO

To control the OLED display, you will need to include libraries that support the SSD1306 driver. The Adafruit SSD1306 library is a common choice.

#include <Wire.h>
#include <Adafruit_GFX.h>
#include <Adafruit_SSD1306.h>

#define SCREEN_WIDTH 128 // OLED display width, in pixels
#define SCREEN_HEIGHT 64 // OLED display height, in pixels

// Declaration for an SSD1306 display connected to I2C (SCL, SDA pins)
Adafruit_SSD1306 display(SCREEN_WIDTH, SCREEN_HEIGHT, &Wire);

void setup() {
  // Initialize with the I2C addr 0x3C (for the 128x64)
  if(!display.begin(SSD1306_SWITCHCAPVCC, 0x3C)) {
    Serial.println(F("SSD1306 allocation failed"));
    for(;;); // Don't proceed, loop forever
  }

  // Clear the buffer
  display.clearDisplay();

  // Draw a single pixel in white
  display.drawPixel(10, 10, WHITE);

  // Display the image buffer on the screen
  display.display();
}

void loop() {
  // Code to update the display continuously
}

Important Considerations and Best Practices

  • Always check the voltage compatibility before connecting the display to your microcontroller.
  • Use a level shifter if your microcontroller operates at a different logic level than the display.
  • Avoid exposing the display to moisture or extreme temperatures.
  • When handling the display, take precautions against static discharge.

Troubleshooting and FAQs

Common Issues

  • Display Not Turning On: Check the power connections and ensure the correct voltage is applied.
  • Garbled or No Image: Verify the I2C address and connections. Reset the display if necessary.
  • Dim Display: Adjust the contrast or check if the display is receiving adequate power.

FAQs

Q: Can I use this display with a 5V system? A: Yes, the OLED display is typically 5V tolerant, but always check the datasheet for your specific module.

Q: How do I adjust the brightness of the display? A: Brightness can be controlled through software commands using the display library.

Q: What library should I use for the Arduino? A: The Adafruit SSD1306 library is recommended for its ease of use and compatibility with the Arduino.

For further assistance, consult the manufacturer's datasheet and technical forums for the specific OLED module you are using.