
How to Use TQFP32-5MM: Examples, Pinouts, and Specs
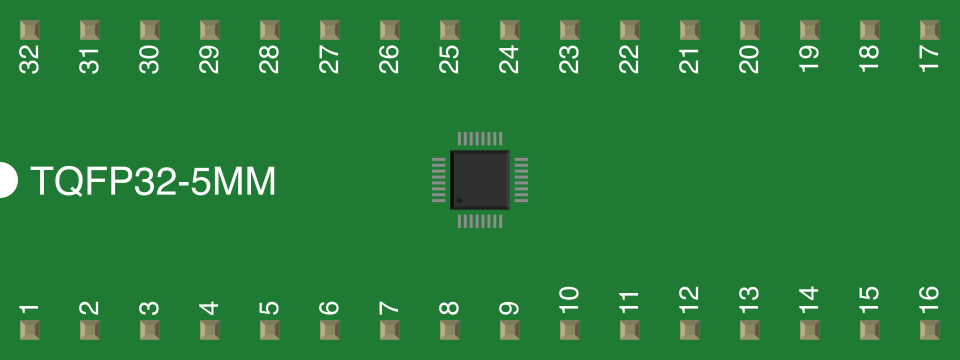
 Design with TQFP32-5MM in Cirkit Designer
Introduction
The TQFP32-5MM is a Thin Quad Flat Package (TQFP) with 32 pins and a compact 5mm x 5mm body size. This surface-mount package is widely used for integrated circuits (ICs) in applications where space-saving and high pin density are critical. Its thin profile and gull-wing leads make it ideal for automated soldering processes, ensuring reliable connections in densely packed PCBs.
Explore Projects Built with TQFP32-5MM
 Open Project in Cirkit Designer
 Open Project in Cirkit Designer
 Open Project in Cirkit Designer
 Open Project in Cirkit Designer
Explore Projects Built with TQFP32-5MM
Open Project in Cirkit DesignerOpen Project in Cirkit DesignerOpen Project in Cirkit DesignerOpen Project in Cirkit DesignerCommon Applications
- Microcontrollers and microprocessors
- Memory ICs (e.g., EEPROM, Flash)
- Signal processing ICs
- Communication modules
- Consumer electronics, such as smartphones and wearables
Technical Specifications
The TQFP32-5MM package is designed to meet the needs of modern electronics with the following specifications:
Key Technical Details
| Parameter | Value |
|---|---|
| Body Size | 5mm x 5mm |
| Pin Count | 32 |
| Lead Pitch | 0.8mm |
| Package Height | 1.0mm (maximum) |
| Thermal Resistance | ~40°C/W (dependent on IC design) |
| Mounting Type | Surface Mount Technology (SMT) |
| Material | Plastic mold compound |
Pin Configuration and Descriptions
The TQFP32-5MM package has 32 pins arranged in a square layout. The pin configuration depends on the specific IC housed in the package. Below is a generic example of pin descriptions for a microcontroller:
| Pin Number | Pin Name | Description |
|---|---|---|
| 1 | VCC | Power supply (positive voltage) |
| 2 | GND | Ground |
| 3-10 | GPIO1-GPIO8 | General-purpose input/output pins |
| 11 | RESET | Reset input |
| 12-19 | ADC1-ADC8 | Analog-to-digital converter inputs |
| 20 | TX | UART Transmit |
| 21 | RX | UART Receive |
| 22-31 | GPIO9-GPIO18 | Additional GPIO pins |
| 32 | OSC_IN | External oscillator input |
Note: Pin assignments vary depending on the IC inside the TQFP32-5MM package. Always refer to the specific IC datasheet for accurate pin mapping.
Usage Instructions
How to Use the TQFP32-5MM in a Circuit
- PCB Design: Ensure your PCB layout matches the TQFP32-5MM footprint. The lead pitch is 0.8mm, so precise alignment is critical.
- Soldering: Use a reflow soldering process for best results. Apply solder paste to the PCB pads, place the TQFP32-5MM, and heat the assembly in a reflow oven.
- Power Supply: Connect the VCC and GND pins to the appropriate power source. Verify the voltage and current requirements of the IC inside the package.
- Peripheral Connections: Connect GPIO, ADC, UART, or other pins to external components as needed. Use pull-up or pull-down resistors where required.
Important Considerations
- Thermal Management: Ensure adequate heat dissipation, especially for high-power ICs. Use thermal vias or a heat sink if necessary.
- ESD Protection: Handle the TQFP32-5MM package with care to avoid electrostatic discharge damage.
- Alignment: Use a microscope or alignment tool to ensure the package is correctly positioned on the PCB.
Example: Connecting a TQFP32-5MM Microcontroller to an Arduino UNO
If the TQFP32-5MM houses a microcontroller, you can interface it with an Arduino UNO for programming or communication. Below is an example of connecting UART pins:
// Example: Arduino UNO communicating with a TQFP32-5MM microcontroller
// via UART. Ensure the TQFP32-5MM microcontroller is powered and connected
// to the Arduino UNO's TX and RX pins.

void setup() {
  Serial.begin(9600); // Initialize UART communication at 9600 baud rate
  Serial.println("TQFP32-5MM Microcontroller Communication Started");
}

void loop() {
  if (Serial.available()) {
    char received = Serial.read(); // Read data from TQFP32-5MM microcontroller
    Serial.print("Received: ");
    Serial.println(received); // Print received data to Serial Monitor
  }

  // Send data to TQFP32-5MM microcontroller
  Serial.println("Hello from Arduino UNO");
  delay(1000); // Wait for 1 second
}
Note: Ensure proper voltage level matching between the Arduino UNO (5V logic) and the TQFP32-5MM microcontroller (typically 3.3V or 5V).
Troubleshooting and FAQs
Common Issues
- Misaligned Soldering: If the TQFP32-5MM is not properly aligned during soldering, it may cause short circuits or open connections.
- Solution: Use a stencil for solder paste application and a microscope for alignment.
- Overheating: Excessive heat during soldering can damage the IC inside the package.
- Solution: Follow the recommended reflow temperature profile from the IC datasheet.
- No Communication: If UART or other communication protocols fail, check the connections and voltage levels.
- Solution: Verify the pin mapping and ensure proper pull-up or pull-down resistors are used.
FAQs
Q: Can I hand-solder a TQFP32-5MM package?
A: Yes, but it requires precision and experience. Use a fine-tipped soldering iron and flux to avoid bridging pins.
Q: What is the maximum current the TQFP32-5MM can handle?
A: The current rating depends on the IC inside the package. Refer to the IC datasheet for specific details.
Q: How do I clean flux residue after soldering?
A: Use isopropyl alcohol and a soft brush to clean the PCB and remove flux residue.
Q: Can I use the TQFP32-5MM package for prototyping?
A: Yes, but you may need a breakout board to adapt the TQFP32-5MM to a breadboard-friendly format.
By following this documentation, you can effectively integrate the TQFP32-5MM package into your electronic designs. Always consult the specific IC datasheet for detailed information.