How to Use 2 x 18650 in case: Examples, Pinouts, and Specs

Introduction
The 2 x 18650 battery holder is a compact and durable enclosure designed to securely hold two 18650 lithium-ion batteries. It provides a convenient way to power electronic circuits and devices, offering a stable and portable power source. This holder is commonly used in DIY electronics, robotics, IoT projects, and portable devices where a reliable power supply is essential.
Explore Projects Built with 2 x 18650 in case

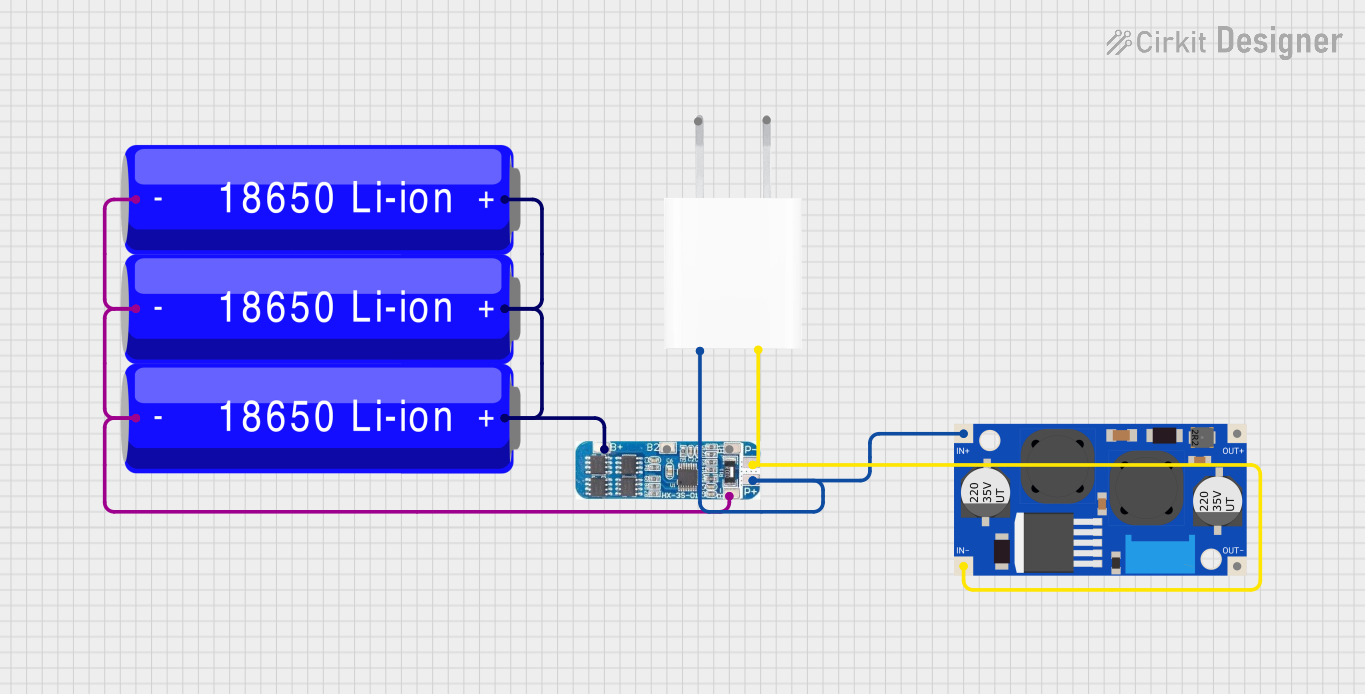

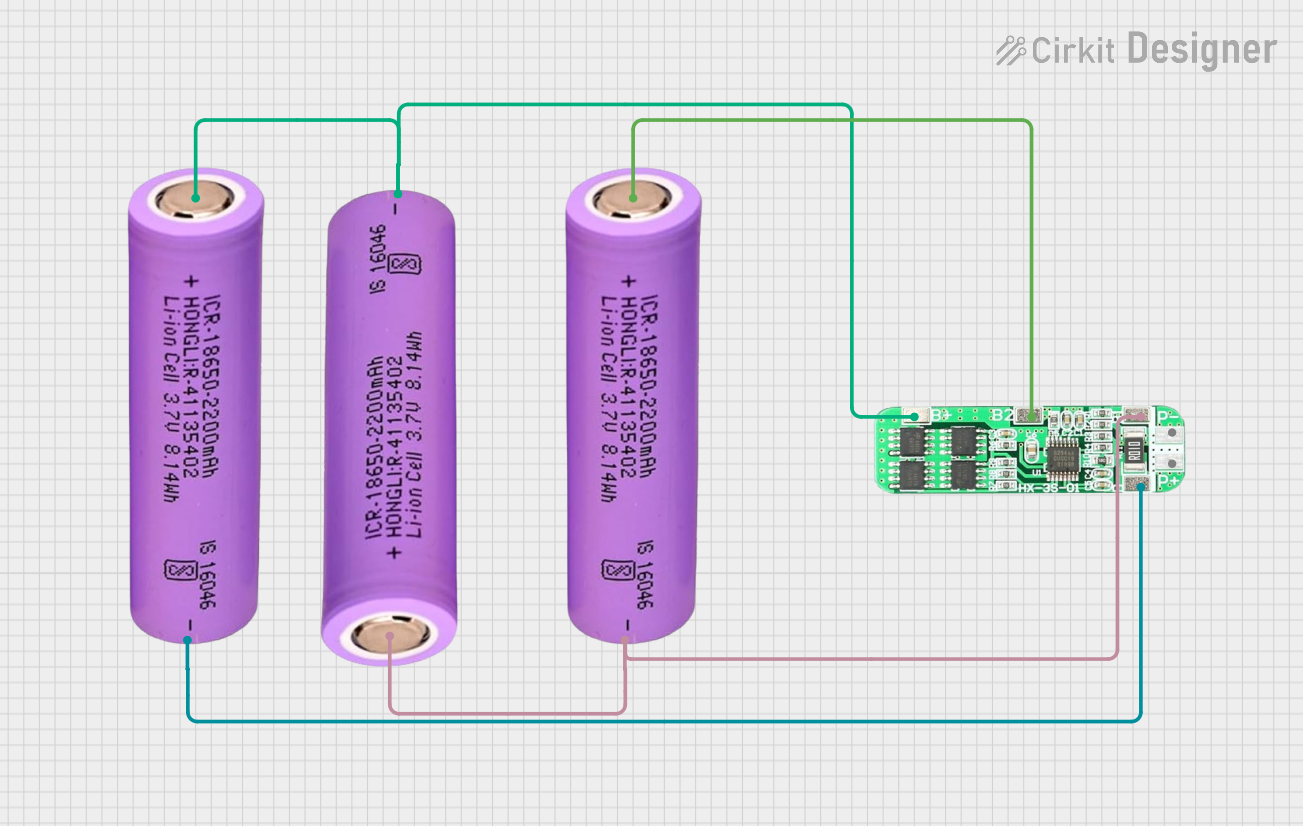
Explore Projects Built with 2 x 18650 in case
Common Applications:
- Powering Arduino, Raspberry Pi, and other microcontroller-based projects
- Robotics and motorized systems
- Portable electronic devices
- LED lighting systems
- IoT and wireless communication modules
Technical Specifications
The 2 x 18650 battery holder is designed to accommodate two standard 18650 lithium-ion batteries. Below are the key technical details:
| Specification | Details |
|---|---|
| Battery Type | 18650 lithium-ion (3.7V nominal voltage per cell) |
| Number of Batteries | 2 |
| Output Voltage | 3.7V (single cell) or 7.4V (two cells in series, depending on configuration) |
| Output Current | Depends on the battery's discharge rating (e.g., 2A, 5A, etc.) |
| Material | Plastic housing with metal spring terminals |
| Dimensions | Typically ~75mm x 40mm x 20mm (varies by manufacturer) |
| Connection Type | Solderable wires or pre-attached leads (positive and negative terminals) |
Pin Configuration and Descriptions
The battery holder typically has two wires for connection:
| Wire Color | Description |
|---|---|
| Red | Positive terminal (+) |
| Black | Negative terminal (-) |
Note: Ensure proper polarity when connecting the wires to your circuit to avoid damage to components.
Usage Instructions
How to Use the 2 x 18650 Battery Holder in a Circuit:
Insert Batteries:
- Place two 18650 lithium-ion batteries into the holder, ensuring correct polarity. The positive and negative terminals of the batteries should align with the markings on the holder.
Connect to Circuit:
- Use the red wire (positive) and black wire (negative) to connect the holder to your circuit. Solder the wires to your circuit board or use connectors as needed.
Voltage Configuration:
- Check whether the holder is wired for series or parallel configuration:
- Series Configuration: Provides a combined voltage of ~7.4V (3.7V x 2).
- Parallel Configuration: Provides a combined capacity while maintaining a voltage of ~3.7V.
- Check whether the holder is wired for series or parallel configuration:
Secure the Holder:
- Mount the holder securely in your project enclosure to prevent movement or accidental disconnection.
Important Considerations:
- Battery Protection: Use batteries with built-in protection circuits or add an external protection module to prevent overcharging, over-discharging, and short circuits.
- Current Rating: Ensure the batteries can supply sufficient current for your application.
- Heat Management: Avoid exposing the holder to excessive heat, as it may damage the plastic housing or batteries.
- Polarity Check: Double-check the polarity of the wires before connecting to your circuit to avoid damage.
Example: Connecting to an Arduino UNO
To power an Arduino UNO using the 2 x 18650 battery holder, follow these steps:
- Insert two 18650 batteries into the holder.
- Connect the red wire (positive) to the Arduino's VIN pin.
- Connect the black wire (negative) to the Arduino's GND pin.
Here is a simple Arduino sketch to blink an LED when powered by the battery holder:
// Simple LED Blink Example
// This code blinks an LED connected to pin 13 of the Arduino UNO.
// Ensure the battery holder is connected to VIN and GND.

void setup() {
  pinMode(13, OUTPUT); // Set pin 13 as an output
}

void loop() {
  digitalWrite(13, HIGH); // Turn the LED on
  delay(1000);            // Wait for 1 second
  digitalWrite(13, LOW);  // Turn the LED off
  delay(1000);            // Wait for 1 second
}
Note: Ensure the total voltage from the battery holder does not exceed the Arduino's input voltage range (7-12V recommended for VIN).
Troubleshooting and FAQs
Common Issues:
No Power Output:
- Cause: Batteries are inserted incorrectly or are depleted.
- Solution: Check the battery polarity and ensure the batteries are charged.
Overheating:
- Cause: Excessive current draw or short circuit.
- Solution: Verify the circuit's current requirements and ensure there are no short circuits.
Loose Connections:
- Cause: Wires are not securely connected to the circuit.
- Solution: Solder the wires properly or use secure connectors.
Voltage Drop:
- Cause: Batteries are nearing depletion or have a low discharge rating.
- Solution: Replace the batteries with fully charged ones or use batteries with a higher discharge rating.
FAQs:
Q: Can I use rechargeable 18650 batteries with this holder?
A: Yes, the holder is designed for 18650 lithium-ion batteries, which are typically rechargeable.Q: Is the holder waterproof?
A: No, the holder is not waterproof. Avoid exposing it to moisture or water.Q: Can I connect multiple holders in parallel or series?
A: Yes, you can connect multiple holders in parallel to increase capacity or in series to increase voltage. Ensure proper wiring and use batteries with matching specifications.Q: How do I know if the holder is wired in series or parallel?
A: Check the internal wiring of the holder. In series, the positive terminal of one battery connects to the negative terminal of the other. In parallel, both positive terminals are connected together, and both negative terminals are connected together.
By following this documentation, you can effectively use the 2 x 18650 battery holder in your electronic projects.