How to Use MATEK F405 HDTE: Examples, Pinouts, and Specs
Introduction
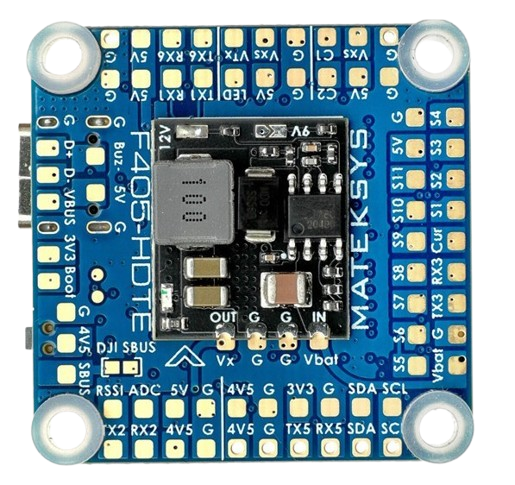
The MATEK F405 HDTE is a high-performance flight controller designed specifically for drones. It is powered by the STM32F405 microcontroller, offering robust processing capabilities for advanced flight control. This flight controller is equipped with an integrated On-Screen Display (OSD) and supports a wide range of sensors and peripherals, making it ideal for high-definition video transmission and complex drone applications.
Explore Projects Built with MATEK F405 HDTE


Explore Projects Built with MATEK F405 HDTE
Common Applications and Use Cases
- High-definition FPV (First-Person View) drone systems
- Racing drones requiring low-latency control
- Aerial photography and videography drones
- Autonomous drone navigation and mapping
- Custom drone builds with advanced telemetry and sensor integration
Technical Specifications
Key Technical Details
| Parameter | Specification |
|---|---|
| Microcontroller | STM32F405RGT6 (32-bit ARM Cortex-M4, 168 MHz) |
| Input Voltage Range | 7V - 30V (2S - 6S LiPo) |
| Integrated OSD | Yes (Betaflight OSD) |
| UART Ports | 6 UARTs (configurable for peripherals) |
| I2C Ports | 1 I2C port |
| SPI Ports | 1 SPI port |
| ESC Protocols Supported | DShot, ProShot, Oneshot, Multishot |
| Gyroscope/Accelerometer | MPU6000 (SPI connection) |
| Barometer | BMP280 |
| Flash Memory | 16 MB Blackbox data storage |
| Dimensions | 36 x 36 mm |
| Mounting Hole Spacing | 30.5 x 30.5 mm (M3 screws) |
| Weight | 7.5 g |
Pin Configuration and Descriptions
| Pin Name | Description |
|---|---|
| GND | Ground connection for power and signal reference |
| VBAT | Battery voltage input (7V - 30V) |
| 5V | 5V output for powering peripherals |
| 3.3V | 3.3V output for low-power peripherals |
| UART1 (TX/RX) | UART port 1 for peripherals (e.g., GPS, telemetry) |
| UART2 (TX/RX) | UART port 2 for peripherals |
| UART3 (TX/RX) | UART port 3 for peripherals |
| I2C (SCL/SDA) | I2C port for external sensors |
| SPI (MISO/MOSI/SCK) | SPI port for high-speed peripherals |
| Motor Outputs | PWM outputs for ESCs (supports up to 8 motors) |
| LED_STRIP | Addressable LED strip control |
| Buzzer | Connection for an active buzzer |
| RSSI | Analog input for receiver signal strength indication |
| Current Sensor | Analog input for current monitoring |
Usage Instructions
How to Use the MATEK F405 HDTE in a Drone
Powering the Flight Controller:
- Connect the VBAT pin to your drone's battery (2S-6S LiPo).
- Ensure proper polarity to avoid damage to the board.
Connecting Peripherals:
- Use the UART ports for devices like GPS modules, telemetry radios, or receivers.
- Connect ESCs to the motor output pins. Configure the ESC protocol in the firmware.
- Attach an addressable LED strip to the LED_STRIP pin for visual feedback.
Flashing Firmware:
- Use Betaflight Configurator to flash the latest firmware.
- Connect the flight controller to your computer via USB.
- Select the correct COM port and firmware target (e.g., MATEKF405).
Configuring Sensors and OSD:
- Use Betaflight Configurator to enable and calibrate the gyroscope, accelerometer, and barometer.
- Customize the OSD layout to display telemetry data like battery voltage, flight time, and GPS coordinates.
Connecting to an Arduino UNO (Optional):
- The MATEK F405 HDTE can communicate with an Arduino UNO via UART or I2C.
- Example: Use UART to send telemetry data to the Arduino for custom processing.
// Example Arduino code to read telemetry data from UART
#include <SoftwareSerial.h>

SoftwareSerial TelemetrySerial(10, 11); // RX, TX pins on Arduino

void setup() {
  Serial.begin(9600); // Initialize Serial Monitor
  TelemetrySerial.begin(9600); // Initialize UART communication
  Serial.println("Telemetry Receiver Ready");
}

void loop() {
  if (TelemetrySerial.available()) {
    // Read data from the flight controller
    String telemetryData = TelemetrySerial.readString();
    Serial.println("Telemetry: " + telemetryData);
  }
}
Important Considerations and Best Practices
- Power Supply: Ensure the input voltage is within the specified range (7V - 30V). Use a voltage regulator if necessary.
- ESC Calibration: Calibrate your ESCs before the first flight to ensure proper motor control.
- Firmware Updates: Always use the latest firmware version for optimal performance and bug fixes.
- Vibration Isolation: Mount the flight controller on vibration-dampening pads to improve sensor accuracy.
- Wiring: Double-check all connections to avoid short circuits or reversed polarity.
Troubleshooting and FAQs
Common Issues and Solutions
Flight Controller Not Powering On:
- Check the battery connection and ensure the VBAT pin is receiving the correct voltage.
- Verify that the polarity of the power connection is correct.
No Communication with Betaflight Configurator:
- Ensure the USB cable is functional and supports data transfer.
- Check that the correct COM port is selected in Betaflight Configurator.
- Put the flight controller in bootloader mode by holding the BOOT button while connecting it to the computer.
Unstable Flight or Drifting:
- Calibrate the accelerometer and gyroscope in Betaflight Configurator.
- Check for excessive vibrations and use vibration-dampening mounts if necessary.
OSD Not Displaying Data:
- Ensure the OSD is enabled in Betaflight Configurator.
- Verify the video signal connections between the flight controller and the camera/VTX.
Motors Not Spinning:
- Check the motor output connections and ESC wiring.
- Ensure the ESC protocol is correctly configured in Betaflight.
FAQs
Can I use the MATEK F405 HDTE with iNav firmware?
- Yes, the MATEK F405 HDTE is compatible with iNav firmware for advanced navigation features.
What is the maximum number of motors supported?
- The flight controller supports up to 8 motors, depending on the firmware configuration.
Does the MATEK F405 HDTE support GPS?
- Yes, it supports GPS modules via UART. Configure GPS settings in Betaflight or iNav.
Can I use this flight controller for fixed-wing aircraft?
- Yes, the MATEK F405 HDTE is suitable for fixed-wing aircraft with appropriate firmware.
Is the flight controller waterproof?
- No, it is not waterproof. Use conformal coating to protect it from moisture if necessary.