
How to Use Led Strip 5V: Examples, Pinouts, and Specs

 Design with Led Strip 5V in Cirkit Designer
Introduction
The LED Strip 5V by Raspberry Pi (Manufacturer Part ID: 5) is a flexible circuit board embedded with surface-mounted light-emitting diodes (LEDs). Designed to operate on a 5V power supply, this component is ideal for decorative lighting, backlighting, and accent lighting in a variety of applications. Its flexibility and ease of use make it a popular choice for hobbyists, DIY enthusiasts, and professionals alike.
Explore Projects Built with Led Strip 5V
 Open Project in Cirkit Designer
 Open Project in Cirkit Designer
 Open Project in Cirkit Designer
 Open Project in Cirkit Designer
Explore Projects Built with Led Strip 5V
Open Project in Cirkit DesignerOpen Project in Cirkit DesignerOpen Project in Cirkit DesignerOpen Project in Cirkit DesignerCommon Applications
- Decorative Lighting: Used in homes, events, and commercial spaces for aesthetic illumination.
- Backlighting: Ideal for TVs, monitors, and signage to enhance visual appeal.
- Accent Lighting: Highlights architectural features, furniture, or artwork.
- DIY Projects: Frequently used in Arduino and Raspberry Pi projects for custom lighting effects.
Technical Specifications
Key Technical Details
| Parameter | Specification |
|---|---|
| Operating Voltage | 5V DC |
| Power Consumption | ~0.3W per LED (varies by model) |
| LED Type | Surface-mounted (SMD) LEDs |
| LED Density | 30, 60, or 144 LEDs per meter |
| Color Options | RGB (addressable) or single color |
| Control Protocol | WS2812B (for addressable models) |
| Operating Temperature | -20°C to 60°C |
| Strip Length | Typically 1m, 2m, or 5m rolls |
| Waterproofing | Optional (IP65 or IP67 rated) |
Pin Configuration and Descriptions
The LED Strip 5V typically has three pins for connection:
| Pin Name | Description |
|---|---|
| +5V | Power input (connect to a 5V DC power source). |
| GND | Ground connection (common ground for power and control). |
| DIN | Data input (receives control signals for addressable LEDs). |
For addressable LED strips, the DIN pin is used to send data signals from a microcontroller (e.g., Arduino or Raspberry Pi). Non-addressable strips may only have +5V and GND pins.
Usage Instructions
How to Use the LED Strip in a Circuit
- Power Supply: Ensure you have a 5V DC power source capable of supplying sufficient current. Calculate the required current based on the number of LEDs (e.g., ~60mA per RGB LED at full brightness).
- Connections:
- Connect the +5V pin of the strip to the positive terminal of the power supply.
- Connect the GND pin to the ground terminal of the power supply.
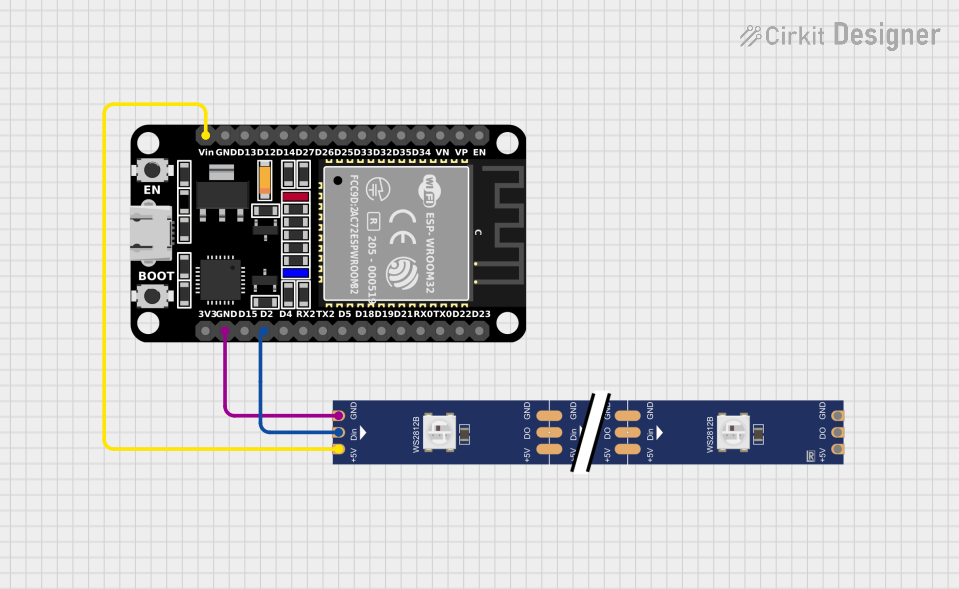
- For addressable strips, connect the DIN pin to the data output pin of your microcontroller (e.g., Arduino).
- Data Signal: Use a resistor (330–470 ohms) between the microcontroller's data pin and the strip's DIN pin to protect the LEDs from voltage spikes.
- Capacitor: Place a 1000µF capacitor across the +5V and GND pins near the strip to stabilize the power supply.
Important Considerations
- Voltage Drop: For long strips, voltage drop may occur. Inject power at multiple points to maintain consistent brightness.
- Heat Management: Avoid overheating by ensuring proper ventilation or using heat sinks for high-density strips.
- Polarity: Double-check connections to avoid damaging the LEDs due to reverse polarity.
- Signal Direction: Addressable strips have a specific data flow direction (marked by arrows on the strip). Ensure the data signal enters the correct end.
Example Code for Arduino UNO
Below is an example of how to control an addressable LED strip using an Arduino UNO and the Adafruit NeoPixel library:
#include <Adafruit_NeoPixel.h>

// Define the pin connected to the DIN pin of the LED strip
#define LED_PIN 6

// Define the number of LEDs in the strip
#define NUM_LEDS 30

// Create a NeoPixel object
Adafruit_NeoPixel strip = Adafruit_NeoPixel(NUM_LEDS, LED_PIN, NEO_GRB + NEO_KHZ800);

void setup() {
  strip.begin();  // Initialize the LED strip
  strip.show();   // Turn off all LEDs initially
}

void loop() {
  // Example: Set all LEDs to red
  for (int i = 0; i < NUM_LEDS; i++) {
    strip.setPixelColor(i, strip.Color(255, 0, 0)); // Red color
  }
  strip.show();  // Update the strip to display the color
  delay(1000);   // Wait for 1 second

  // Example: Turn off all LEDs
  for (int i = 0; i < NUM_LEDS; i++) {
    strip.setPixelColor(i, strip.Color(0, 0, 0)); // Turn off
  }
  strip.show();  // Update the strip to turn off LEDs
  delay(1000);   // Wait for 1 second
}
Troubleshooting and FAQs
Common Issues and Solutions
LEDs Not Lighting Up:
- Check the power supply voltage and current rating.
- Verify all connections, especially the +5V, GND, and DIN pins.
- Ensure the data signal is entering the correct end of the strip.
Flickering or Unstable LEDs:
- Add a capacitor (1000µF) across the power supply terminals to stabilize voltage.
- Use a resistor (330–470 ohms) on the data line to reduce noise.
- Check for loose or poor connections.
Incorrect Colors on Addressable Strips:
- Ensure the correct control protocol (e.g., WS2812B) is selected in your code.
- Verify the wiring order (e.g., DIN, +5V, GND) matches the strip's pinout.
Voltage Drop on Long Strips:
- Inject power at multiple points along the strip.
- Use thicker wires to reduce resistance.
FAQs
Can I cut the LED strip to a custom length? Yes, the strip can be cut at marked intervals (usually every 1–3 LEDs). Ensure you cut only at the designated points.
Can I extend the LED strip? Yes, you can connect multiple strips in series, but ensure your power supply can handle the total current draw.
Is the LED strip waterproof? Some models are waterproof (IP65 or IP67 rated). Check the product specifications before use in wet environments.
Can I control the strip with a Raspberry Pi? Yes, addressable LED strips can be controlled using a Raspberry Pi with libraries like
rpi_ws281xorAdafruit CircuitPython NeoPixel.
This documentation provides a comprehensive guide to using the Raspberry Pi LED Strip 5V (Part ID: 5). Follow the instructions and best practices to achieve optimal performance and longevity for your lighting projects.