Cirkit Designer Logo
Cirkit Designer
Your all-in-one circuit design IDE
Home / 
Component Documentation

How to Use Tiny AVR Programmer: Examples, Pinouts, and Specs

Image of Tiny AVR Programmer
Cirkit Designer LogoDesign with Tiny AVR Programmer in Cirkit Designer

Introduction

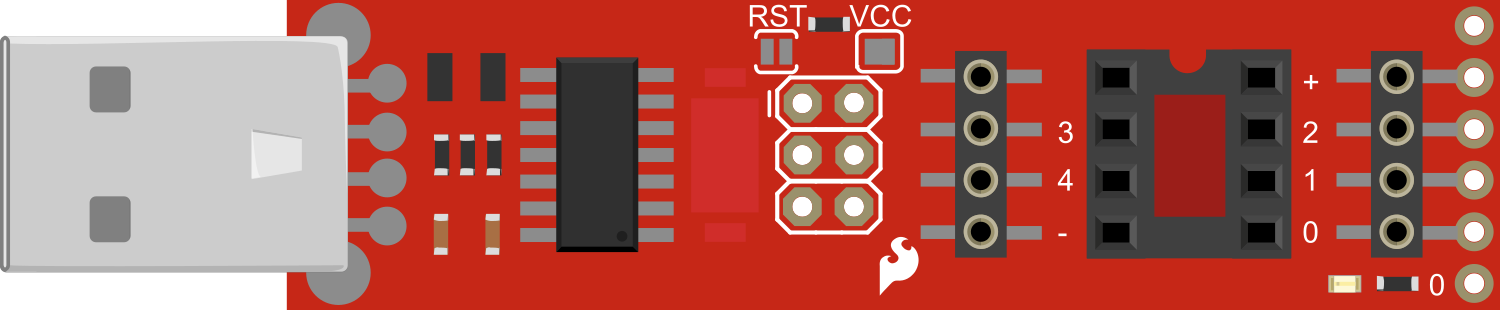
The Tiny AVR Programmer is a versatile tool designed for programming and debugging Atmel AVR microcontrollers. It is a compact device that supports a range of programming interfaces, making it compatible with a variety of AVR chips. This programmer is particularly useful for hobbyists, educators, and professionals who require a simple and efficient way to program AVR microcontrollers. Common applications include embedded systems development, DIY electronics projects, and educational purposes where learning microcontroller programming is essential.

Explore Projects Built with Tiny AVR Programmer

Use Cirkit Designer to design, explore, and prototype these projects online. Some projects support real-time simulation. Click "Open Project" to start designing instantly!
ATMEGA328 Battery-Powered LED Blinker with FTDI Programming
Image of Homemade Arduino using ATmega328: A project utilizing Tiny AVR Programmer in a practical application
This circuit is a basic microcontroller setup using an ATMEGA328, powered by a 5V battery, and includes an FTDI programmer for serial communication. It features a pushbutton for reset functionality and two LEDs controlled by the microcontroller, with one LED blinking at a 1-second interval as programmed.
Cirkit Designer LogoOpen Project in Cirkit Designer
ATMEGA328 Microcontroller Circuit with Serial Programming Interface
Image of breadboardArduino: A project utilizing Tiny AVR Programmer in a practical application
This circuit features an ATMEGA328 microcontroller configured with a crystal oscillator for precise timing, and a pushbutton for reset functionality. An FTDI Programmer is connected for serial communication, allowing for programming and data exchange with the microcontroller.
Cirkit Designer LogoOpen Project in Cirkit Designer
ATmega328P-Based Sensor Hub with OLED Display and LIDAR
Image of TILTPCB: A project utilizing Tiny AVR Programmer in a practical application
This circuit features an Mtiny Uno ATmega328P microcontroller as its central processing unit, interfacing with a variety of sensors and peripherals. It includes a 0.96" OLED display and an MPU6050 accelerometer/gyroscope for user interface and motion sensing, respectively. The circuit also integrates a TF LUNA LIDAR for distance measurement, a DHT11 sensor for temperature and humidity readings, and uses a 9V battery with a 7805 voltage regulator for power management. Communication with a computer for programming and data exchange is facilitated by an Adafruit FTDI Friend module.
Cirkit Designer LogoOpen Project in Cirkit Designer
Arduino Pro Mini-Based Battery-Powered Temperature and Laser Display System
Image of thermal temperture gun: A project utilizing Tiny AVR Programmer in a practical application
This circuit features an Arduino Pro Mini microcontroller interfaced with a USB Serial TTL for programming and power, a momentary switch for user input, and a 9V battery for power supply. It includes a KY-008 laser emitter, a 0.96" OLED display, and an MLX90614 temperature sensor, all connected to the Arduino for a potential temperature measurement and display application.
Cirkit Designer LogoOpen Project in Cirkit Designer

Explore Projects Built with Tiny AVR Programmer

Use Cirkit Designer to design, explore, and prototype these projects online. Some projects support real-time simulation. Click "Open Project" to start designing instantly!
Image of Homemade Arduino using ATmega328: A project utilizing Tiny AVR Programmer in a practical application
ATMEGA328 Battery-Powered LED Blinker with FTDI Programming
This circuit is a basic microcontroller setup using an ATMEGA328, powered by a 5V battery, and includes an FTDI programmer for serial communication. It features a pushbutton for reset functionality and two LEDs controlled by the microcontroller, with one LED blinking at a 1-second interval as programmed.
Cirkit Designer LogoOpen Project in Cirkit Designer
Image of breadboardArduino: A project utilizing Tiny AVR Programmer in a practical application
ATMEGA328 Microcontroller Circuit with Serial Programming Interface
This circuit features an ATMEGA328 microcontroller configured with a crystal oscillator for precise timing, and a pushbutton for reset functionality. An FTDI Programmer is connected for serial communication, allowing for programming and data exchange with the microcontroller.
Cirkit Designer LogoOpen Project in Cirkit Designer
Image of TILTPCB: A project utilizing Tiny AVR Programmer in a practical application
ATmega328P-Based Sensor Hub with OLED Display and LIDAR
This circuit features an Mtiny Uno ATmega328P microcontroller as its central processing unit, interfacing with a variety of sensors and peripherals. It includes a 0.96" OLED display and an MPU6050 accelerometer/gyroscope for user interface and motion sensing, respectively. The circuit also integrates a TF LUNA LIDAR for distance measurement, a DHT11 sensor for temperature and humidity readings, and uses a 9V battery with a 7805 voltage regulator for power management. Communication with a computer for programming and data exchange is facilitated by an Adafruit FTDI Friend module.
Cirkit Designer LogoOpen Project in Cirkit Designer
Image of thermal temperture gun: A project utilizing Tiny AVR Programmer in a practical application
Arduino Pro Mini-Based Battery-Powered Temperature and Laser Display System
This circuit features an Arduino Pro Mini microcontroller interfaced with a USB Serial TTL for programming and power, a momentary switch for user input, and a 9V battery for power supply. It includes a KY-008 laser emitter, a 0.96" OLED display, and an MLX90614 temperature sensor, all connected to the Arduino for a potential temperature measurement and display application.
Cirkit Designer LogoOpen Project in Cirkit Designer

Technical Specifications

Key Technical Details

  • Supported Microcontrollers: Atmel AVR 8-bit microcontrollers
  • Programming Interfaces: ISP (In-System Programming), PDI (Program and Debug Interface)
  • Operating Voltage: 5V (powered via USB)
  • Connectivity: USB interface for connection to a computer
  • Dimensions: Compact and portable design

Pin Configuration and Descriptions

Pin Number Description Notes
1 MISO (Master In Slave Out) Data output from AVR to programmer
2 VCC 5V power supply
3 SCK (Serial Clock) Clock signal for programming
4 MOSI (Master Out Slave In) Data input to AVR from programmer
5 RESET Resets the AVR microcontroller
6 GND (Ground) Common ground reference

Usage Instructions

How to Use the Component in a Circuit

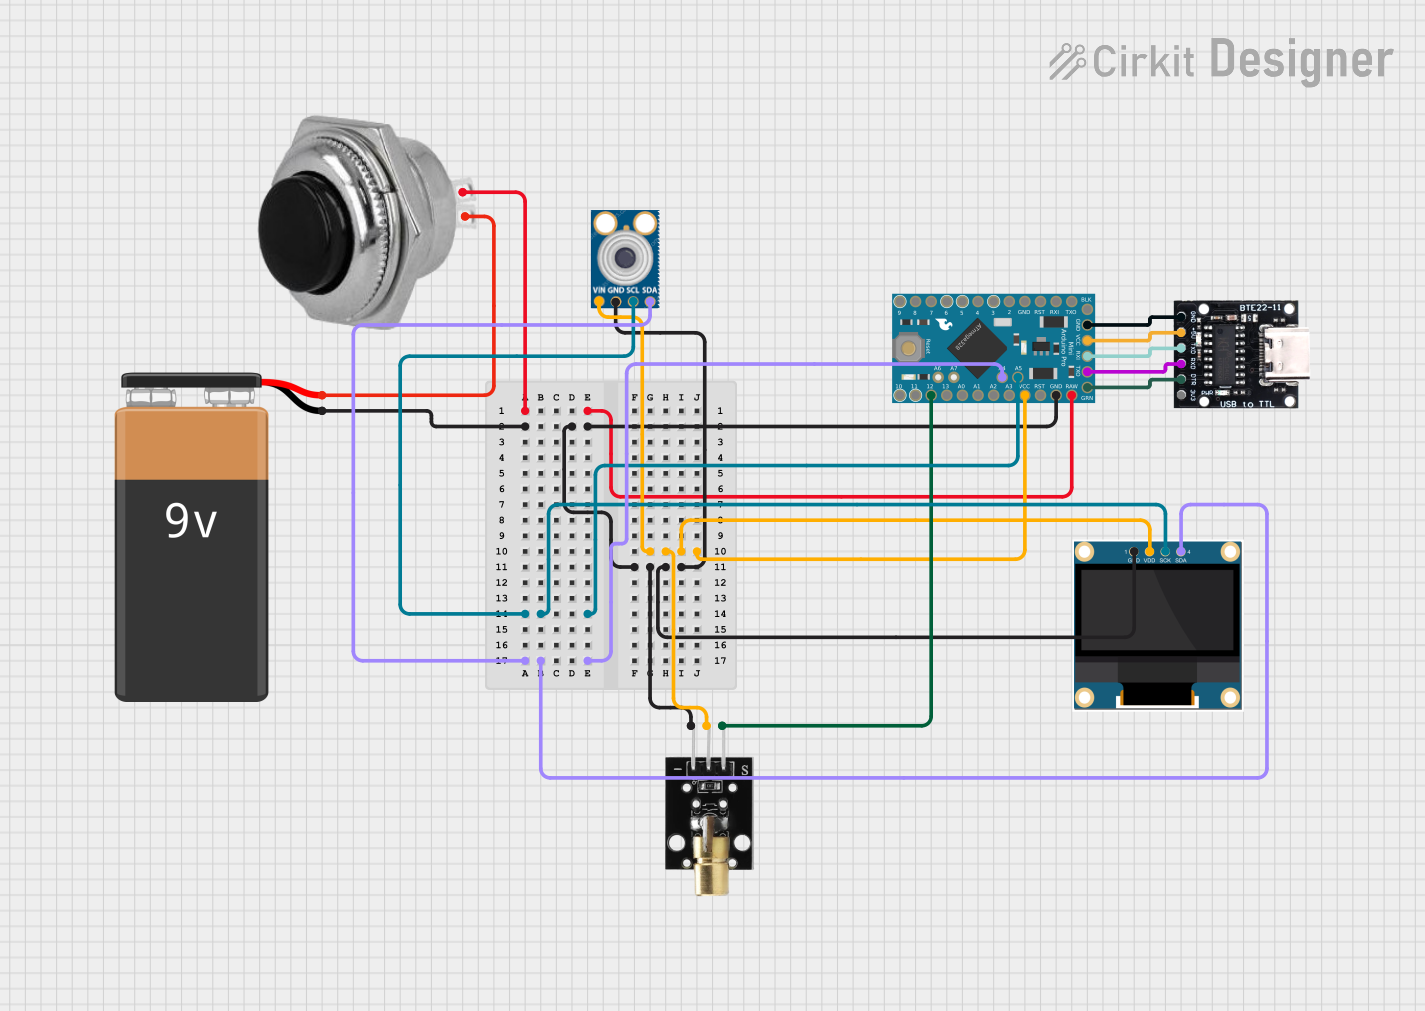
  1. Connecting the Programmer:

    • Connect the Tiny AVR Programmer to the AVR microcontroller using a 6-pin ISP connector.
    • Ensure that the pin 1 indicator on the programmer aligns with the pin 1 marking on the microcontroller's ISP header.
  2. Powering the Programmer:

    • The Tiny AVR Programmer is powered via the USB connection to your computer.
    • Ensure that the microcontroller is also powered appropriately, either through the programmer (if supported) or via an external power source.
  3. Programming the Microcontroller:

    • Open your preferred development software, such as the Arduino IDE.
    • Select the correct board and port for the AVR microcontroller you are programming.
    • Write or load the desired program (firmware) into the development software.
    • Initiate the programming process through the software interface.

Important Considerations and Best Practices

  • Check Compatibility: Verify that the AVR microcontroller you intend to program is supported by the Tiny AVR Programmer.
  • Firmware Backup: Always backup existing firmware before reprogramming, if possible.
  • Connection Check: Double-check all connections before powering up to prevent damage to the programmer or microcontroller.
  • ESD Precautions: Use proper electrostatic discharge (ESD) precautions to avoid damaging sensitive components.

Troubleshooting and FAQs

Common Issues

  • Programmer Not Recognized: Ensure that the drivers are correctly installed and that the USB cable is functioning.
  • Programming Errors: Check the connections between the programmer and the microcontroller. Verify that the correct device and programming settings are selected in the software.
  • Power Issues: If the microcontroller does not power on, check the power supply and connections.

Solutions and Tips for Troubleshooting

  • Driver Installation: Make sure that the latest drivers for the Tiny AVR Programmer are installed on your computer.
  • Cable Check: Use a different USB cable if the programmer is not recognized or if there are intermittent connection issues.
  • Software Configuration: Recheck all software settings, including board type and port selection, to ensure they match the connected AVR microcontroller.

FAQs

Q: Can the Tiny AVR Programmer be used with all AVR microcontrollers? A: The programmer supports a wide range of Atmel AVR 8-bit microcontrollers. However, it is important to check the compatibility list for your specific model.

Q: Do I need external power for the microcontroller when using the Tiny AVR Programmer? A: It depends on the microcontroller and the programmer's capabilities. Some setups allow the programmer to power the microcontroller, while others require an external power source.

Q: How do I know if my AVR microcontroller is properly programmed? A: After programming, verify the functionality by running a test program or checking the output signals of the microcontroller.

Example Code for Arduino UNO

// This example code is designed to be used with an Arduino UNO as the target microcontroller.

#include <avr/io.h>

int main(void) {
  // Set up Port B pin 5 mode to output
  DDRB |= (1 << DDB5);

  while (1) {
    // Toggle Port B pin 5 output state
    PORTB ^= (1 << PORTB5);
    // Introduce a delay
    for (volatile int i = 0; i < 10000; i++);
  }
}

// Note: This code is a simple blink example that toggles an LED connected to pin 13 on the Arduino UNO.
// It is written in plain AVR C code and should be compiled with an AVR toolchain.

Remember to use the appropriate development environment and toolchain for AVR programming when working with the Tiny AVR Programmer. The Arduino IDE can be used for certain AVR microcontrollers, but for others, you may need to use Atmel Studio or other AVR-specific development tools.