How to Use ESP32-C3-MINI LaskaKit Meteo Mini: Examples, Pinouts, and Specs
Introduction
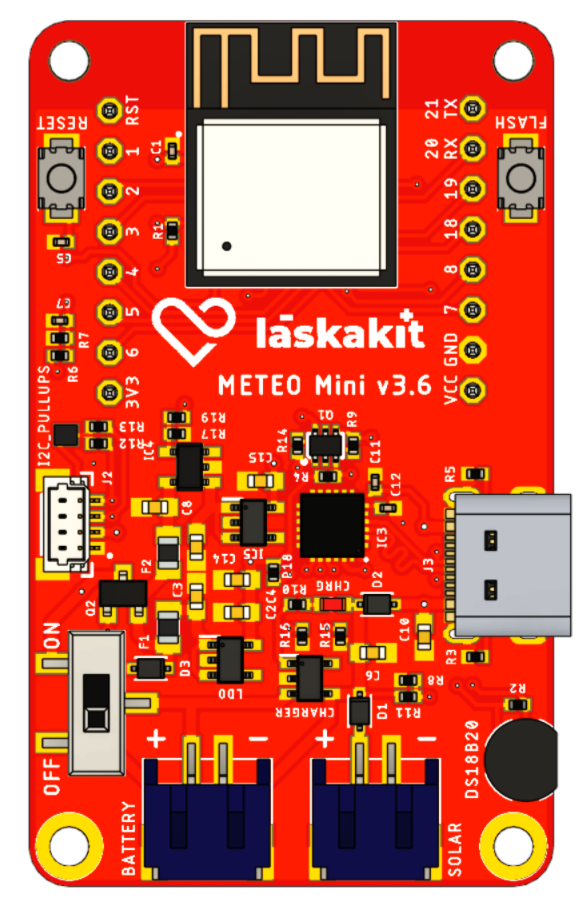
The ESP32-C3-MINI LaskaKit Meteo Mini is a compact weather station kit designed for measuring temperature, humidity, and atmospheric pressure. Built around the ESP32-C3-MINI microcontroller, this module is ideal for educational purposes, DIY projects, and IoT applications. Its small form factor and integrated sensors make it a versatile tool for hobbyists and professionals alike.
Explore Projects Built with ESP32-C3-MINI LaskaKit Meteo Mini

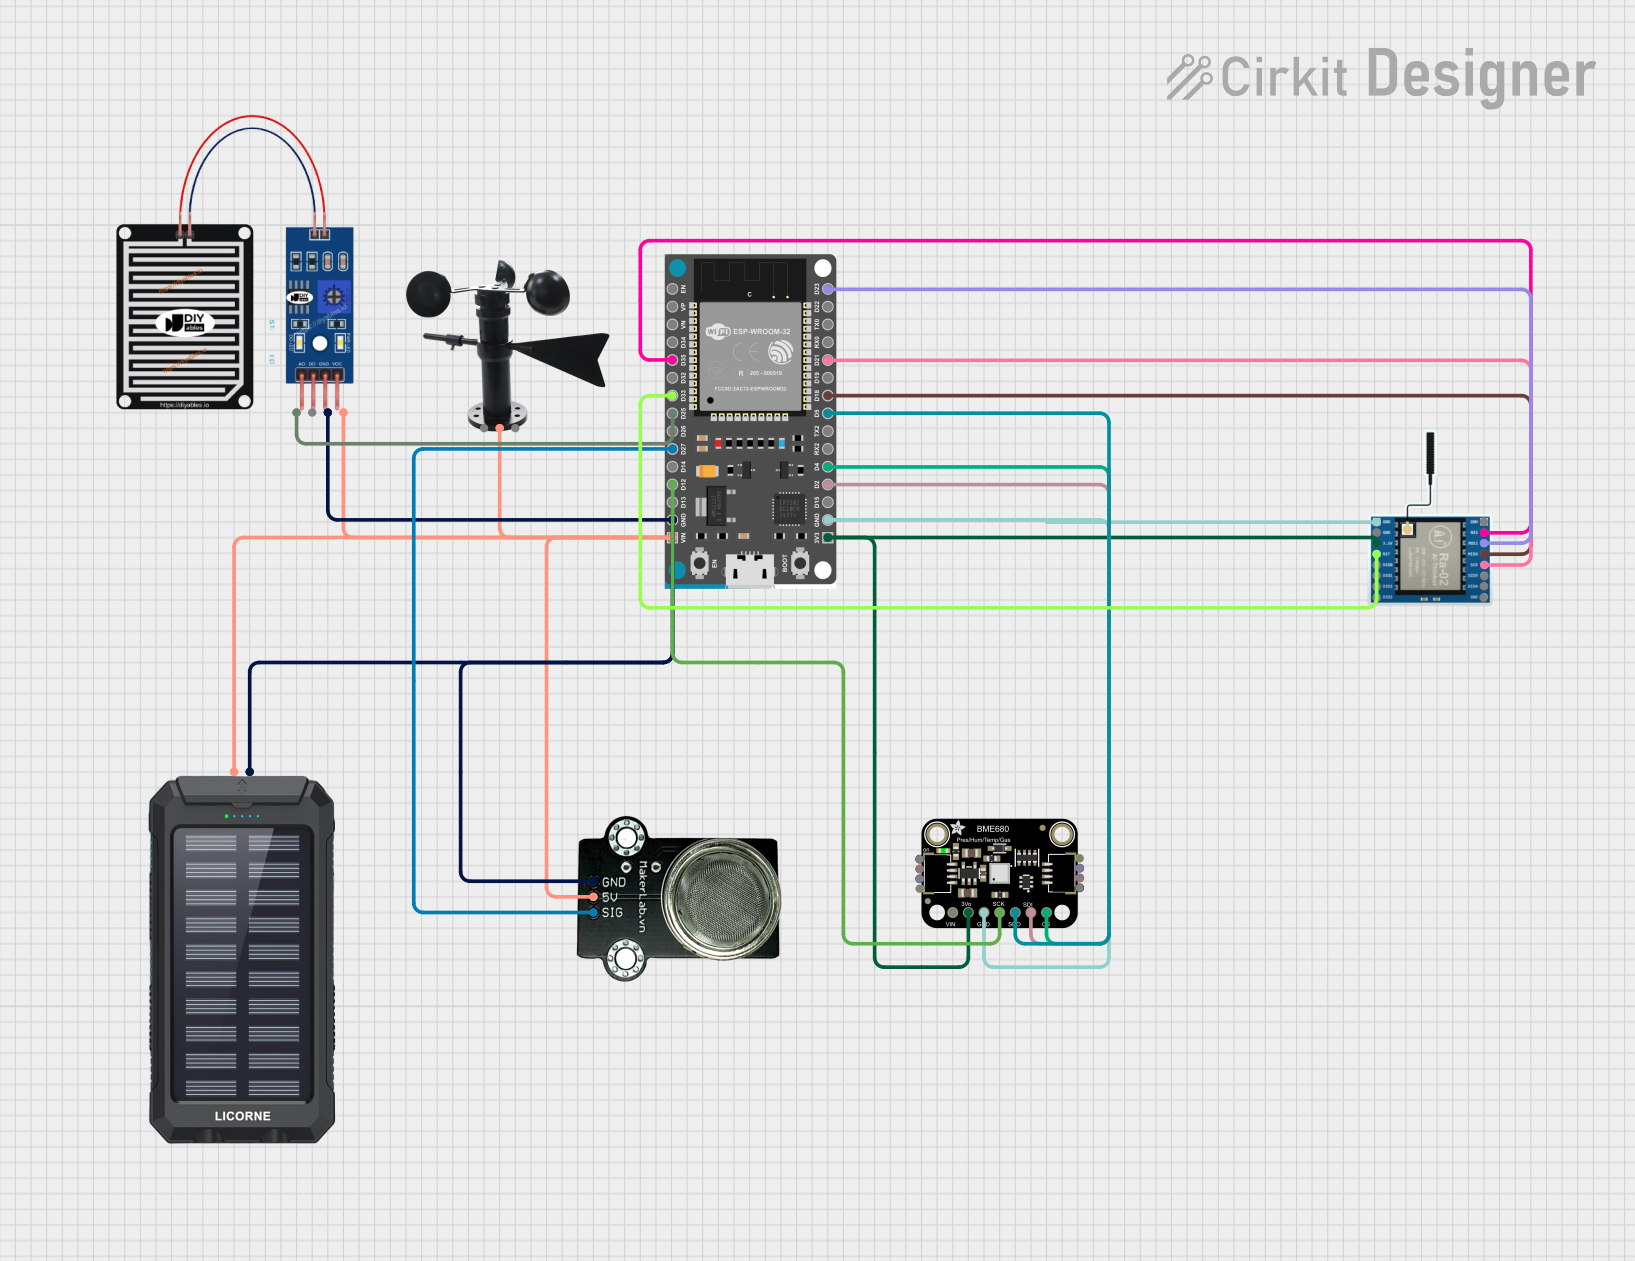
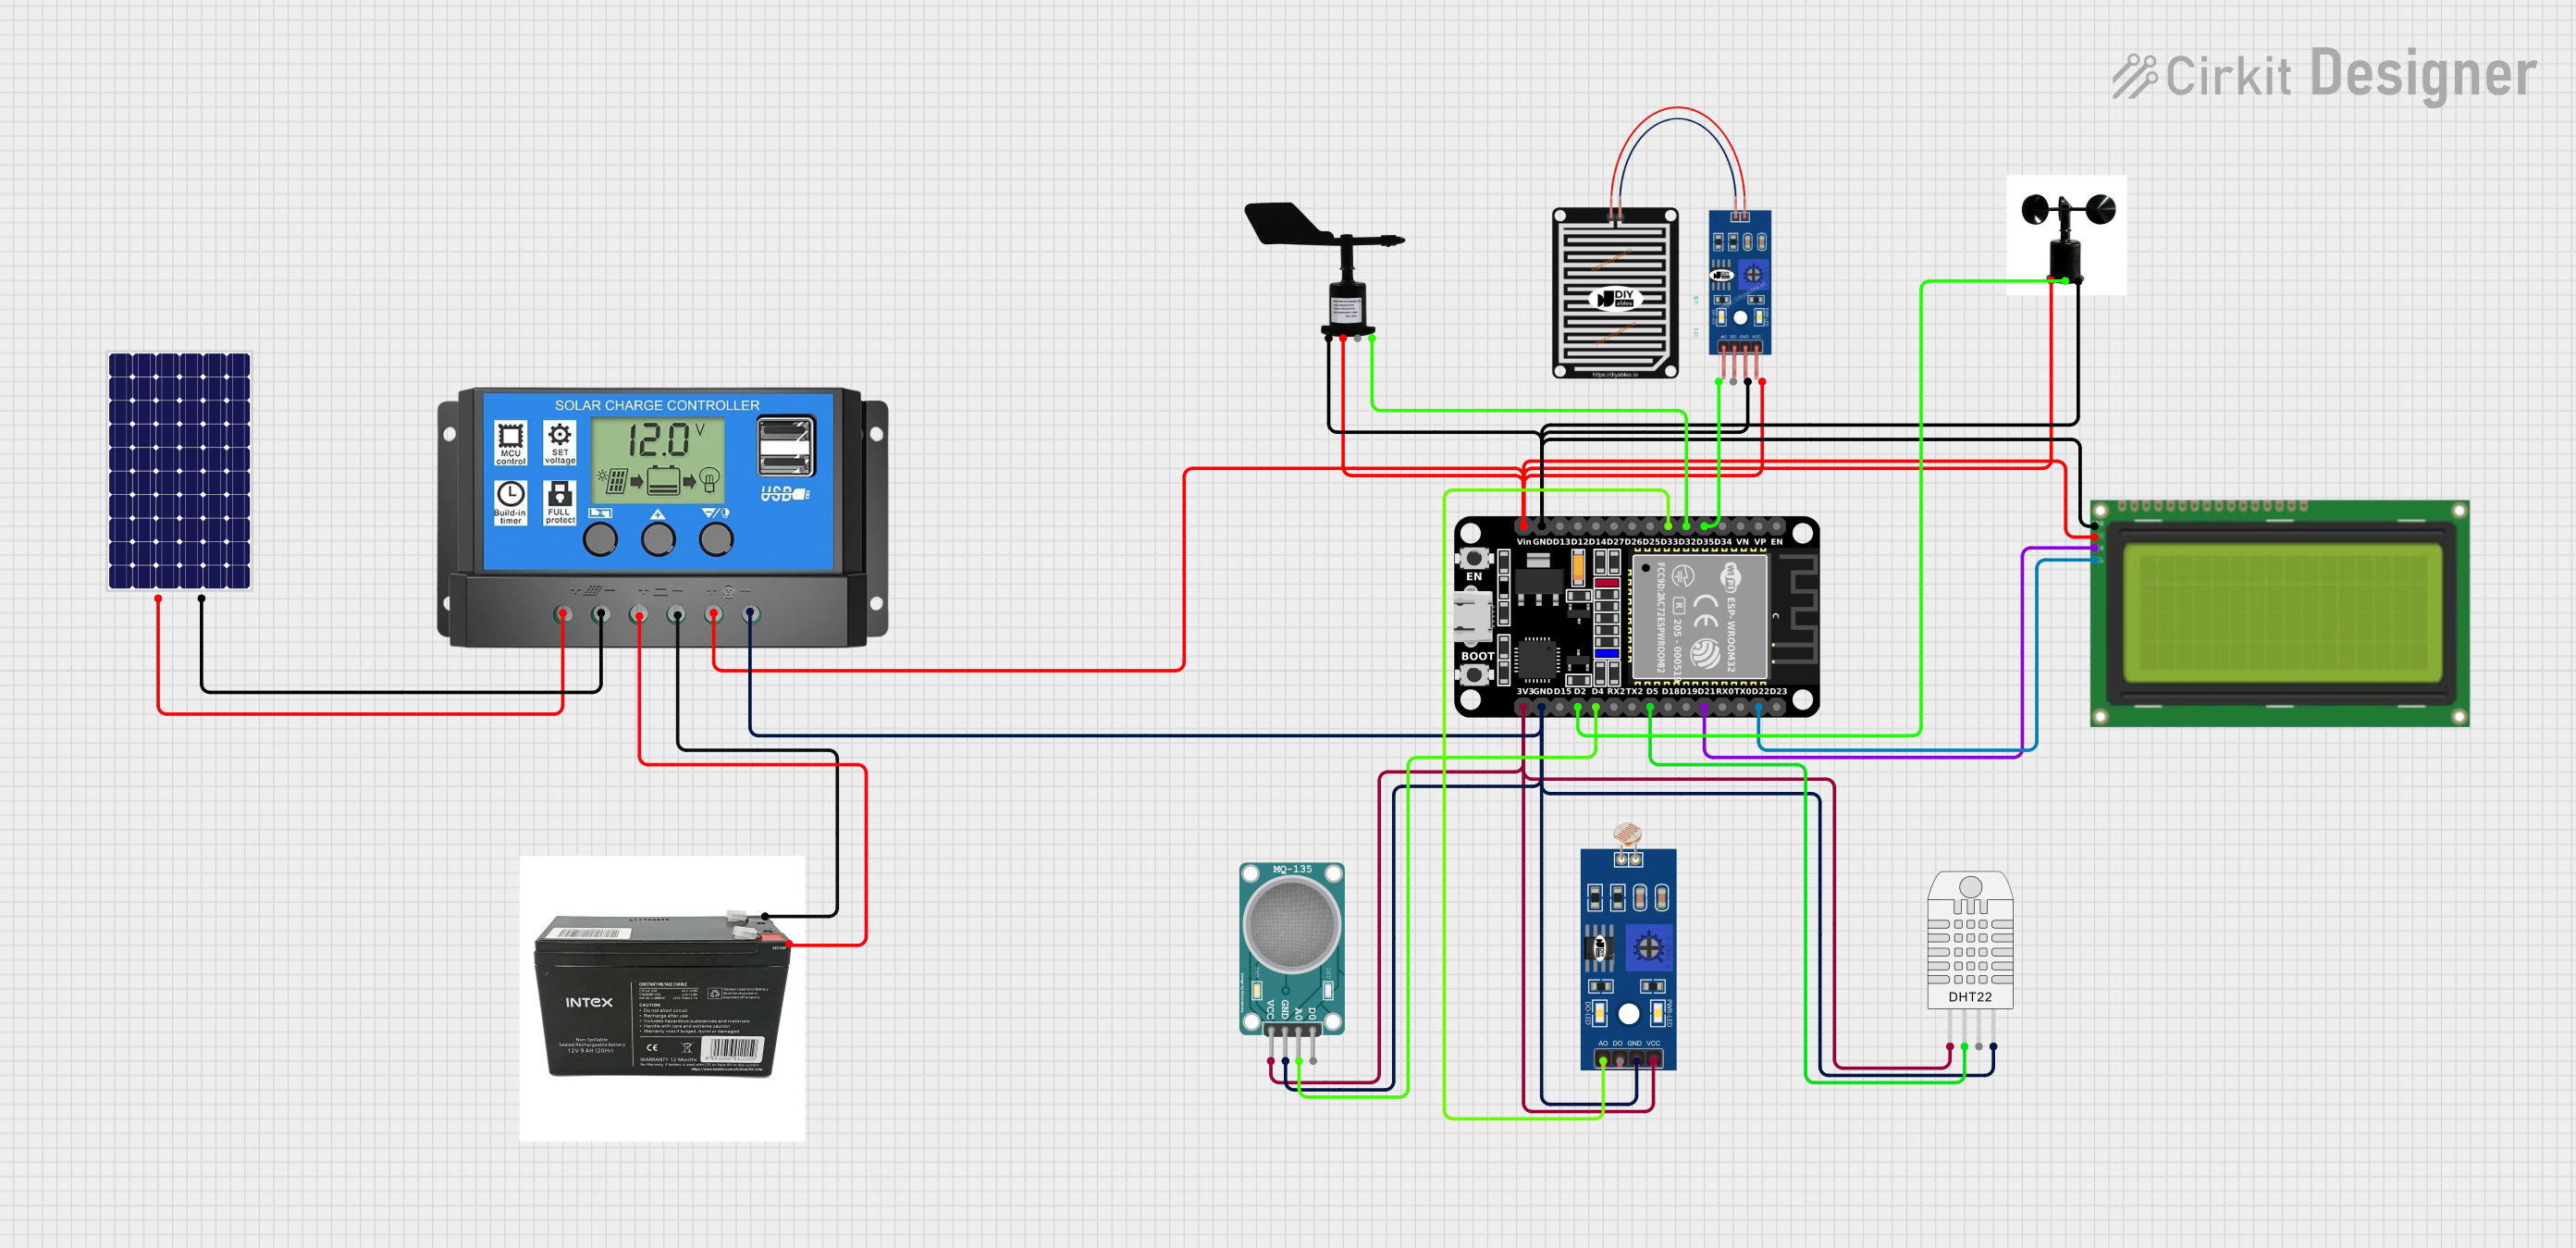
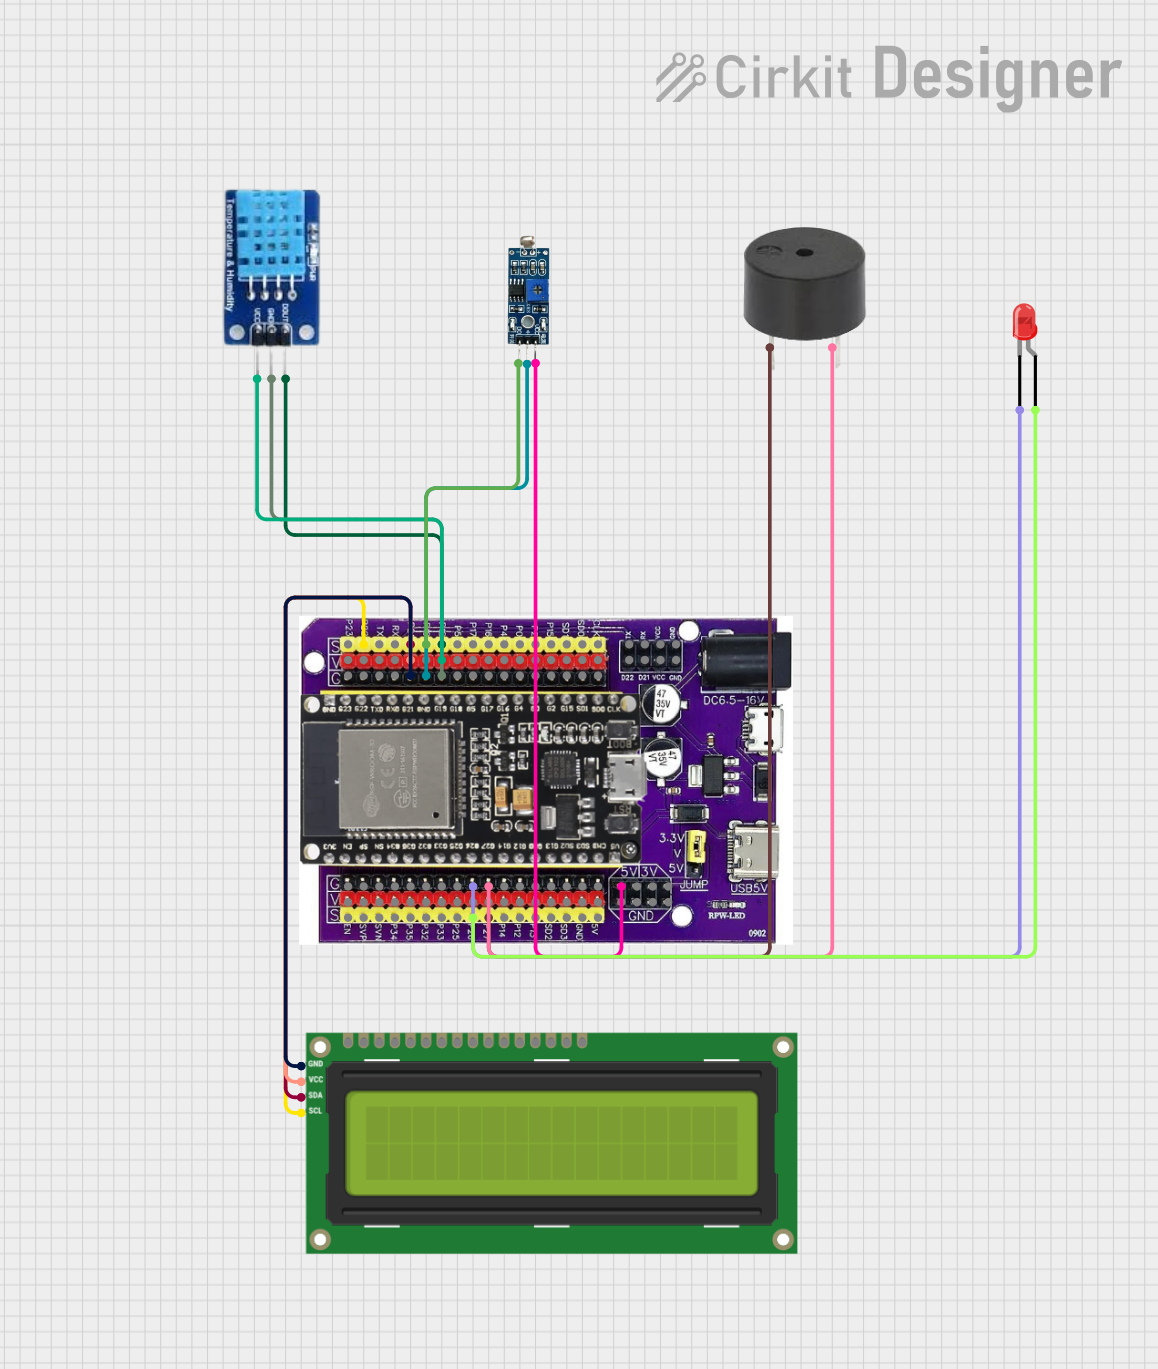
Explore Projects Built with ESP32-C3-MINI LaskaKit Meteo Mini
Common Applications and Use Cases
- DIY weather monitoring stations
- IoT-based environmental data logging
- Educational projects for learning about sensors and microcontrollers
- Smart home automation systems
- Agricultural and greenhouse monitoring
Technical Specifications
Key Technical Details
| Parameter | Specification |
|---|---|
| Manufacturer | LaskaKit |
| Part ID | LaskaKit_METEO_MINI_v_3_5 |
| Microcontroller | ESP32-C3-MINI |
| Wireless Connectivity | Wi-Fi (802.11 b/g/n) and Bluetooth Low Energy |
| Operating Voltage | 3.3V |
| Power Supply | USB-C (5V) or external 3.3V source |
| Temperature Sensor | ±0.3°C accuracy (range: -40°C to +85°C) |
| Humidity Sensor | ±2% RH accuracy (range: 0% to 100% RH) |
| Pressure Sensor | ±1 hPa accuracy (range: 300 hPa to 1100 hPa) |
| Dimensions | 40mm x 25mm x 10mm |
| Operating Temperature | -40°C to +85°C |
| GPIO Pins | 6 (configurable for digital/analog input/output) |
| Communication Protocols | I2C, SPI, UART |
Pin Configuration and Descriptions
| Pin Name | Pin Number | Description |
|---|---|---|
| VIN | 1 | Power input (5V via USB-C or external 3.3V source) |
| GND | 2 | Ground connection |
| SDA | 3 | I2C data line |
| SCL | 4 | I2C clock line |
| GPIO0 | 5 | General-purpose I/O pin (configurable) |
| GPIO1 | 6 | General-purpose I/O pin (configurable) |
| GPIO2 | 7 | General-purpose I/O pin (configurable) |
| GPIO3 | 8 | General-purpose I/O pin (configurable) |
Usage Instructions
How to Use the Component in a Circuit
Powering the Module:
- Connect the VIN pin to a 5V USB-C power source or an external 3.3V regulated power supply.
- Connect the GND pin to the ground of your power source.
Connecting to Sensors:
- The onboard sensors (temperature, humidity, and pressure) are pre-wired to the ESP32-C3-MINI via the I2C bus.
- Use the SDA and SCL pins to connect additional I2C devices if needed.
Programming the ESP32-C3-MINI:
- Use the Arduino IDE or ESP-IDF to program the module.
- Install the necessary libraries for the onboard sensors (e.g., Adafruit BME280 library for pressure, temperature, and humidity).
Data Logging and Communication:
- Use Wi-Fi or Bluetooth to transmit sensor data to a cloud platform or local device.
- Alternatively, log data to an SD card or display it on an OLED screen.
Important Considerations and Best Practices
- Ensure the power supply is stable and within the specified voltage range to avoid damaging the module.
- Avoid exposing the module to extreme environmental conditions beyond its operating range.
- Use pull-up resistors (typically 4.7kΩ) on the SDA and SCL lines if additional I2C devices are connected.
- When programming, ensure the correct board and port are selected in the Arduino IDE or ESP-IDF.
Example Code for Arduino UNO
Below is an example code snippet to read temperature, humidity, and pressure data from the onboard sensors and print it to the serial monitor.
#include <Wire.h>
#include <Adafruit_Sensor.h>
#include <Adafruit_BME280.h>

// Create an instance of the BME280 sensor
Adafruit_BME280 bme;

// Define I2C address for the BME280 sensor
#define BME280_I2C_ADDRESS 0x76

void setup() {
  Serial.begin(115200); // Initialize serial communication
  while (!Serial);      // Wait for the serial port to connect

  // Initialize the BME280 sensor
  if (!bme.begin(BME280_I2C_ADDRESS)) {
    Serial.println("Error: Could not find BME280 sensor!");
    while (1); // Halt execution if sensor initialization fails
  }

  Serial.println("BME280 sensor initialized successfully.");
}

void loop() {
  // Read temperature, humidity, and pressure from the sensor
  float temperature = bme.readTemperature();
  float humidity = bme.readHumidity();
  float pressure = bme.readPressure() / 100.0F; // Convert to hPa

  // Print the sensor data to the serial monitor
  Serial.print("Temperature: ");
  Serial.print(temperature);
  Serial.println(" °C");

  Serial.print("Humidity: ");
  Serial.print(humidity);
  Serial.println(" %");

  Serial.print("Pressure: ");
  Serial.print(pressure);
  Serial.println(" hPa");

  delay(2000); // Wait 2 seconds before the next reading
}
Troubleshooting and FAQs
Common Issues and Solutions
The module does not power on:
- Verify that the power supply is providing the correct voltage (5V via USB-C or 3.3V).
- Check the connections to the VIN and GND pins.
Sensor readings are incorrect or not updating:
- Ensure the onboard sensors are properly initialized in the code.
- Verify the I2C address of the sensors (default is
0x76for the BME280). - Check for loose or faulty connections on the SDA and SCL lines.
Wi-Fi or Bluetooth connectivity issues:
- Ensure the ESP32-C3-MINI is within range of the Wi-Fi router or Bluetooth device.
- Double-check the SSID and password in your code for Wi-Fi connections.
Arduino IDE cannot detect the module:
- Install the ESP32 board package in the Arduino IDE.
- Select the correct board (
ESP32C3 Dev Module) and COM port in the Tools menu.
FAQs
Q: Can I use this module with a battery?
A: Yes, you can power the module with a 3.7V LiPo battery and a 3.3V regulator. Ensure the battery provides sufficient current for the ESP32-C3-MINI and sensors.
Q: What is the maximum range for Wi-Fi connectivity?
A: The Wi-Fi range depends on environmental factors but typically extends up to 30 meters indoors and 100 meters outdoors.
Q: Can I add external sensors to this module?
A: Yes, you can connect additional sensors via the I2C, SPI, or GPIO pins, provided they are within the module's voltage and current limits.
Q: Is the module compatible with other microcontrollers?
A: While designed around the ESP32-C3-MINI, the onboard sensors can be interfaced with other microcontrollers using I2C or SPI communication.