How to Use MAX17048 Fuel Gauge: Examples, Pinouts, and Specs
Introduction
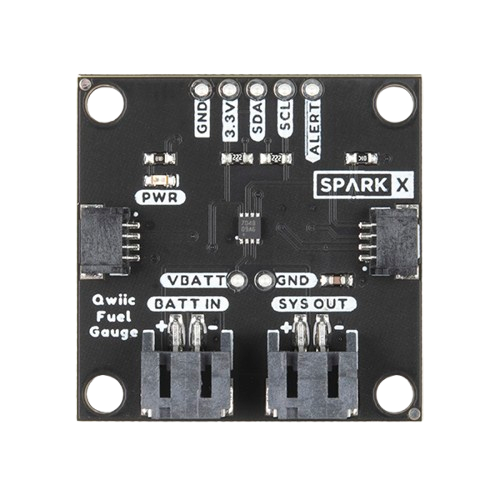
The MAX17048 is a highly accurate battery fuel gauge designed for lithium-ion batteries. It uses a sophisticated model-based algorithm to estimate the remaining battery capacity, providing real-time monitoring of voltage, current, and temperature. This component is ideal for applications requiring precise battery management, such as portable electronics, wearables, IoT devices, and battery-powered medical equipment.
Explore Projects Built with MAX17048 Fuel Gauge


Explore Projects Built with MAX17048 Fuel Gauge
Common Applications
- Smartphones and tablets
- Wearable devices
- Internet of Things (IoT) devices
- Battery-powered medical instruments
- Portable electronics
Technical Specifications
Key Technical Details
- Operating Voltage Range: 2.5V to 4.5V
- Current Consumption: 1.2µA (typical in low-power mode)
- Battery Chemistry: Lithium-ion (Li-ion)
- Communication Interface: I²C (2-wire)
- Operating Temperature Range: -40°C to +85°C
- Package: 1.4mm x 1.5mm, 8-pin µDFN
Pin Configuration and Descriptions
The MAX17048 comes in an 8-pin µDFN package. Below is the pin configuration:
| Pin Number | Pin Name | Description |
|---|---|---|
| 1 | VDD | Power supply input (2.5V to 4.5V). Connect to the positive terminal of the battery. |
| 2 | SDA | I²C data line. Used for communication with the host microcontroller. |
| 3 | SCL | I²C clock line. Used for communication with the host microcontroller. |
| 4 | GND | Ground. Connect to the negative terminal of the battery. |
| 5 | THRM | Thermistor input for temperature monitoring. |
| 6 | ALRT | Alert output. Active-low signal to indicate low battery or other conditions. |
| 7 | RST | Reset input. Pull low to reset the device. |
| 8 | N.C. | No connection. Leave this pin unconnected. |
Usage Instructions
How to Use the MAX17048 in a Circuit
- Power Supply: Connect the VDD pin to the positive terminal of the lithium-ion battery (2.5V to 4.5V). Connect the GND pin to the negative terminal.
- I²C Communication: Connect the SDA and SCL pins to the corresponding I²C lines of the host microcontroller. Use pull-up resistors (typically 4.7kΩ) on both lines.
- Thermistor: If temperature monitoring is required, connect a 10kΩ thermistor to the THRM pin. Otherwise, leave it unconnected.
- Alert Signal: Connect the ALRT pin to a GPIO pin on the microcontroller to monitor alerts. This pin is active-low.
- Reset: If needed, connect the RST pin to a GPIO pin or a manual reset button. Pull it low to reset the device.
Important Considerations and Best Practices
- Ensure the battery voltage is within the operating range (2.5V to 4.5V) to avoid damage to the MAX17048.
- Use appropriate pull-up resistors on the I²C lines to ensure reliable communication.
- If the THRM pin is unused, leave it floating (do not connect it to ground or VDD).
- The ALRT pin can be used to trigger low-battery warnings or other alerts. Configure it in the firmware as needed.
- Place decoupling capacitors (e.g., 0.1µF) close to the VDD pin to reduce noise and improve stability.
Example Code for Arduino UNO
Below is an example of how to interface the MAX17048 with an Arduino UNO using the I²C protocol:
#include <Wire.h>

// MAX17048 I²C address
#define MAX17048_ADDRESS 0x36

void setup() {
  Wire.begin(); // Initialize I²C communication
  Serial.begin(9600); // Initialize serial communication for debugging

  // Check communication with MAX17048
  Wire.beginTransmission(MAX17048_ADDRESS);
  if (Wire.endTransmission() == 0) {
    Serial.println("MAX17048 detected!");
  } else {
    Serial.println("MAX17048 not detected. Check connections.");
  }
}

void loop() {
  // Read battery voltage
  float voltage = readBatteryVoltage();
  Serial.print("Battery Voltage: ");
  Serial.print(voltage);
  Serial.println(" V");

  delay(1000); // Wait 1 second before the next reading
}

float readBatteryVoltage() {
  Wire.beginTransmission(MAX17048_ADDRESS);
  Wire.write(0x02); // Register address for voltage
  Wire.endTransmission(false);
  Wire.requestFrom(MAX17048_ADDRESS, 2);

  if (Wire.available() == 2) {
    uint16_t rawVoltage = (Wire.read() << 8) | Wire.read();
    return rawVoltage * 0.00125; // Convert to volts (1.25mV per LSB)
  }

  return 0.0; // Return 0 if no data is available
}
Troubleshooting and FAQs
Common Issues and Solutions
MAX17048 Not Detected on I²C Bus
- Cause: Incorrect wiring or missing pull-up resistors on SDA and SCL lines.
- Solution: Verify the connections and ensure 4.7kΩ pull-up resistors are present.
Incorrect Voltage Readings
- Cause: Battery voltage is outside the operating range or poor connections.
- Solution: Ensure the battery voltage is between 2.5V and 4.5V. Check all connections.
ALRT Pin Always Active
- Cause: Low battery or other alert conditions.
- Solution: Read the alert status register via I²C to determine the cause. Address the issue (e.g., charge the battery).
Device Not Resetting
- Cause: RST pin not properly connected or held low for insufficient time.
- Solution: Ensure the RST pin is pulled low for at least 1µs to reset the device.
FAQs
Q: Can the MAX17048 be used with batteries other than lithium-ion?
A: No, the MAX17048 is specifically designed for lithium-ion batteries and may not provide accurate readings with other chemistries.Q: What is the typical accuracy of the fuel gauge?
A: The MAX17048 provides highly accurate capacity estimation, typically within ±1% under normal operating conditions.Q: Can I use the MAX17048 without a thermistor?
A: Yes, the THRM pin can be left unconnected if temperature monitoring is not required.Q: How do I configure the alert thresholds?
A: Alert thresholds can be configured by writing to the appropriate registers via the I²C interface. Refer to the MAX17048 datasheet for details.
This concludes the documentation for the MAX17048 Fuel Gauge. For further details, consult the official datasheet or application notes.