Cirkit Designer Logo
Cirkit Designer
Your all-in-one circuit design IDE
Home / 
Component Documentation

How to Use Rain Gauge: Examples, Pinouts, and Specs

Image of Rain Gauge
Cirkit Designer LogoDesign with Rain Gauge in Cirkit Designer

Introduction

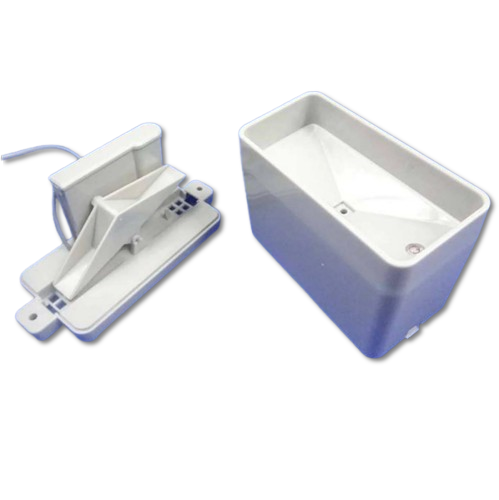
A rain gauge is an essential instrument used in meteorology to measure the amount of precipitation that falls over a specific area during a given period. This DIY Rain Gauge (Part ID: 1) is designed for hobbyists, researchers, and weather enthusiasts who wish to monitor rainfall patterns for agricultural, hydrological, or climatological purposes.

Explore Projects Built with Rain Gauge

Use Cirkit Designer to design, explore, and prototype these projects online. Some projects support real-time simulation. Click "Open Project" to start designing instantly!
Arduino UNO Based Weather Monitoring System with LCD Display
Image of agriculture: A project utilizing Rain Gauge in a practical application
This is a weather monitoring and control system built around an Arduino UNO. It collects data from rain, water level, and temperature/humidity sensors, displays readings on an LCD, and can control a water pump using a relay, possibly for automated plant watering based on the sensor inputs.
Cirkit Designer LogoOpen Project in Cirkit Designer
Arduino-Based Water Quality Monitoring System with SIM900A and Multiple Sensors
Image of feito: A project utilizing Rain Gauge in a practical application
This circuit is a water quality monitoring system that uses an Arduino UNO to collect data from a YF-S201 water flow meter, a turbidity sensor, and a temperature sensor. The collected data is then transmitted via a SIM900A GSM module to a remote server or user through SMS. The system measures water flow rate, temperature, and turbidity, and sends periodic updates.
Cirkit Designer LogoOpen Project in Cirkit Designer
Arduino UNO and ESP8266-Based Smart Water Monitoring System with Wi-Fi Connectivity
Image of automatic water leak detection: A project utilizing Rain Gauge in a practical application
This circuit monitors water pressure and flow using a Gravity Analog Water Pressure Sensor and a water flow sensor, interfaced with an Arduino UNO. The Arduino UNO processes the sensor data and communicates with an ESP8266 module for potential wireless data transmission, all powered by a 5V adapter.
Cirkit Designer LogoOpen Project in Cirkit Designer
Wi-Fi Enabled Water Monitoring System with ESP8266
Image of automatic water leak detection: A project utilizing Rain Gauge in a practical application
This circuit monitors water pressure and flow using a Gravity analog water pressure sensor and a water flow sensor, respectively. The sensors are powered by a 5V adapter and their signals are read by an ESP8266 microcontroller, which can process and transmit the data for further use.
Cirkit Designer LogoOpen Project in Cirkit Designer

Explore Projects Built with Rain Gauge

Use Cirkit Designer to design, explore, and prototype these projects online. Some projects support real-time simulation. Click "Open Project" to start designing instantly!
Image of agriculture: A project utilizing Rain Gauge in a practical application
Arduino UNO Based Weather Monitoring System with LCD Display
This is a weather monitoring and control system built around an Arduino UNO. It collects data from rain, water level, and temperature/humidity sensors, displays readings on an LCD, and can control a water pump using a relay, possibly for automated plant watering based on the sensor inputs.
Cirkit Designer LogoOpen Project in Cirkit Designer
Image of feito: A project utilizing Rain Gauge in a practical application
Arduino-Based Water Quality Monitoring System with SIM900A and Multiple Sensors
This circuit is a water quality monitoring system that uses an Arduino UNO to collect data from a YF-S201 water flow meter, a turbidity sensor, and a temperature sensor. The collected data is then transmitted via a SIM900A GSM module to a remote server or user through SMS. The system measures water flow rate, temperature, and turbidity, and sends periodic updates.
Cirkit Designer LogoOpen Project in Cirkit Designer
Image of automatic water leak detection: A project utilizing Rain Gauge in a practical application
Arduino UNO and ESP8266-Based Smart Water Monitoring System with Wi-Fi Connectivity
This circuit monitors water pressure and flow using a Gravity Analog Water Pressure Sensor and a water flow sensor, interfaced with an Arduino UNO. The Arduino UNO processes the sensor data and communicates with an ESP8266 module for potential wireless data transmission, all powered by a 5V adapter.
Cirkit Designer LogoOpen Project in Cirkit Designer
Image of automatic water leak detection: A project utilizing Rain Gauge in a practical application
Wi-Fi Enabled Water Monitoring System with ESP8266
This circuit monitors water pressure and flow using a Gravity analog water pressure sensor and a water flow sensor, respectively. The sensors are powered by a 5V adapter and their signals are read by an ESP8266 microcontroller, which can process and transmit the data for further use.
Cirkit Designer LogoOpen Project in Cirkit Designer

Common Applications and Use Cases

  • Agriculture: Determining irrigation needs based on rainfall.
  • Hydrology: Monitoring and managing water resources.
  • Meteorology: Studying weather patterns and contributing to climate data.
  • Education: Teaching students about weather and environmental science.
  • Personal Interest: For individuals interested in weather patterns and gardening.

Technical Specifications

Key Technical Details

  • Measurement Range: 0 to 9999 mm
  • Resolution: 0.1 mm
  • Accuracy: ±1%
  • Operating Temperature: -10°C to +50°C
  • Material: UV-resistant plastic

Pin Configuration and Descriptions

Pin Number Description Type
1 Signal Output Digital
2 Power Supply (VCC) Power
3 Ground (GND) Power

Usage Instructions

How to Use the Component in a Circuit

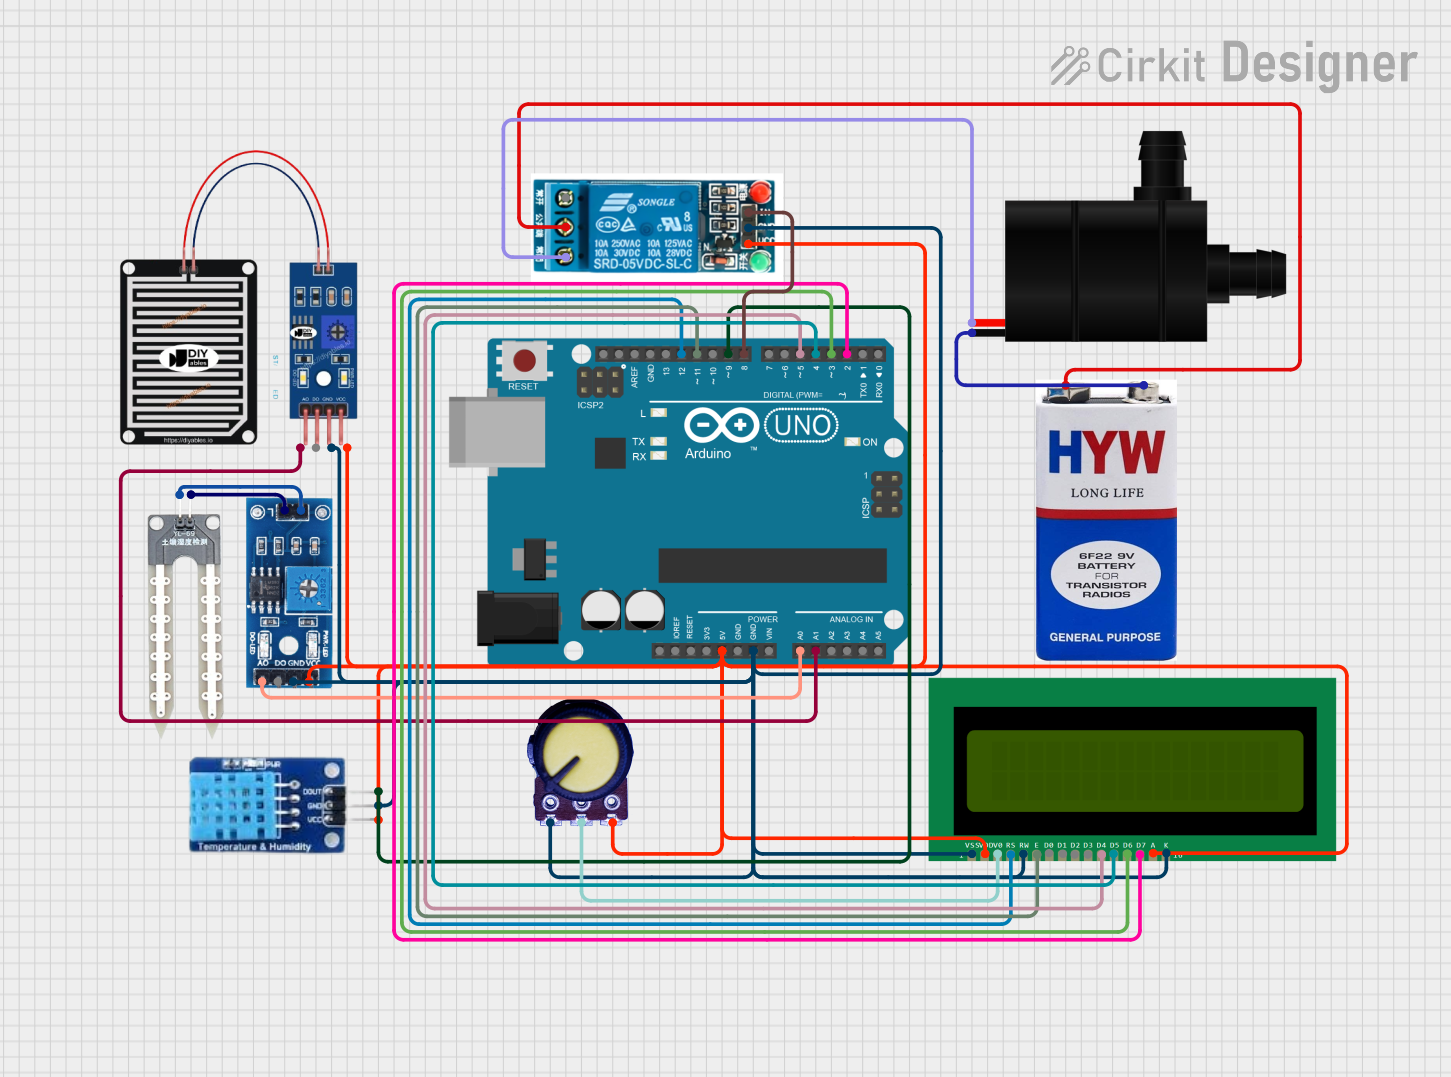
  1. Power Supply: Connect the VCC pin to a 5V power supply.
  2. Ground: Connect the GND pin to the ground of the power supply.
  3. Signal Output: Connect the Signal Output pin to a digital input pin on a microcontroller, such as an Arduino UNO.

Important Considerations and Best Practices

  • Ensure the rain gauge is mounted level and in an open area to accurately collect rain.
  • Avoid placing near trees or buildings that may block or divert rainfall.
  • Regularly clean the collection funnel and the tipping bucket mechanism to prevent debris from affecting measurements.
  • Calibrate the device periodically to maintain accuracy.

Example Arduino Code

// Define the digital pin connected to the rain gauge
const int rainGaugePin = 2;

// Variable to store rainfall count
volatile unsigned int rainCount = 0;

// Interrupt service routine for the tipping bucket
void rainISR() {
  rainCount++;
}

void setup() {
  // Initialize the serial communication
  Serial.begin(9600);
  
  // Set the rain gauge pin as an input
  pinMode(rainGaugePin, INPUT_PULLUP);
  
  // Attach an interrupt to the rain gauge pin
  attachInterrupt(digitalPinToInterrupt(rainGaugePin), rainISR, FALLING);
}

void loop() {
  // Disable interrupts to read rainCount safely
  noInterrupts();
  unsigned int rainCountCopy = rainCount;
  rainCount = 0;
  interrupts();
  
  // Calculate the amount of rainfall in mm
  float rainfall = rainCountCopy * 0.1; // Each tip is 0.1mm of rain
  
  // Print the rainfall amount
  Serial.print("Rainfall: ");
  Serial.print(rainfall);
  Serial.println(" mm");
  
  // Reset the rain count
  rainCount = 0;
  
  // Wait for 1 second before the next loop
  delay(1000);
}

Troubleshooting and FAQs

Common Issues

  • Inaccurate Readings: Ensure the rain gauge is level and free from obstructions.
  • No Readings: Check the wiring and ensure the interrupt pin is correctly configured.
  • Erratic Readings: Debris may be interfering with the tipping mechanism; clean the gauge.

Solutions and Tips for Troubleshooting

  • Calibration: Periodically calibrate the rain gauge by simulating rainfall and adjusting the count as necessary.
  • Maintenance: Regularly clean the rain gauge to prevent debris from affecting the readings.
  • Wiring Check: Revisit the connections to ensure they are secure and free from corrosion.

FAQs

Q: How often should I clean the rain gauge? A: Clean the rain gauge at least once a month or more frequently if located in a dusty or leafy environment.

Q: Can I use a longer cable to connect the rain gauge to the Arduino? A: Yes, but ensure that the cable is of high quality to prevent signal degradation, and consider using shielded cable for long distances.

Q: What should I do if the rain gauge is not responding? A: Check the power supply, ensure the gauge is clean, and verify that the interrupt service routine is correctly configured in your code.