
How to Use 2.0-inch TFT Display with EC11 Rotary Encoder ST7789 SPI: Examples, Pinouts, and Specs
 Design with 2.0-inch TFT Display with EC11 Rotary Encoder ST7789 SPI in Cirkit Designer
Introduction
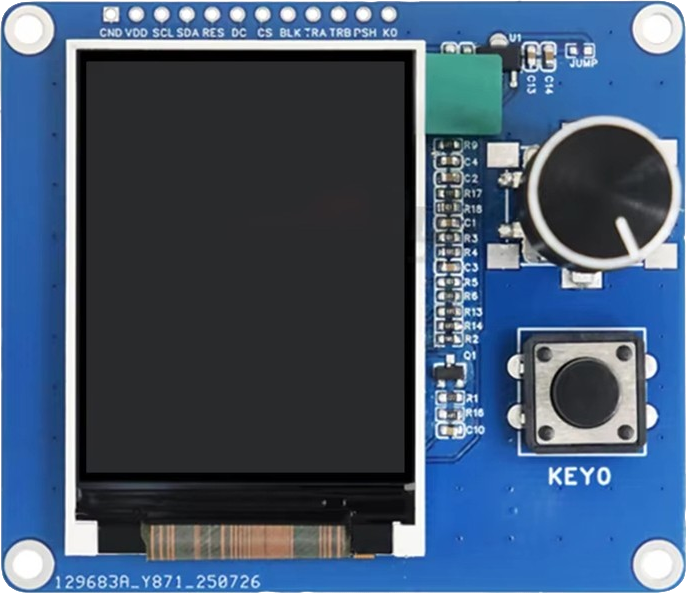
The 2.0-inch TFT Display with EC11 Rotary Encoder, manufactured by EstarDyn, is a compact and versatile display module designed for high-quality color output. It features the ST7789 driver, which ensures vibrant and sharp visuals, and an EC11 rotary encoder for intuitive user input. The module communicates via the SPI (Serial Peripheral Interface), offering fast and efficient data transfer.
This component is ideal for applications such as:
- User interfaces for embedded systems
- Control panels for industrial equipment
- DIY electronics projects
- Portable devices requiring a compact display and input mechanism
Explore Projects Built with 2.0-inch TFT Display with EC11 Rotary Encoder ST7789 SPI
 Open Project in Cirkit Designer
 Open Project in Cirkit Designer
 Open Project in Cirkit Designer
 Open Project in Cirkit Designer
Explore Projects Built with 2.0-inch TFT Display with EC11 Rotary Encoder ST7789 SPI
Open Project in Cirkit DesignerOpen Project in Cirkit DesignerOpen Project in Cirkit DesignerOpen Project in Cirkit DesignerTechnical Specifications
Key Technical Details
| Parameter | Specification |
|---|---|
| Display Size | 2.0 inches |
| Resolution | 240 x 320 pixels |
| Driver IC | ST7789 |
| Communication Interface | SPI |
| Input Voltage (VCC) | 3.3V - 5V |
| Backlight Voltage | 3.0V - 3.3V |
| Backlight Current | 20mA (typical) |
| Rotary Encoder Type | EC11 (incremental, 20 steps per rev) |
| Operating Temperature | -20°C to 70°C |
| Dimensions | 40mm x 60mm x 10mm |
Pin Configuration and Descriptions
TFT Display Pins
| Pin Name | Pin Number | Description |
|---|---|---|
| VCC | 1 | Power supply input (3.3V - 5V) |
| GND | 2 | Ground |
| SCL | 3 | SPI clock input |
| SDA | 4 | SPI data input (MOSI) |
| RES | 5 | Reset pin (active low) |
| DC | 6 | Data/Command control pin |
| BLK | 7 | Backlight control (active low) |
| CS | 8 | Chip select (active low) |
EC11 Rotary Encoder Pins
| Pin Name | Description |
|---|---|
| CLK | Clock signal output |
| DT | Data signal output |
| SW | Push-button switch output |
| VCC | Power supply input (3.3V - 5V) |
| GND | Ground |
Usage Instructions
Connecting the Component
- Power Supply: Connect the VCC pin to a 3.3V or 5V power source and the GND pin to ground.
- SPI Communication:
- Connect the SCL pin to the SPI clock pin of your microcontroller.
- Connect the SDA pin to the SPI MOSI pin.
- Use the CS pin to enable/disable the display.
- Use the DC pin to toggle between data and command modes.
- Backlight Control: Connect the BLK pin to ground to enable the backlight.
- Rotary Encoder:
- Connect the CLK and DT pins to GPIO pins on your microcontroller.
- Connect the SW pin to a GPIO pin for push-button functionality.
Example: Using with Arduino UNO
Below is an example of how to use the display and rotary encoder with an Arduino UNO.
Wiring Diagram
| TFT Display Pin | Arduino Pin | Rotary Encoder Pin | Arduino Pin |
|---|---|---|---|
| VCC | 5V | VCC | 5V |
| GND | GND | GND | GND |
| SCL | D13 | CLK | D2 |
| SDA | D11 | DT | D3 |
| RES | D9 | SW | D4 |
| DC | D8 | ||
| CS | D10 | ||
| BLK | GND |
Arduino Code
#include <Adafruit_GFX.h>       // Graphics library for displays
#include <Adafruit_ST7789.h>    // Library for ST7789 driver
#include <Encoder.h>            // Library for rotary encoder

// Define TFT pins
#define TFT_CS    10
#define TFT_DC    8
#define TFT_RST   9

// Define rotary encoder pins
#define ENCODER_CLK 2
#define ENCODER_DT  3
#define ENCODER_SW  4

// Initialize TFT display
Adafruit_ST7789 tft = Adafruit_ST7789(TFT_CS, TFT_DC, TFT_RST);

// Initialize rotary encoder
Encoder myEnc(ENCODER_CLK, ENCODER_DT);

void setup() {
  // Initialize serial communication
  Serial.begin(9600);

  // Initialize TFT display
  tft.init(240, 320);  // Initialize with 240x320 resolution
  tft.setRotation(1);  // Set display orientation
  tft.fillScreen(ST77XX_BLACK);  // Clear screen with black color
  tft.setTextColor(ST77XX_WHITE);
  tft.setTextSize(2);
  tft.setCursor(10, 10);
  tft.println("TFT Display Ready!");

  // Initialize rotary encoder switch pin
  pinMode(ENCODER_SW, INPUT_PULLUP);
}

void loop() {
  // Read rotary encoder position
  static long oldPosition  = -999;
  long newPosition = myEnc.read() / 4;  // Divide by 4 for EC11 resolution
  if (newPosition != oldPosition) {
    oldPosition = newPosition;
    Serial.print("Encoder Position: ");
    Serial.println(newPosition);

    // Display position on TFT
    tft.fillRect(10, 50, 200, 30, ST77XX_BLACK);  // Clear previous text
    tft.setCursor(10, 50);
    tft.print("Position: ");
    tft.print(newPosition);
  }

  // Check if rotary encoder button is pressed
  if (digitalRead(ENCODER_SW) == LOW) {
    tft.fillRect(10, 100, 200, 30, ST77XX_RED);  // Highlight button press
    tft.setCursor(10, 100);
    tft.print("Button Pressed!");
    delay(500);  // Debounce delay
    tft.fillRect(10, 100, 200, 30, ST77XX_BLACK);  // Clear button text
  }
}
Best Practices
- Use a level shifter if your microcontroller operates at 5V logic levels to avoid damaging the display.
- Ensure proper debounce handling for the rotary encoder to avoid erratic readings.
- Use a stable power supply to prevent flickering or instability in the display.
Troubleshooting and FAQs
Common Issues
- Display not turning on:
- Verify the power supply voltage (3.3V - 5V).
- Ensure the BLK pin is connected to ground to enable the backlight.
- No image on the display:
- Check SPI connections (SCL, SDA, CS, DC).
- Ensure the correct initialization sequence in your code.
- Rotary encoder not responding:
- Verify connections to CLK, DT, and SW pins.
- Check for proper debounce handling in the code.
FAQs
Q: Can I use this display with a 3.3V microcontroller?
A: Yes, the display is compatible with both 3.3V and 5V systems.
Q: How do I adjust the brightness of the backlight?
A: Use a PWM signal on the BLK pin to control the backlight brightness.
Q: What is the maximum SPI clock speed supported?
A: The ST7789 driver supports SPI clock speeds up to 15 MHz for optimal performance.
Q: Can I use the rotary encoder without the display?
A: Yes, the rotary encoder can function independently for other applications.