How to Use Auto Clip Terminal Block (2 ways): Examples, Pinouts, and Specs

 Design with Auto Clip Terminal Block (2 ways) in Cirkit Designer
Introduction
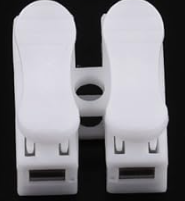
The Auto Clip Terminal Block (2 Ways), manufactured by DHARVIM (Part ID: CH-2), is a compact and reliable connector designed for quick and secure wire connections. It features a clip mechanism that allows for easy installation and removal without the need for specialized tools. This component is ideal for applications requiring frequent wiring changes or maintenance.
Explore Projects Built with Auto Clip Terminal Block (2 ways)

 Open Project in Cirkit Designer
 Open Project in Cirkit Designer
 Open Project in Cirkit Designer
 Open Project in Cirkit Designer
Explore Projects Built with Auto Clip Terminal Block (2 ways)

 Open Project in Cirkit Designer
 Open Project in Cirkit Designer
 Open Project in Cirkit Designer
 Open Project in Cirkit Designer
Common Applications and Use Cases
- Electrical wiring in industrial and residential systems
- Prototyping and testing circuits
- Connecting power supplies to devices
- LED lighting installations
- Automation systems and control panels
Technical Specifications
The following table outlines the key technical details of the DHARVIM CH-2 Auto Clip Terminal Block:
| Parameter | Specification |
|---|---|
| Manufacturer | DHARVIM |
| Part ID | CH-2 |
| Number of Ways | 2 |
| Rated Voltage | 250V AC |
| Rated Current | 10A |
| Wire Size Compatibility | 0.5mm² to 2.5mm² (20-14 AWG) |
| Material | Flame-retardant polycarbonate (PC) |
| Contact Material | Copper alloy with tin plating |
| Operating Temperature | -40°C to 105°C |
| Dimensions (LxWxH) | 20mm x 15mm x 13mm |
| Mounting Type | Free-standing or panel mount |
Pin Configuration and Descriptions
The CH-2 terminal block does not have traditional pins but instead features two wire slots for connection. The table below describes the slots:
| Slot | Description |
|---|---|
| Slot 1 | Input wire connection (positive or negative) |
| Slot 2 | Output wire connection (positive or negative) |
Note: The polarity of the slots is not fixed, allowing for flexible wiring configurations.
Usage Instructions
How to Use the Component in a Circuit
Prepare the Wires:
- Strip approximately 8-10mm of insulation from the ends of the wires you wish to connect.
- Ensure the exposed wire is clean and free of frayed strands.
Insert the Wires:
- Open the clip mechanism by pressing down on the lever.
- Insert the stripped end of the wire into the corresponding slot.
- Release the lever to secure the wire in place.
Verify the Connection:
- Gently tug on the wire to ensure it is firmly held by the clip.
- Repeat the process for the second wire.
Connect to the Circuit:
- Place the terminal block in the desired location within your circuit.
- Ensure proper insulation and spacing to avoid short circuits.
Important Considerations and Best Practices
- Wire Compatibility: Use wires within the specified size range (0.5mm² to 2.5mm²).
- Current and Voltage Ratings: Do not exceed the rated current (10A) or voltage (250V AC).
- Secure Mounting: If used in a high-vibration environment, consider securing the terminal block to a panel or enclosure.
- Avoid Overheating: Ensure proper ventilation and avoid overloading the terminal block.
Example: Connecting to an Arduino UNO
The CH-2 terminal block can be used to connect external components, such as an LED strip, to an Arduino UNO. Below is an example of wiring an LED strip to the Arduino using the terminal block:
Circuit Diagram
- Connect the positive wire of the LED strip to one slot of the CH-2 terminal block.
- Connect the negative wire of the LED strip to the other slot.
- Use jumper wires to connect the terminal block to the Arduino's 5V and GND pins.
Arduino Code
// Example code to control an LED strip connected via the CH-2 terminal block
const int ledPin = 9; // Pin connected to the LED strip

void setup() {
  pinMode(ledPin, OUTPUT); // Set the LED pin as an output
}

void loop() {
  digitalWrite(ledPin, HIGH); // Turn the LED strip on
  delay(1000); // Wait for 1 second
  digitalWrite(ledPin, LOW); // Turn the LED strip off
  delay(1000); // Wait for 1 second
}
Note: Ensure the LED strip's power requirements are within the Arduino's output capabilities.
Troubleshooting and FAQs
Common Issues Users Might Face
Loose Connections:
- Cause: Wire not fully inserted or clip not properly engaged.
- Solution: Reinsert the wire and ensure the clip is securely closed.
Overheating:
- Cause: Exceeding the rated current or poor ventilation.
- Solution: Reduce the load or improve airflow around the terminal block.
Wire Slippage:
- Cause: Using wires outside the specified size range.
- Solution: Use wires within the 0.5mm² to 2.5mm² range.
Intermittent Connections:
- Cause: Oxidation or dirt on the wire or contact surface.
- Solution: Clean the wire ends and ensure proper contact.
FAQs
Q: Can the CH-2 terminal block be reused?
A: Yes, the clip mechanism allows for repeated use without significant wear.
Q: Is the terminal block suitable for outdoor use?
A: The CH-2 is not waterproof. For outdoor applications, use it within a weatherproof enclosure.
Q: Can I connect wires of different sizes?
A: Yes, as long as both wires are within the specified size range (0.5mm² to 2.5mm²).
Q: Does the terminal block support DC connections?
A: Yes, the CH-2 can be used for both AC and DC connections within the rated voltage and current limits.