Cirkit Designer
Your all-in-one circuit design IDE
Home /
Component Documentation
How to Use SHT41 Temperature Humidity Sensor: Examples, Pinouts, and Specs
Introduction
The SHT41 is a high-precision sensor manufactured by SIMPLE ROBOT. It is designed to measure both temperature and humidity with high accuracy and reliability. This sensor is widely used in applications such as HVAC systems, weather stations, and industrial monitoring due to its robust performance and ease of integration.
Explore Projects Built with SHT41 Temperature Humidity Sensor
Arduino UNO with HTU21D-F Sensor for Temperature and Humidity Monitoring
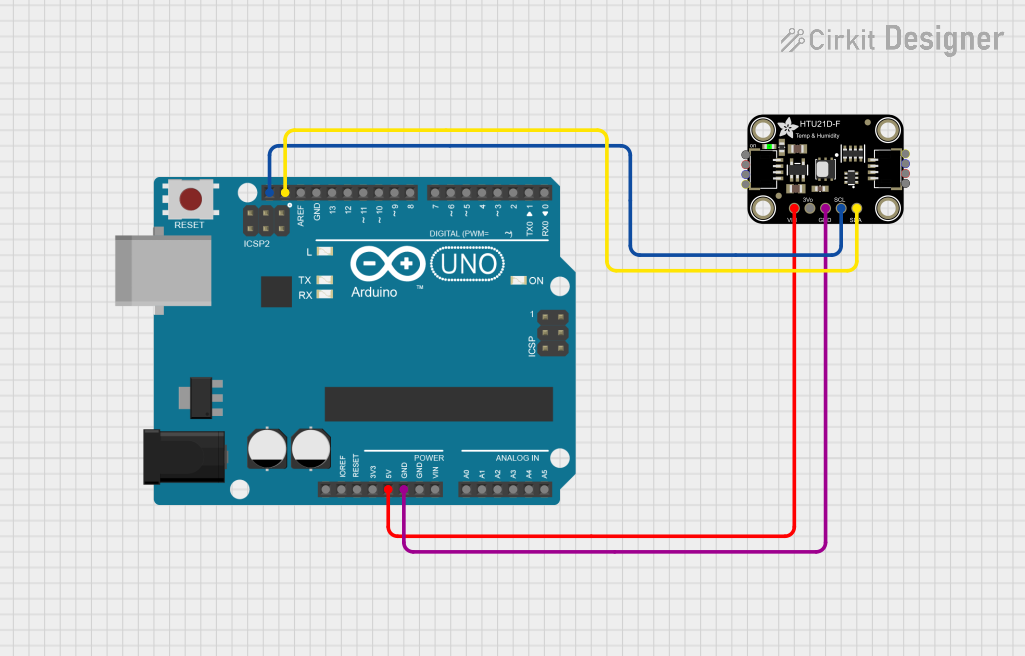
This circuit connects an Arduino UNO microcontroller to an Adafruit HTU21D-F Temperature & Humidity Sensor. The Arduino is programmed to read temperature and humidity data from the sensor and output the readings to the Serial Monitor at half-second intervals. The sensor is powered by the Arduino's 5V output and communicates with the microcontroller via the I2C protocol using the SCL and SDA lines.
Arduino UNO with DHT11 Temperature and Humidity Sensor Monitoring
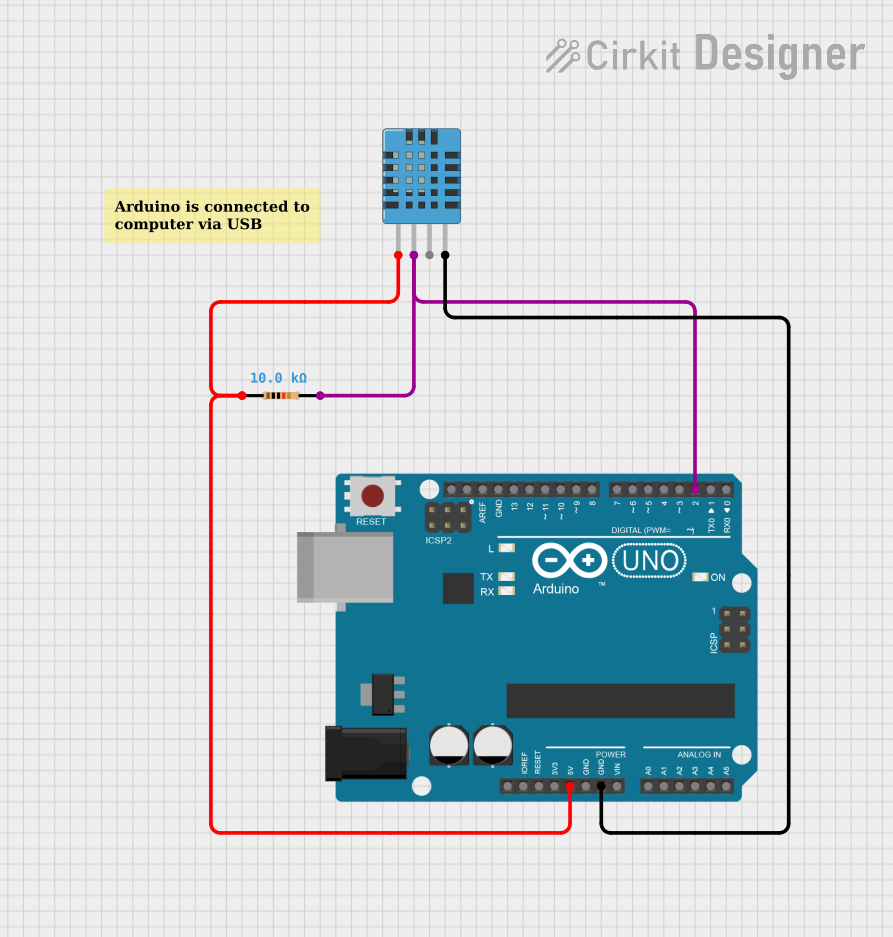
This circuit is designed to measure temperature and humidity using a DHT11 sensor interfaced with an Arduino UNO microcontroller. The Arduino is programmed to read the sensor data and output the temperature and humidity readings to the serial monitor. A pull-up resistor is connected to the data line of the DHT11 sensor to ensure reliable communication with the Arduino.
Arduino UNO Based Temperature and Humidity Monitoring System

This circuit is designed to measure ambient temperature and humidity using a DHT11 sensor, which is connected to an Arduino UNO microcontroller. The Arduino reads the sensor data and outputs the temperature and humidity readings to the serial monitor. A 10k Ohm pull-up resistor is used on the data line of the DHT11 sensor.
Arduino UNO with DHT11 Temperature and Humidity Sensor

This circuit connects a DHT11 Humidity and Temperature Sensor to an Arduino UNO for the purpose of measuring environmental conditions. The Arduino is programmed to read temperature and humidity data from the DHT11 sensor and output the readings to the serial monitor. A pull-up resistor is included in the data line to ensure reliable communication between the sensor and the microcontroller.
Explore Projects Built with SHT41 Temperature Humidity Sensor
Arduino UNO with HTU21D-F Sensor for Temperature and Humidity Monitoring
This circuit connects an Arduino UNO microcontroller to an Adafruit HTU21D-F Temperature & Humidity Sensor. The Arduino is programmed to read temperature and humidity data from the sensor and output the readings to the Serial Monitor at half-second intervals. The sensor is powered by the Arduino's 5V output and communicates with the microcontroller via the I2C protocol using the SCL and SDA lines.
Arduino UNO with DHT11 Temperature and Humidity Sensor Monitoring
This circuit is designed to measure temperature and humidity using a DHT11 sensor interfaced with an Arduino UNO microcontroller. The Arduino is programmed to read the sensor data and output the temperature and humidity readings to the serial monitor. A pull-up resistor is connected to the data line of the DHT11 sensor to ensure reliable communication with the Arduino.
Arduino UNO Based Temperature and Humidity Monitoring System
This circuit is designed to measure ambient temperature and humidity using a DHT11 sensor, which is connected to an Arduino UNO microcontroller. The Arduino reads the sensor data and outputs the temperature and humidity readings to the serial monitor. A 10k Ohm pull-up resistor is used on the data line of the DHT11 sensor.
Arduino UNO with DHT11 Temperature and Humidity Sensor
This circuit connects a DHT11 Humidity and Temperature Sensor to an Arduino UNO for the purpose of measuring environmental conditions. The Arduino is programmed to read temperature and humidity data from the DHT11 sensor and output the readings to the serial monitor. A pull-up resistor is included in the data line to ensure reliable communication between the sensor and the microcontroller.
Technical Specifications
Key Technical Details
| Parameter | Value |
|---|---|
| Supply Voltage | 2.4V to 5.5V |
| Average Current | 0.4 µA (at 1 measurement/s) |
| Temperature Range | -40°C to 125°C |
| Temperature Accuracy | ±0.2°C |
| Humidity Range | 0% to 100% RH |
| Humidity Accuracy | ±1.5% RH |
| Communication | I2C |
| I2C Address | 0x44 |
Pin Configuration and Descriptions
| Pin No. | Pin Name | Description |
|---|---|---|
| 1 | VDD | Power Supply (2.4V to 5.5V) |
| 2 | GND | Ground |
| 3 | SDA | I2C Data Line |
| 4 | SCL | I2C Clock Line |
| 5 | NC | Not Connected |
| 6 | NC | Not Connected |
Usage Instructions
How to Use the Component in a Circuit
- Power Supply: Connect the VDD pin to a power supply ranging from 2.4V to 5.5V and the GND pin to the ground.
- I2C Communication: Connect the SDA (data) and SCL (clock) pins to the corresponding I2C pins on your microcontroller (e.g., Arduino UNO).
- Pull-up Resistors: Ensure that pull-up resistors (typically 4.7kΩ) are connected to the SDA and SCL lines if they are not already present on your microcontroller board.
Important Considerations and Best Practices
- Power Supply Stability: Ensure a stable power supply to avoid measurement inaccuracies.
- I2C Bus Speed: The SHT41 supports standard (100 kHz) and fast (400 kHz) I2C communication speeds.
- Sensor Placement: Place the sensor in a location where it can accurately measure the ambient temperature and humidity without obstruction or interference.
Sample Arduino Code
Below is a sample code to interface the SHT41 sensor with an Arduino UNO:
#include <Wire.h>
#include "SHT41.h" // Include the SHT41 library

SHT41 sht41;

void setup() {
  Serial.begin(9600);
  Wire.begin();

  if (!sht41.begin()) {
    Serial.println("Failed to initialize SHT41 sensor!");
    while (1);
  }
  Serial.println("SHT41 sensor initialized successfully.");
}

void loop() {
  float temperature = sht41.readTemperature();
  float humidity = sht41.readHumidity();

  Serial.print("Temperature: ");
  Serial.print(temperature);
  Serial.println(" °C");

  Serial.print("Humidity: ");
  Serial.print(humidity);
  Serial.println(" %RH");

  delay(2000); // Wait for 2 seconds before the next reading
}
Troubleshooting and FAQs
Common Issues Users Might Face
- Sensor Not Responding: Ensure that the power supply is stable and the I2C connections are correct.
- Inaccurate Readings: Check for proper sensor placement and ensure there are no sources of heat or moisture nearby that could affect the readings.
- I2C Communication Errors: Verify that the correct I2C address (0x44) is being used and that pull-up resistors are present on the SDA and SCL lines.
Solutions and Tips for Troubleshooting
- Double-check Connections: Ensure all connections are secure and correctly oriented.
- Use a Multimeter: Verify the voltage levels on the VDD and GND pins.
- Check for Interference: Ensure that there are no strong electromagnetic sources near the sensor that could interfere with I2C communication.
- Update Libraries: Ensure that you are using the latest version of the SHT41 library and the Arduino IDE.
By following this documentation, users should be able to effectively integrate and utilize the SHT41 Temperature Humidity Sensor in their projects.