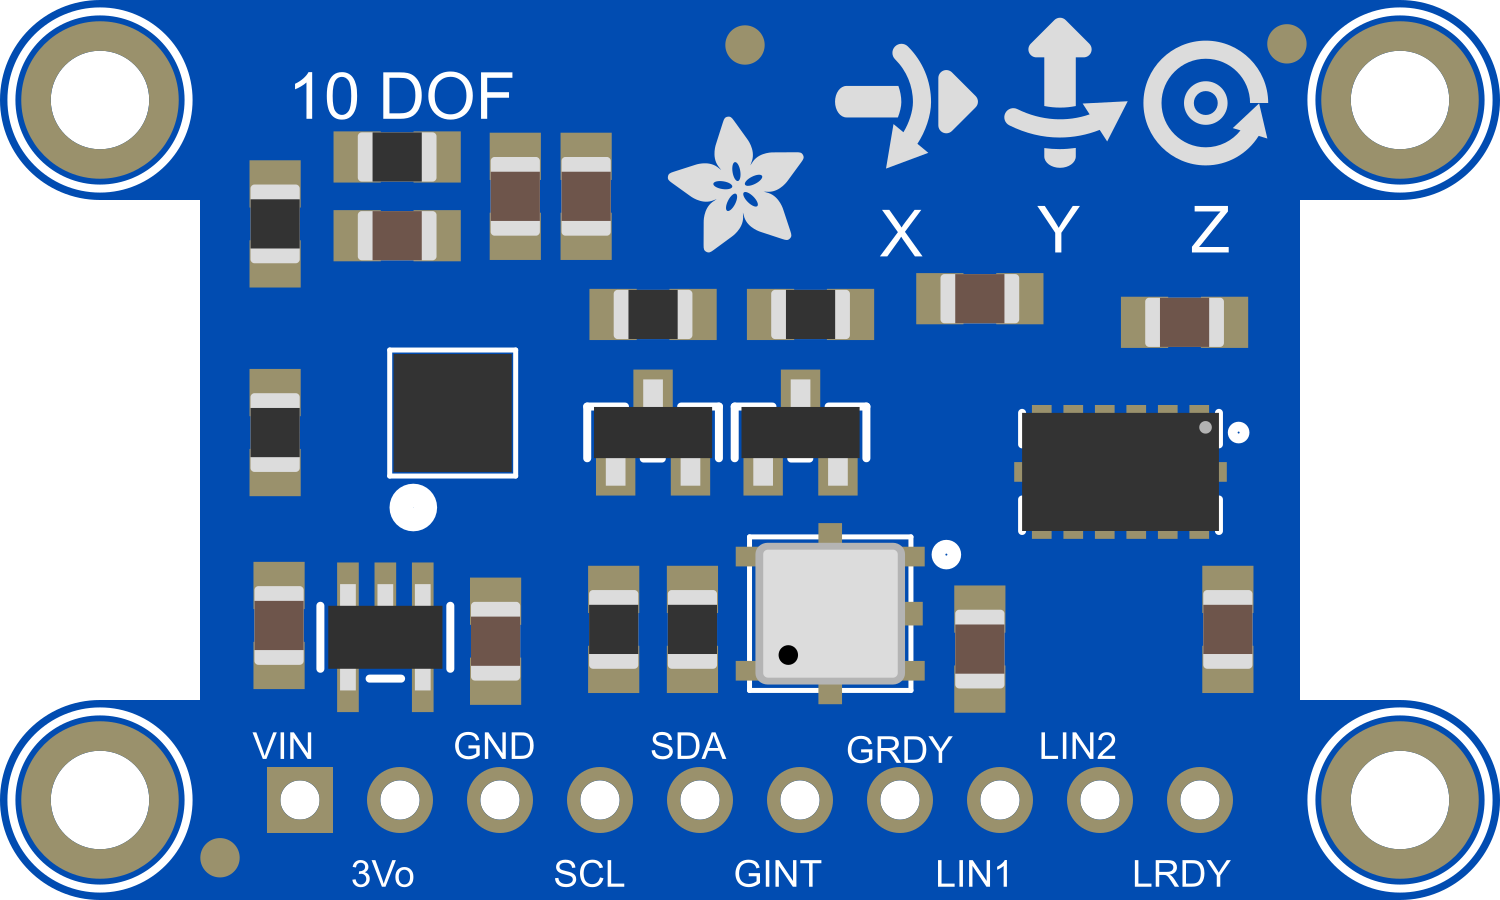
How to Use Adafruit 10-DOF IMU L3GD20H + LSM303 + BMP180: Examples, Pinouts, and Specs
Introduction
The Adafruit 10-DOF IMU is a compact and versatile sensor module that integrates four key sensors: a gyroscope (L3GD20H), an accelerometer and magnetometer combo (LSM303), and a barometric pressure sensor (BMP180). This Inertial Measurement Unit (IMU) is designed to provide precise motion and environmental data, making it ideal for a wide range of applications including robotics, drones, navigation systems, and motion tracking.
Explore Projects Built with Adafruit 10-DOF IMU L3GD20H + LSM303 + BMP180

Explore Projects Built with Adafruit 10-DOF IMU L3GD20H + LSM303 + BMP180
Technical Specifications
Key Technical Details
- Voltage Supply: 3.3V to 5V (logic level is 3.3V)
- Communication Interface: I2C (up to 400 kHz)
- Operating Temperature Range: -40°C to +85°C
Pin Configuration and Descriptions
| Pin Number | Name | Description |
|---|---|---|
| 1 | VIN | Supply voltage (3.3V to 5V) |
| 2 | 3Vo | 3.3V output from the voltage regulator |
| 3 | GND | Ground |
| 4 | SCL | I2C clock |
| 5 | SDA | I2C data |
| 6 | SDO/SA0 | SPI Serial Data Output (also I2C address selection for LSM303) |
| 7 | CS | SPI Chip Select (active low) |
Usage Instructions
Integration into a Circuit
To use the Adafruit 10-DOF IMU in a circuit:
- Connect VIN to a 3.3V to 5V power supply.
- Connect GND to the ground of your power supply.
- Connect SCL and SDA to the I2C clock and data lines of your microcontroller, respectively.
- If using SPI, connect SDO/SA0, CS, and additional SPI pins as required by your microcontroller.
Important Considerations and Best Practices
- Ensure that the power supply is within the specified voltage range.
- Use pull-up resistors on the I2C lines if they are not already present on your microcontroller board.
- When using with a 5V microcontroller like an Arduino UNO, ensure that the I2C lines are level-shifted to 3.3V to avoid damaging the sensors.
- For optimal performance, calibrate the magnetometer and accelerometer according to the manufacturer's instructions.
Example Code for Arduino UNO
#include <Wire.h>
#include <Adafruit_Sensor.h>
#include <Adafruit_L3GD20_U.h>
#include <Adafruit_LSM303_U.h>
#include <Adafruit_BMP085_U.h>

// Create sensor instances.
Adafruit_L3GD20_Unified gyro = Adafruit_L3GD20_Unified(20);
Adafruit_LSM303_Accel_Unified accel = Adafruit_LSM303_Accel_Unified(30301);
Adafruit_LSM303_Mag_Unified mag = Adafruit_LSM303_Mag_Unified(30302);
Adafruit_BMP085_Unified bmp = Adafruit_BMP085_Unified(18001);

void setup() {
  Serial.begin(9600);
  // Initialize the sensors.
  if(!gyro.begin() || !accel.begin() || !mag.begin() || !bmp.begin()) {
    Serial.println("Ooops, no sensor detected ... Check your wiring!");
    while(1);
  }
}

void loop() {
  // Read and print the sensor values.
  sensors_event_t event;
  gyro.getEvent(&event);
  Serial.print("Gyro X: "); Serial.print(event.gyro.x); Serial.print(" ");
  Serial.print("Y: "); Serial.print(event.gyro.y); Serial.print(" ");
  Serial.print("Z: "); Serial.println(event.gyro.z);

  accel.getEvent(&event);
  Serial.print("Accel X: "); Serial.print(event.acceleration.x); Serial.print(" ");
  Serial.print("Y: "); Serial.print(event.acceleration.y); Serial.print(" ");
  Serial.print("Z: "); Serial.println(event.acceleration.z);

  mag.getEvent(&event);
  Serial.print("Mag X: "); Serial.print(event.magnetic.x); Serial.print(" ");
  Serial.print("Y: "); Serial.print(event.magnetic.y); Serial.print(" ");
  Serial.print("Z: "); Serial.println(event.magnetic.z);

  bmp.getEvent(&event);
  if (event.pressure) {
    float temperature;
    bmp.getTemperature(&temperature);
    Serial.print("Pressure: "); Serial.print(event.pressure); Serial.print(" hPa ");
    Serial.print("Temp: "); Serial.println(temperature);
  }

  delay(500);
}
Troubleshooting and FAQs
Common Issues
- Sensor not detected: Ensure that the wiring is correct and that the power supply is within the specified range. Check for proper soldering on the pins.
- Inaccurate readings: Calibrate the sensors as per the datasheet instructions. Ensure that the sensor is not being affected by magnetic fields or physical shocks.
- I2C communication errors: Verify that the pull-up resistors are in place and that there is no bus contention.
Solutions and Tips for Troubleshooting
- Always start by checking the connections and ensuring that the power supply is stable and within the required voltage range.
- Use the I2C scanner sketch to check if the Arduino is detecting the IMU.
- If using long wires, consider using shielded cables to reduce noise.
- When facing issues with the sensor data, consult the datasheet for advanced calibration techniques.
FAQs
Q: Can I use this sensor with a 5V microcontroller? A: Yes, but ensure that the I2C lines are level-shifted to 3.3V.
Q: How do I change the I2C address of the LSM303? A: The I2C address can be changed by connecting the SDO/SA0 pin to either ground or VCC.
Q: What is the default I2C address for each sensor? A: The default I2C addresses are:
- L3GD20H: 0x6B
- LSM303: 0x1E (magnetometer), 0x19 (accelerometer)
- BMP180: 0x77
Q: Can I use this sensor outdoors? A: The sensor can operate in a wide range of temperatures, but it should be protected from the elements, such as water and dust.