Cirkit Designer Logo
Cirkit Designer
Your all-in-one circuit design IDE
Home / 
Component Documentation

How to Use TOF050C: Examples, Pinouts, and Specs

Image of TOF050C
Cirkit Designer LogoDesign with TOF050C in Cirkit Designer

Introduction

The TOF050C is a time-of-flight (TOF) sensor designed for precise distance measurement and object detection. It operates by emitting a light pulse and calculating the time it takes for the light to reflect back from an object. This enables highly accurate distance readings, even in dynamic environments. The TOF050C is widely used in applications such as robotics, automation, drones, industrial equipment, and smart home devices.

Explore Projects Built with TOF050C

Use Cirkit Designer to design, explore, and prototype these projects online. Some projects support real-time simulation. Click "Open Project" to start designing instantly!
Battery-Powered Health Monitoring System with Nucleo WB55RG and OLED Display
Image of Pulsefex: A project utilizing TOF050C in a practical application
This circuit is a multi-sensor data acquisition system that uses a Nucleo WB55RG microcontroller to interface with a digital temperature sensor (TMP102), a pulse oximeter and heart-rate sensor (MAX30102), and a 0.96" OLED display via I2C. Additionally, it includes a Sim800l module for GSM communication, powered by a 3.7V LiPo battery.
Cirkit Designer LogoOpen Project in Cirkit Designer
ESP32-Powered Wi-Fi Controlled Robotic Car with OLED Display and Ultrasonic Sensor
Image of playbot: A project utilizing TOF050C in a practical application
This circuit is a battery-powered system featuring an ESP32 microcontroller that controls an OLED display, a motor driver for two hobby motors, an ultrasonic sensor for distance measurement, and a DFPlayer Mini for audio output through a loudspeaker. The TP4056 module manages battery charging, and a step-up boost converter provides a stable 5V supply to the components.
Cirkit Designer LogoOpen Project in Cirkit Designer
Arduino Mega 2560 Based Security System with Fingerprint Authentication and SMS Alerts
Image of Door security system: A project utilizing TOF050C in a practical application
This circuit features an Arduino Mega 2560 microcontroller interfaced with a SIM800L GSM module, two fingerprint scanners, an I2C LCD display, an IR sensor, and a piezo buzzer. Power management is handled by a PowerBoost 1000 Basic Pad USB, a TP4056 charging module, and a Li-ion 18650 battery, with an option to use a Mini AC-DC 110V-230V to 5V 700mA module for direct power supply. The primary functionality appears to be a security system with GSM communication capabilities, biometric access control, and visual/audible feedback.
Cirkit Designer LogoOpen Project in Cirkit Designer
Arduino UNO-Based Eye Pressure Monitor with OLED Display and TOF Sensor
Image of test1: A project utilizing TOF050C in a practical application
This circuit is designed to measure eye pressure and display the status on a 0.96" OLED screen, using an Arduino UNO as the central processing unit. It includes a TOF10120 sensor for distance measurement and a TCRT 5000 IR sensor for detecting surface changes, both interfacing with the Arduino. A 9V battery powers the system, with a rocker switch to control power flow, and the Arduino manages sensor data processing and OLED display output to indicate eye pressure as high, normal, or low.
Cirkit Designer LogoOpen Project in Cirkit Designer

Explore Projects Built with TOF050C

Use Cirkit Designer to design, explore, and prototype these projects online. Some projects support real-time simulation. Click "Open Project" to start designing instantly!
Image of Pulsefex: A project utilizing TOF050C in a practical application
Battery-Powered Health Monitoring System with Nucleo WB55RG and OLED Display
This circuit is a multi-sensor data acquisition system that uses a Nucleo WB55RG microcontroller to interface with a digital temperature sensor (TMP102), a pulse oximeter and heart-rate sensor (MAX30102), and a 0.96" OLED display via I2C. Additionally, it includes a Sim800l module for GSM communication, powered by a 3.7V LiPo battery.
Cirkit Designer LogoOpen Project in Cirkit Designer
Image of playbot: A project utilizing TOF050C in a practical application
ESP32-Powered Wi-Fi Controlled Robotic Car with OLED Display and Ultrasonic Sensor
This circuit is a battery-powered system featuring an ESP32 microcontroller that controls an OLED display, a motor driver for two hobby motors, an ultrasonic sensor for distance measurement, and a DFPlayer Mini for audio output through a loudspeaker. The TP4056 module manages battery charging, and a step-up boost converter provides a stable 5V supply to the components.
Cirkit Designer LogoOpen Project in Cirkit Designer
Image of Door security system: A project utilizing TOF050C in a practical application
Arduino Mega 2560 Based Security System with Fingerprint Authentication and SMS Alerts
This circuit features an Arduino Mega 2560 microcontroller interfaced with a SIM800L GSM module, two fingerprint scanners, an I2C LCD display, an IR sensor, and a piezo buzzer. Power management is handled by a PowerBoost 1000 Basic Pad USB, a TP4056 charging module, and a Li-ion 18650 battery, with an option to use a Mini AC-DC 110V-230V to 5V 700mA module for direct power supply. The primary functionality appears to be a security system with GSM communication capabilities, biometric access control, and visual/audible feedback.
Cirkit Designer LogoOpen Project in Cirkit Designer
Image of test1: A project utilizing TOF050C in a practical application
Arduino UNO-Based Eye Pressure Monitor with OLED Display and TOF Sensor
This circuit is designed to measure eye pressure and display the status on a 0.96" OLED screen, using an Arduino UNO as the central processing unit. It includes a TOF10120 sensor for distance measurement and a TCRT 5000 IR sensor for detecting surface changes, both interfacing with the Arduino. A 9V battery powers the system, with a rocker switch to control power flow, and the Arduino manages sensor data processing and OLED display output to indicate eye pressure as high, normal, or low.
Cirkit Designer LogoOpen Project in Cirkit Designer

Common Applications:

  • Obstacle detection in robotics
  • Distance measurement in drones
  • Presence detection in smart home systems
  • Industrial automation and safety systems
  • Gesture recognition in consumer electronics

Technical Specifications

The TOF050C is a compact and efficient sensor with the following key specifications:

Parameter Value
Operating Voltage 2.8V to 5.5V
Operating Current 20 mA (typical)
Measurement Range 5 mm to 2 m
Accuracy ±3% (typical)
Light Source 940 nm Infrared (IR) Laser
Field of View (FoV) 27°
Communication Interface I2C
I2C Address (Default) 0x29
Operating Temperature -20°C to 70°C
Dimensions 4.4 mm x 2.4 mm x 1.0 mm

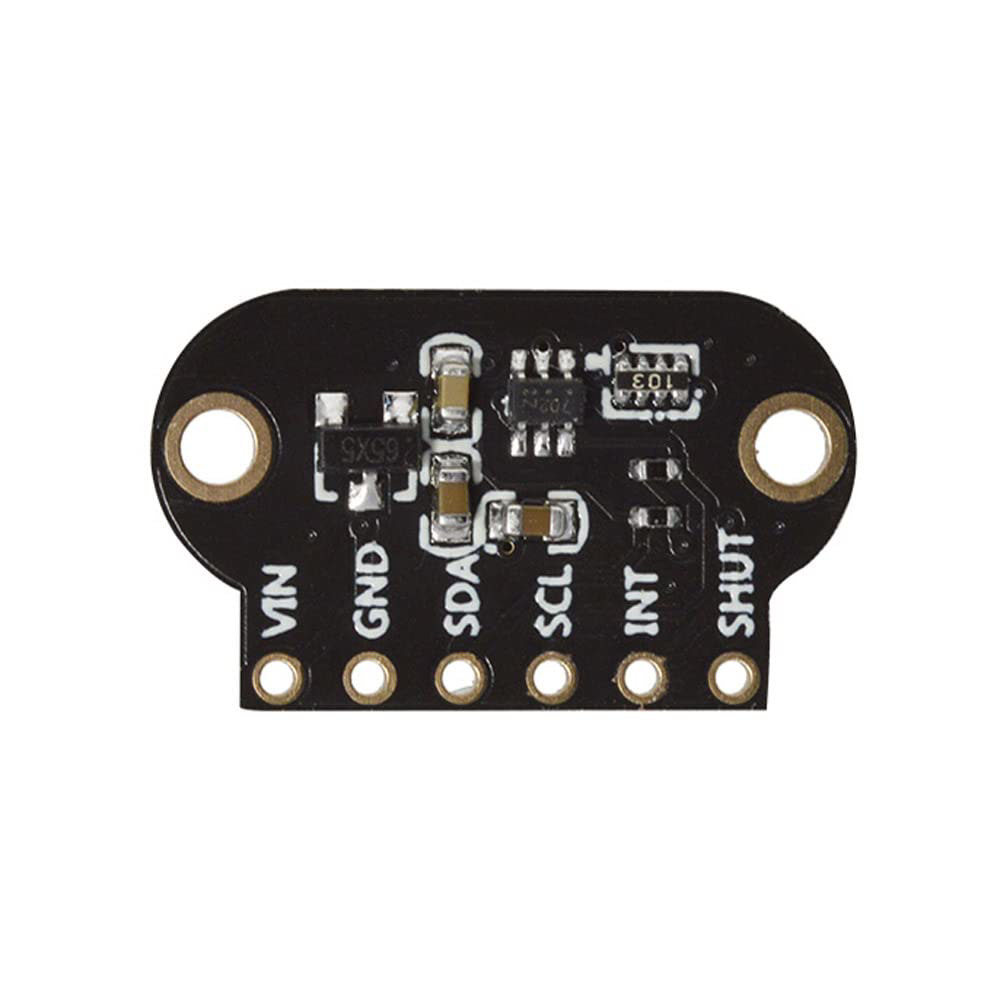
Pin Configuration and Descriptions

The TOF050C has a 6-pin configuration as detailed below:

Pin Name Description
1 VCC Power supply input (2.8V to 5.5V)
2 GND Ground connection
3 SDA I2C data line
4 SCL I2C clock line
5 GPIO1 General-purpose I/O pin (interrupt or configuration)
6 XSHUT Shutdown pin (active low, used to enable/disable)

Usage Instructions

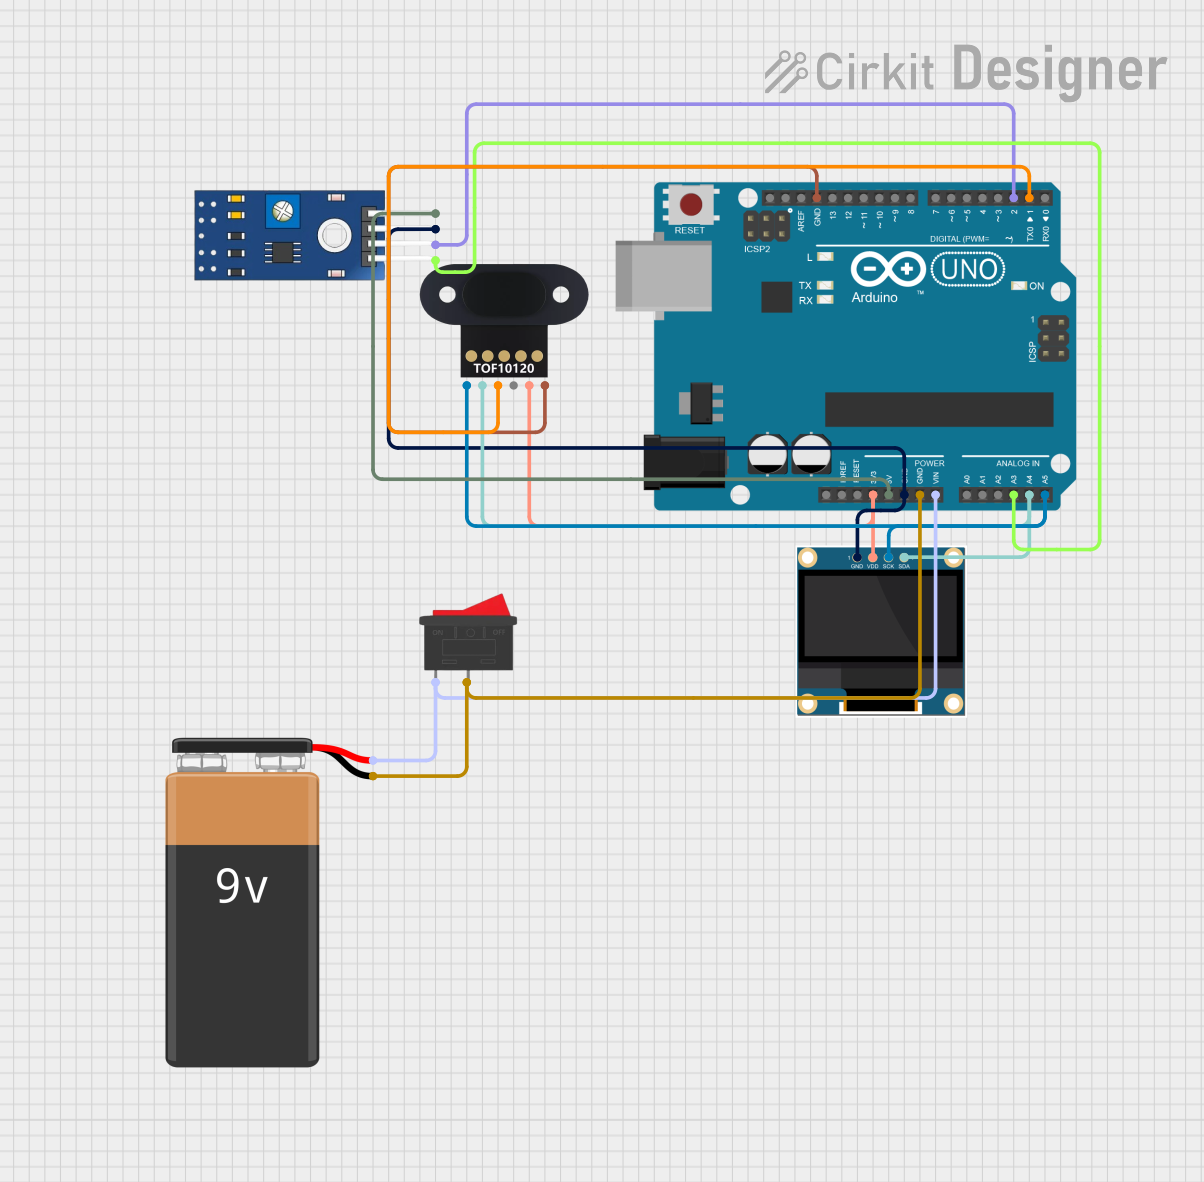
Using the TOF050C in a Circuit

  1. Power Supply: Connect the VCC pin to a 3.3V or 5V power source and the GND pin to ground.
  2. I2C Communication: Connect the SDA and SCL pins to the corresponding I2C pins on your microcontroller (e.g., Arduino).
  3. Shutdown Control: Use the XSHUT pin to enable or disable the sensor. Pull it high to enable the sensor and low to shut it down.
  4. Interrupts: The GPIO1 pin can be configured as an interrupt pin for event detection.

Important Considerations:

  • Use appropriate pull-up resistors (typically 4.7 kΩ) on the SDA and SCL lines for I2C communication.
  • Avoid exposing the sensor to direct sunlight or reflective surfaces, as this may affect accuracy.
  • Ensure the sensor is mounted securely to prevent vibrations or misalignment.

Example Code for Arduino UNO

Below is an example of how to interface the TOF050C with an Arduino UNO using the Wire library:

#include <Wire.h>

#define TOF050C_I2C_ADDRESS 0x29 // Default I2C address of the TOF050C

void setup() {
  Wire.begin(); // Initialize I2C communication
  Serial.begin(9600); // Initialize serial communication for debugging

  // Initialize the TOF050C sensor
  if (!initializeTOF050C()) {
    Serial.println("Failed to initialize TOF050C sensor!");
    while (1); // Halt execution if initialization fails
  }
  Serial.println("TOF050C sensor initialized successfully.");
}

void loop() {
  int distance = readDistance();
  if (distance >= 0) {
    Serial.print("Distance: ");
    Serial.print(distance);
    Serial.println(" mm");
  } else {
    Serial.println("Error reading distance.");
  }
  delay(500); // Wait 500ms before the next reading
}

bool initializeTOF050C() {
  Wire.beginTransmission(TOF050C_I2C_ADDRESS);
  // Example: Write initialization commands to the sensor
  // Replace with actual initialization sequence from the datasheet
  if (Wire.endTransmission() != 0) {
    return false; // Return false if communication fails
  }
  return true;
}

int readDistance() {
  Wire.beginTransmission(TOF050C_I2C_ADDRESS);
  // Example: Request distance measurement
  // Replace with actual commands from the datasheet
  Wire.write(0x00); // Hypothetical register for distance measurement
  if (Wire.endTransmission() != 0) {
    return -1; // Return -1 if communication fails
  }

  Wire.requestFrom(TOF050C_I2C_ADDRESS, 2); // Request 2 bytes of data
  if (Wire.available() == 2) {
    int highByte = Wire.read();
    int lowByte = Wire.read();
    return (highByte << 8) | lowByte; // Combine high and low bytes
  }
  return -1; // Return -1 if data is unavailable
}

Notes:

  • Refer to the TOF050C datasheet for the exact initialization and measurement commands.
  • Modify the I2C address if the default address (0x29) is changed.

Troubleshooting and FAQs

Common Issues:

  1. Sensor Not Responding:

    • Ensure the VCC and GND connections are secure.
    • Verify that the XSHUT pin is pulled high to enable the sensor.
    • Check the I2C address and ensure it matches the one used in the code.
  2. Inaccurate Distance Measurements:

    • Avoid reflective or transparent surfaces in the sensor's field of view.
    • Ensure the sensor is not exposed to excessive ambient light.
  3. I2C Communication Errors:

    • Check the pull-up resistors on the SDA and SCL lines.
    • Verify the I2C connections and ensure there are no loose wires.

FAQs:

Q: Can the TOF050C measure distances beyond 2 meters?
A: No, the TOF050C is designed for a maximum range of 2 meters. For longer ranges, consider using a different TOF sensor.

Q: How do I change the I2C address of the TOF050C?
A: The I2C address can typically be changed via specific configuration commands. Refer to the datasheet for details.

Q: Can the TOF050C detect transparent objects?
A: The sensor may struggle with transparent objects due to low reflectivity. Use additional sensors for such applications.

Q: Is the TOF050C suitable for outdoor use?
A: While the TOF050C can operate in a wide temperature range, direct sunlight may affect its performance. Use protective enclosures or filters for outdoor applications.