Cirkit Designer Logo
Cirkit Designer
Your all-in-one circuit design IDE
Home / 
Component Documentation

How to Use Speaker: Examples, Pinouts, and Specs

Image of Speaker
Cirkit Designer LogoDesign with Speaker in Cirkit Designer

Introduction

The 1.5W 8Ω Speaker is a versatile audio component designed to convert electrical signals into sound waves. This speaker is commonly used in various audio systems, including radios, televisions, computers, and DIY electronics projects. Its compact size and efficient performance make it an ideal choice for both hobbyists and professionals.

Explore Projects Built with Speaker

Use Cirkit Designer to design, explore, and prototype these projects online. Some projects support real-time simulation. Click "Open Project" to start designing instantly!
ESP32-Based Voice Assistant with Battery-Powered Microphone and Speaker
Image of Minor: A project utilizing Speaker in a practical application
This circuit is a voice-controlled system that uses an ESP32 microcontroller to process audio input from a microphone, send the data to a Gemini API for speech-to-text conversion, and output responses through a speaker. It includes an IR sensor for additional input, an LED for status indication, and a battery with a charging module for power management.
Cirkit Designer LogoOpen Project in Cirkit Designer
ESP32-Based Voice-Controlled Speaker
Image of Main Design: A project utilizing Speaker in a practical application
This circuit is a digital voice playback and recording system powered by a 3.7V battery. It features an ESP32 microcontroller for processing, an Adafruit MAX98357A amplifier to drive a loudspeaker for audio output, and an Adafruit MAX9814 microphone amplifier for audio input. A pushbutton provides user interaction, and a 3.3V regulator ensures stable power supply to the components.
Cirkit Designer LogoOpen Project in Cirkit Designer
Arduino UNO Bluetooth-Controlled Speaker
Image of Bluetooth Speaker: A project utilizing Speaker in a practical application
This circuit is designed to function as a Bluetooth-controlled speaker system using an Arduino UNO as the central controller. The Arduino is connected to a Bluetooth Mate Gold module for wireless communication and a speaker for audio output. The Arduino's digital pins D0 and D1 are used for RX and TX communication with the Bluetooth module, while pin D9 is configured to drive the speaker.
Cirkit Designer LogoOpen Project in Cirkit Designer
Arduino UNO Voice Assistant with KY-037 Microphone and Speaker
Image of VOICE PY 2: A project utilizing Speaker in a practical application
This circuit is a voice assistant project that uses an Arduino UNO to interface with a KY-037 microphone and a speaker. The microphone detects voice commands, which are processed by the Arduino, and the speaker provides audio feedback based on the detected commands.
Cirkit Designer LogoOpen Project in Cirkit Designer

Explore Projects Built with Speaker

Use Cirkit Designer to design, explore, and prototype these projects online. Some projects support real-time simulation. Click "Open Project" to start designing instantly!
Image of Minor: A project utilizing Speaker in a practical application
ESP32-Based Voice Assistant with Battery-Powered Microphone and Speaker
This circuit is a voice-controlled system that uses an ESP32 microcontroller to process audio input from a microphone, send the data to a Gemini API for speech-to-text conversion, and output responses through a speaker. It includes an IR sensor for additional input, an LED for status indication, and a battery with a charging module for power management.
Cirkit Designer LogoOpen Project in Cirkit Designer
Image of Main Design: A project utilizing Speaker in a practical application
ESP32-Based Voice-Controlled Speaker
This circuit is a digital voice playback and recording system powered by a 3.7V battery. It features an ESP32 microcontroller for processing, an Adafruit MAX98357A amplifier to drive a loudspeaker for audio output, and an Adafruit MAX9814 microphone amplifier for audio input. A pushbutton provides user interaction, and a 3.3V regulator ensures stable power supply to the components.
Cirkit Designer LogoOpen Project in Cirkit Designer
Image of Bluetooth Speaker: A project utilizing Speaker in a practical application
Arduino UNO Bluetooth-Controlled Speaker
This circuit is designed to function as a Bluetooth-controlled speaker system using an Arduino UNO as the central controller. The Arduino is connected to a Bluetooth Mate Gold module for wireless communication and a speaker for audio output. The Arduino's digital pins D0 and D1 are used for RX and TX communication with the Bluetooth module, while pin D9 is configured to drive the speaker.
Cirkit Designer LogoOpen Project in Cirkit Designer
Image of VOICE PY 2: A project utilizing Speaker in a practical application
Arduino UNO Voice Assistant with KY-037 Microphone and Speaker
This circuit is a voice assistant project that uses an Arduino UNO to interface with a KY-037 microphone and a speaker. The microphone detects voice commands, which are processed by the Arduino, and the speaker provides audio feedback based on the detected commands.
Cirkit Designer LogoOpen Project in Cirkit Designer

Technical Specifications

Key Technical Details

Parameter Value
Power Rating 1.5W
Impedance
Frequency Range 200Hz - 20kHz
Sensitivity 85dB
Diameter 50mm
Height 20mm

Pin Configuration and Descriptions

Pin Number Description
1 Positive Terminal
2 Negative Terminal

Usage Instructions

How to Use the Component in a Circuit

  1. Identify the Terminals: The speaker has two terminals, marked as positive (+) and negative (-). Ensure you correctly identify these terminals before connecting the speaker to your circuit.

  2. Connect to an Audio Source: Connect the positive terminal of the speaker to the positive output of your audio source (e.g., an amplifier or an Arduino pin). Similarly, connect the negative terminal to the ground (GND) of your audio source.

  3. Power Considerations: Ensure that the power supplied to the speaker does not exceed its rated power of 1.5W to avoid damage.

  4. Amplification: If the audio signal is weak, consider using an amplifier to boost the signal before it reaches the speaker.

Important Considerations and Best Practices

  • Impedance Matching: Ensure that the impedance of the speaker (8Ω) matches the output impedance of your audio source to prevent distortion and potential damage.
  • Volume Control: Use a potentiometer or a digital volume control to adjust the volume and prevent overdriving the speaker.
  • Mounting: Securely mount the speaker in an enclosure to enhance sound quality and protect it from physical damage.

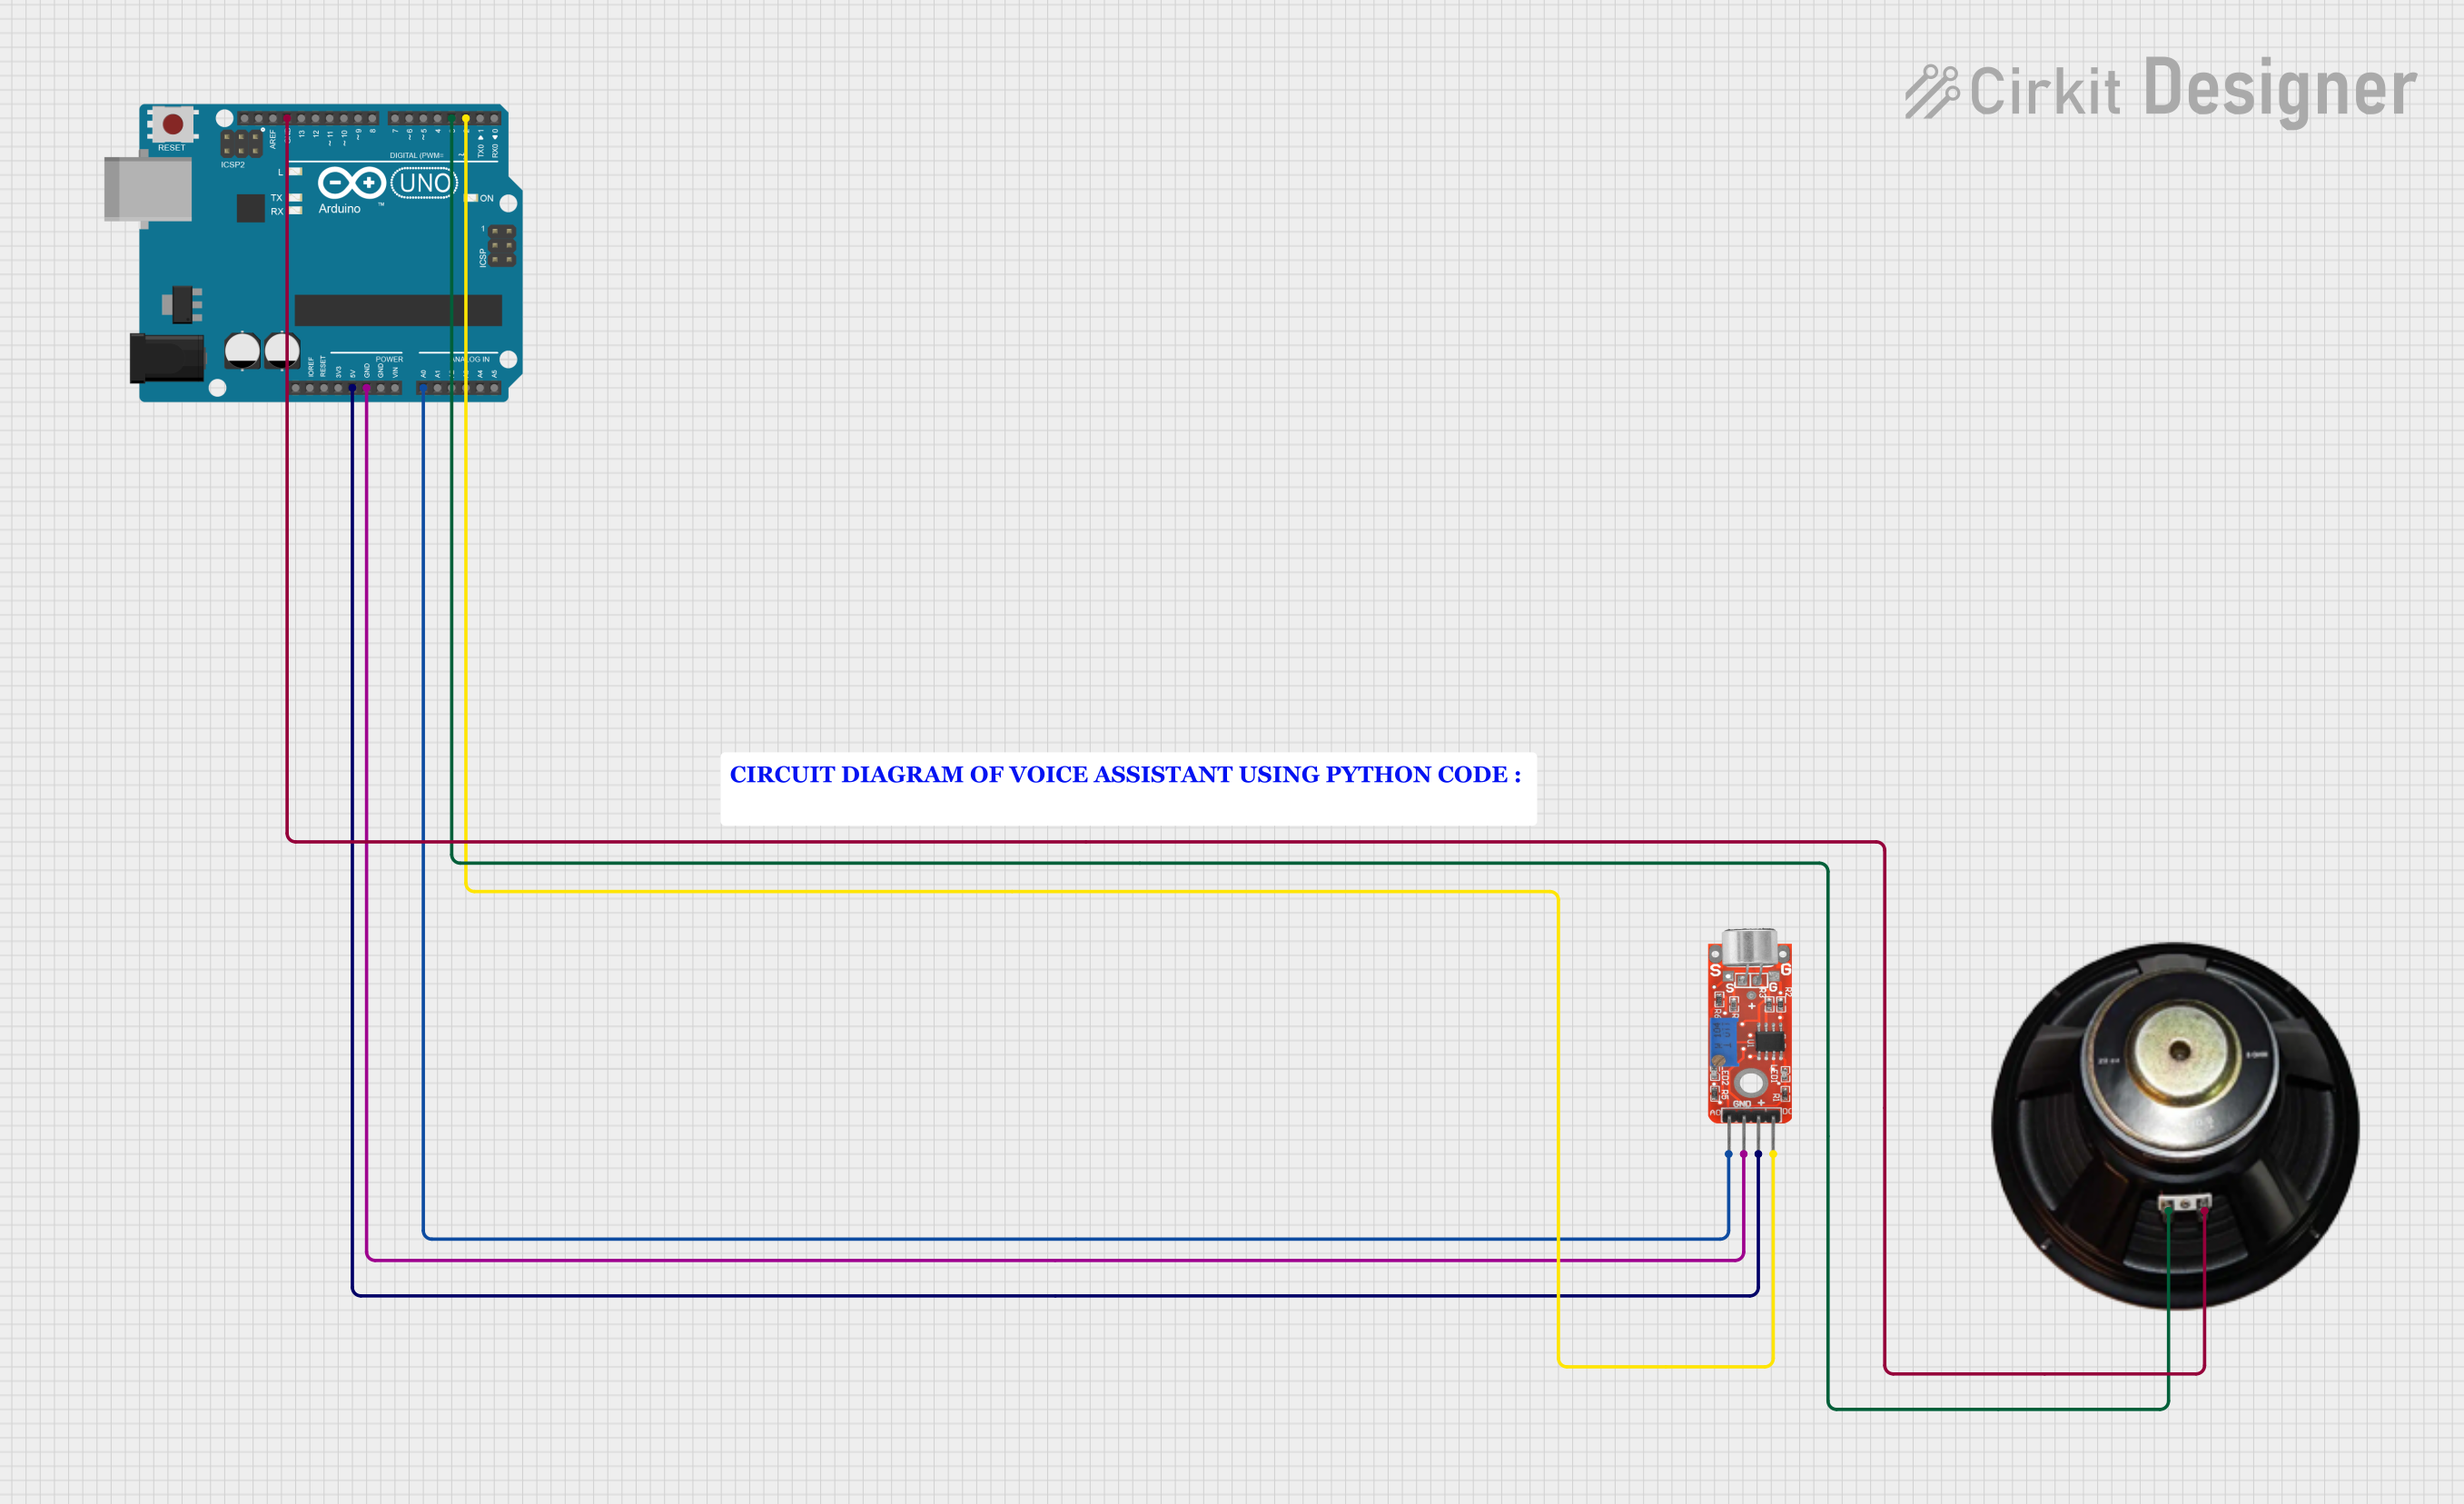
Example: Connecting to an Arduino UNO

To demonstrate how to use the 1.5W 8Ω Speaker with an Arduino UNO, we will create a simple circuit that plays a tone.

Circuit Diagram

Arduino UNO          Speaker
  GND  --------------  Negative Terminal
  Pin 8 --------------  Positive Terminal

Arduino Code

/*
 * Simple Arduino sketch to play a tone on a 1.5W 8Ω Speaker
 * connected to pin 8.
 */

const int speakerPin = 8; // Define the pin connected to the speaker

void setup() {
  pinMode(speakerPin, OUTPUT); // Set the speaker pin as an output
}

void loop() {
  tone(speakerPin, 1000); // Play a 1kHz tone
  delay(1000);            // Wait for 1 second
  noTone(speakerPin);     // Stop the tone
  delay(1000);            // Wait for 1 second
}

Troubleshooting and FAQs

Common Issues Users Might Face

  1. No Sound Output:

    • Solution: Check the connections to ensure the speaker is properly connected to the audio source. Verify that the audio source is functioning correctly.
  2. Distorted Sound:

    • Solution: Ensure that the power supplied to the speaker does not exceed its rated power of 1.5W. Check for impedance matching between the speaker and the audio source.
  3. Low Volume:

    • Solution: Use an amplifier to boost the audio signal. Ensure that the audio source provides a sufficient signal level.

FAQs

Q1: Can I use the 1.5W 8Ω Speaker with a microcontroller other than Arduino?

  • A1: Yes, you can use this speaker with any microcontroller that can generate audio signals. Ensure that the microcontroller's output pin can drive the speaker or use an amplifier if needed.

Q2: How can I improve the sound quality of the speaker?

  • A2: Mount the speaker in a suitable enclosure to enhance sound quality. Ensure proper impedance matching and use an amplifier if necessary.

Q3: What is the maximum volume I can achieve with this speaker?

  • A3: The maximum volume depends on the power supplied to the speaker. Ensure that the power does not exceed 1.5W to avoid damage. Use an amplifier to achieve higher volume levels if needed.

By following this documentation, users can effectively integrate the 1.5W 8Ω Speaker into their audio projects, ensuring optimal performance and sound quality.