Cirkit Designer Logo
Cirkit Designer
Your all-in-one circuit design IDE
Home / 
Component Documentation

How to Use Adafruit Prop Maker Wing: Examples, Pinouts, and Specs

Image of Adafruit Prop Maker Wing
Cirkit Designer LogoDesign with Adafruit Prop Maker Wing in Cirkit Designer

Introduction

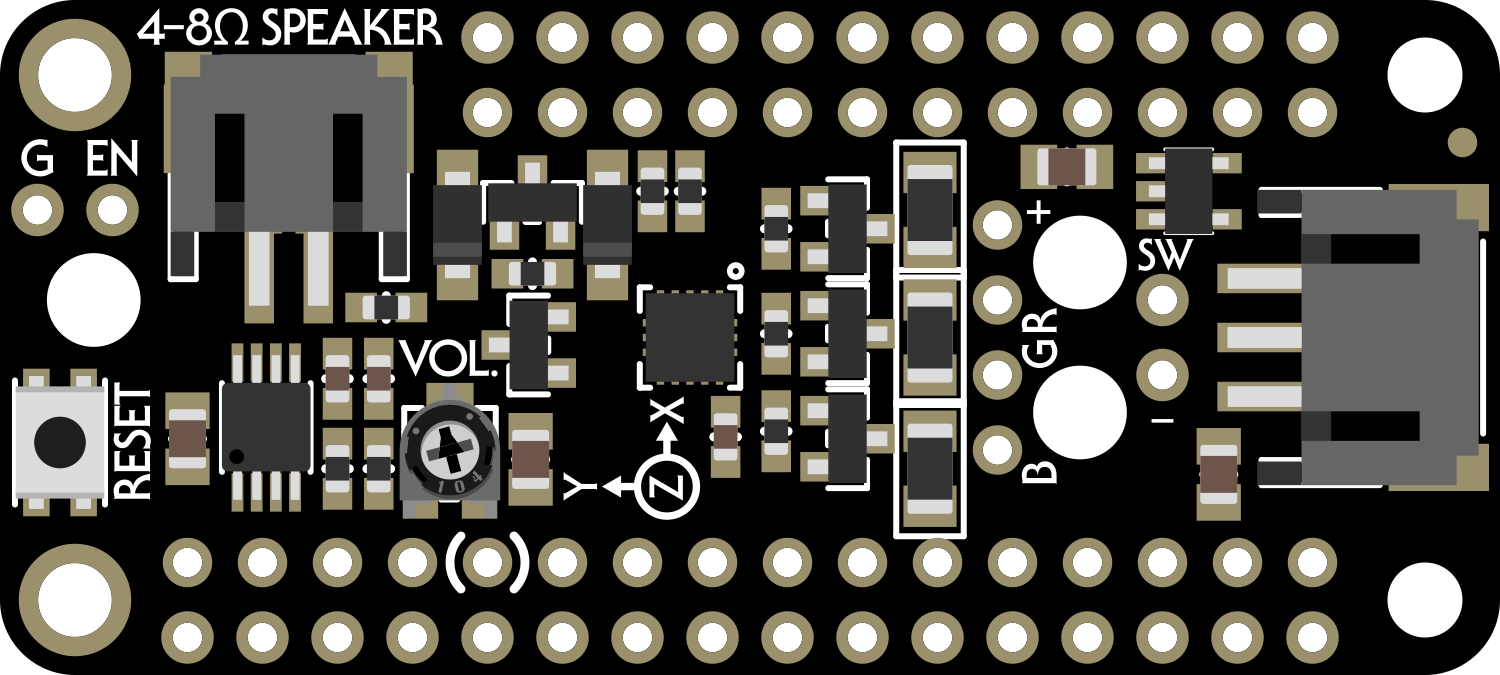
The Adafruit Prop Maker Wing is an add-on board designed for the Adafruit Feather ecosystem, specifically tailored for creating interactive props and cosplay accessories. It harnesses the capabilities of the ATSAMD51 microcontroller and provides a suite of features including 8MB of flash memory, a stereo amplifier, and support for Neopixel LEDs, making it an ideal choice for projects requiring sound, light, and motion effects.

Explore Projects Built with Adafruit Prop Maker Wing

Use Cirkit Designer to design, explore, and prototype these projects online. Some projects support real-time simulation. Click "Open Project" to start designing instantly!
Battery-Powered Smart Sensor Hub with Adafruit QT Py RP2040
Image of wearable final: A project utilizing Adafruit Prop Maker Wing in a practical application
This circuit features an Adafruit QT Py RP2040 microcontroller interfaced with an APDS9960 proximity sensor, an MPU6050 accelerometer and gyroscope, and an OLED display via I2C communication. It also includes a buzzer controlled by the microcontroller and is powered by a 3.7V LiPo battery with a toggle switch for power control.
Cirkit Designer LogoOpen Project in Cirkit Designer
ESP32-Based Vibration Feedback System with Quad Alphanumeric Display and ADXL343 Accelerometer
Image of EC444 - Quest 3: A project utilizing Adafruit Prop Maker Wing in a practical application
This circuit features an Adafruit HUZZAH32 ESP32 Feather board as the central microcontroller, which is connected to an Adafruit Quad AlphaNumeric Featherwing display and an Adafruit ADXL343 accelerometer via I2C communication (SCL and SDA lines). The ESP32 controls a vibration motor connected to one of its GPIO pins (A5_IO4) and shares a common power supply (3.3V) and ground (GND) with the other components. The purpose of this circuit is likely to read acceleration data, display information on the alphanumeric display, and provide haptic feedback through the vibration motor.
Cirkit Designer LogoOpen Project in Cirkit Designer
Battery-Powered Sensor Hub with Adafruit QT Py RP2040 and OLED Display
Image of 512: A project utilizing Adafruit Prop Maker Wing in a practical application
This circuit features an Adafruit QT Py RP2040 microcontroller interfacing with an MPU-6050 accelerometer, an Adafruit APDS-9960 sensor, and a 0.96" OLED display via I2C communication. It is powered by a 3.7V LiPo battery and includes a green LED with a current-limiting resistor connected to an analog pin of the microcontroller.
Cirkit Designer LogoOpen Project in Cirkit Designer
Remote-Controlled Drone with Motion Sensing Capabilities
Image of melty: A project utilizing Adafruit Prop Maker Wing in a practical application
This circuit is designed for motion control and telemetry in a small vehicle or drone. It includes an Adafruit ADXL345 accelerometer interfaced with a SparkFun Pro Micro microcontroller for motion sensing. The circuit also features two Electronic Speed Controllers (ESCs) to drive motors, a step-up voltage regulator to stabilize power supply from a Lipo battery, and a flysky mini receiver to receive control signals from a remote transmitter.
Cirkit Designer LogoOpen Project in Cirkit Designer

Explore Projects Built with Adafruit Prop Maker Wing

Use Cirkit Designer to design, explore, and prototype these projects online. Some projects support real-time simulation. Click "Open Project" to start designing instantly!
Image of wearable final: A project utilizing Adafruit Prop Maker Wing in a practical application
Battery-Powered Smart Sensor Hub with Adafruit QT Py RP2040
This circuit features an Adafruit QT Py RP2040 microcontroller interfaced with an APDS9960 proximity sensor, an MPU6050 accelerometer and gyroscope, and an OLED display via I2C communication. It also includes a buzzer controlled by the microcontroller and is powered by a 3.7V LiPo battery with a toggle switch for power control.
Cirkit Designer LogoOpen Project in Cirkit Designer
Image of EC444 - Quest 3: A project utilizing Adafruit Prop Maker Wing in a practical application
ESP32-Based Vibration Feedback System with Quad Alphanumeric Display and ADXL343 Accelerometer
This circuit features an Adafruit HUZZAH32 ESP32 Feather board as the central microcontroller, which is connected to an Adafruit Quad AlphaNumeric Featherwing display and an Adafruit ADXL343 accelerometer via I2C communication (SCL and SDA lines). The ESP32 controls a vibration motor connected to one of its GPIO pins (A5_IO4) and shares a common power supply (3.3V) and ground (GND) with the other components. The purpose of this circuit is likely to read acceleration data, display information on the alphanumeric display, and provide haptic feedback through the vibration motor.
Cirkit Designer LogoOpen Project in Cirkit Designer
Image of 512: A project utilizing Adafruit Prop Maker Wing in a practical application
Battery-Powered Sensor Hub with Adafruit QT Py RP2040 and OLED Display
This circuit features an Adafruit QT Py RP2040 microcontroller interfacing with an MPU-6050 accelerometer, an Adafruit APDS-9960 sensor, and a 0.96" OLED display via I2C communication. It is powered by a 3.7V LiPo battery and includes a green LED with a current-limiting resistor connected to an analog pin of the microcontroller.
Cirkit Designer LogoOpen Project in Cirkit Designer
Image of melty: A project utilizing Adafruit Prop Maker Wing in a practical application
Remote-Controlled Drone with Motion Sensing Capabilities
This circuit is designed for motion control and telemetry in a small vehicle or drone. It includes an Adafruit ADXL345 accelerometer interfaced with a SparkFun Pro Micro microcontroller for motion sensing. The circuit also features two Electronic Speed Controllers (ESCs) to drive motors, a step-up voltage regulator to stabilize power supply from a Lipo battery, and a flysky mini receiver to receive control signals from a remote transmitter.
Cirkit Designer LogoOpen Project in Cirkit Designer

Common Applications and Use Cases

  • Cosplay accessories with interactive features
  • Prop design for theater and film
  • Educational projects involving electronics and programming
  • DIY electronic toys and gadgets
  • Interactive art installations

Technical Specifications

Key Technical Details

  • Microcontroller: ATSAMD51
  • Flash Memory: 8MB
  • Audio Output: Stereo amplifier with 3W output per channel
  • LED Support: Dedicated pads for Neopixel LEDs
  • Motion Sensing: Built-in 3-axis accelerometer
  • Voltage Requirements: 3.3V to 6V DC input
  • Current Consumption: Varies with usage, typically <100mA without peripherals

Pin Configuration and Descriptions

Pin Number Function Description
1 VBATT Battery input for powering the board
2 EN Enable pin for the 3.3V regulator
3 GND Ground
4 A0 Analog input/output pin
5 A1 Analog input/output pin
6 A2 Analog input/output pin
7 A3 Analog input/output pin
8 A4 Analog input/output pin
9 A5 Analog input/output pin
10 SCK Serial Clock for SPI communication
11 MO Master Out Slave In for SPI communication
12 MI Master In Slave Out for SPI communication
13 RX UART Receive pin
14 TX UART Transmit pin
15 SDA I2C Data line
16 SCL I2C Clock line
17 # Not connected/used

Usage Instructions

How to Use the Component in a Circuit

  1. Powering the Wing: Connect a battery to the VBATT and GND pins or use the USB power from the Feather board.
  2. Connecting Neopixels: Attach Neopixel LEDs to the dedicated pads provided on the board.
  3. Audio Output: Connect speakers to the stereo amplifier outputs for sound effects.
  4. Programming: Use the Feather's programming interface to upload code to the ATSAMD51 microcontroller.

Important Considerations and Best Practices

  • Ensure that the power supply voltage does not exceed the maximum rating of 6V.
  • When driving a large number of Neopixels or using the stereo amplifier at high volumes, consider the current draw and power the Wing accordingly.
  • Use proper ESD precautions when handling the board to prevent damage to sensitive components.
  • Always disconnect the power before making or altering connections to the board.

Troubleshooting and FAQs

Common Issues

  • Neopixels not lighting up: Check the connections and ensure the code is correctly addressing the LEDs.
  • No sound from the amplifier: Verify speaker connections and ensure that the audio file format is supported.
  • Motion sensor not responding: Confirm that the accelerometer is correctly initialized in your code.

Solutions and Tips for Troubleshooting

  • Double-check wiring against the pin configuration table.
  • Use example code to test individual components before integrating into a larger project.
  • Ensure that the battery or power supply is adequately charged and capable of supplying the necessary current.

FAQs

Q: Can I power the Prop Maker Wing through the Feather board? A: Yes, the Wing can be powered via the Feather's USB connection or through a battery connected to the Feather.

Q: What audio formats are supported by the Prop Maker Wing? A: The Wing typically supports common audio formats like WAV, but it depends on the library used for playback.

Q: How many Neopixels can I control with the Prop Maker Wing? A: The number of Neopixels is limited by the power supply and memory constraints. Ensure you have a sufficient power source for the number of LEDs you plan to use.

Example Code for Arduino UNO

#include <Adafruit_NeoPixel.h>

#define PIN            6 // Define the pin for Neopixel data
#define NUMPIXELS      16 // Number of Neopixels

Adafruit_NeoPixel pixels(NUMPIXELS, PIN, NEO_GRB + NEO_KHZ800);

void setup() {
  pixels.begin(); // Initialize the Neopixel library
}

void loop() {
  for(int i=0; i<NUMPIXELS; i++) {
    pixels.setPixelColor(i, pixels.Color(0,150,0)); // Set color to green
    pixels.show(); // Update the pixels
    delay(500);
    pixels.setPixelColor(i, pixels.Color(0,0,0)); // Turn off the pixel
  }
}

Note: This example is for illustrative purposes. The Adafruit Prop Maker Wing is designed for the Feather series and not directly for the Arduino UNO. However, the Neopixel library and general principles of operation are similar across platforms. Adjust the pin definitions and logic according to the actual hardware setup.