Cirkit Designer Logo
Cirkit Designer
Your all-in-one circuit design IDE
Home / 
Component Documentation

How to Use Adafruit MPR121: Examples, Pinouts, and Specs

Image of Adafruit MPR121
Cirkit Designer LogoDesign with Adafruit MPR121 in Cirkit Designer

Introduction

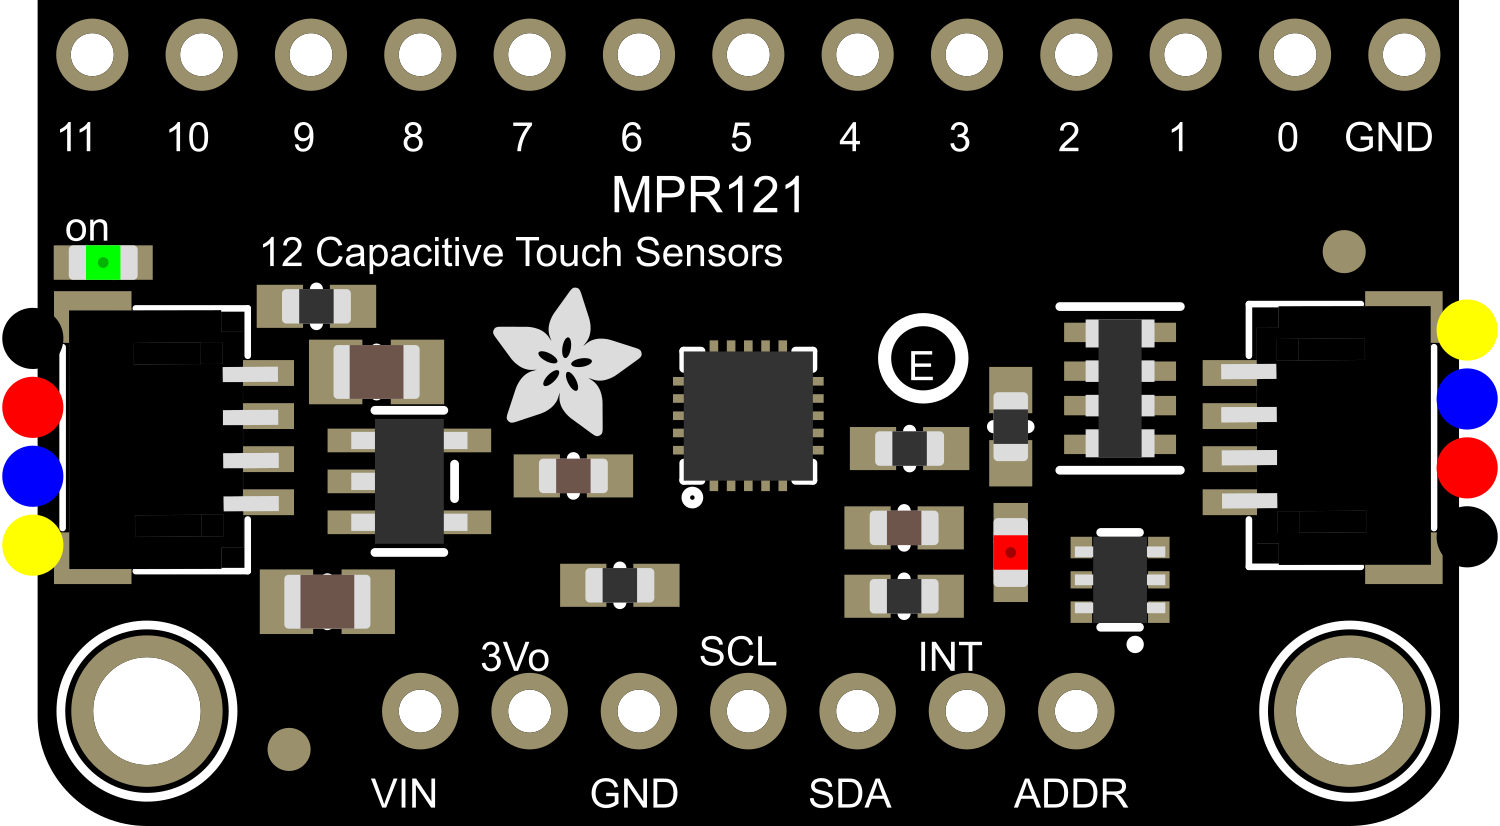
The Adafruit MPR121 is a capacitive touch sensor module that features the MPR121 touch controller IC. It is designed to detect electrical changes on its 12 input pins that occur when a touch or proximity event is detected. This module is commonly used in creating touch interfaces, adding touch buttons to electronic projects, and in applications requiring user input without mechanical buttons.

Explore Projects Built with Adafruit MPR121

Use Cirkit Designer to design, explore, and prototype these projects online. Some projects support real-time simulation. Click "Open Project" to start designing instantly!
Touch-Sensitive Interface with Adafruit MPR121 and Feather 32u4 Bluefruit
Image of MPR121: A project utilizing Adafruit MPR121 in a practical application
This circuit integrates an Adafruit MPR121 capacitive touch sensor with an Adafruit Feather 32u4 Bluefruit microcontroller. The MPR121 is powered by the Feather and communicates via I2C (SCL and SDA) to detect touch inputs, which can be processed or transmitted wirelessly by the Feather.
Cirkit Designer LogoOpen Project in Cirkit Designer
Adafruit Feather 32u4 Bluefruit with MPR121 Capacitive Touch Sensor Interface
Image of ALi WTSE: A project utilizing Adafruit MPR121 in a practical application
This circuit integrates an Adafruit MPR121 capacitive touch sensor with an Adafruit Feather 32u4 Bluefruit microcontroller. The MPR121 is powered by the 3.3V supply from the Feather and communicates with the microcontroller via I2C, with SCL connected to pin 3 and SDA connected to pin 2 of the Feather. This setup allows the Feather to detect touch inputs from the MPR121 for further processing or wireless communication.
Cirkit Designer LogoOpen Project in Cirkit Designer
Arduino UNO-Based Sensor Data Acquisition System with Bluetooth and Wi-Fi Connectivity
Image of smrpe: A project utilizing Adafruit MPR121 in a practical application
This circuit is a multi-sensor data acquisition system with wireless communication capabilities. It utilizes an Arduino UNO to interface with an MPU-6050 gyroscope, an Adafruit ADXL345 accelerometer, an Adafruit MPR121 capacitive touch sensor, and a SparkFun Electret Microphone for audio input. The system can transmit sensor data via an HC-05 Bluetooth module and an ESP8266 WiFi module, and it includes a bi-directional logic level converter for voltage level matching between devices. The circuit is powered by a 9V battery connected to the Arduino's Vin pin.
Cirkit Designer LogoOpen Project in Cirkit Designer
Arduino UNO R4 WiFi Capacitive Touch MIDI Controller with Visual Feedback and Sound Playback
Image of 自适应乐器: A project utilizing Adafruit MPR121 in a practical application
This circuit is an interactive touch-based MIDI controller and audio player. It uses an Arduino UNO R4 WiFi to interface with an MPR121 capacitive touch sensor for input, a MAX7219 8-digit 7-segment display for visual feedback, and a DFPlayer MINI for audio output through a loudspeaker. The system detects touch inputs, plays corresponding sounds, and sends MIDI notes.
Cirkit Designer LogoOpen Project in Cirkit Designer

Explore Projects Built with Adafruit MPR121

Use Cirkit Designer to design, explore, and prototype these projects online. Some projects support real-time simulation. Click "Open Project" to start designing instantly!
Image of MPR121: A project utilizing Adafruit MPR121 in a practical application
Touch-Sensitive Interface with Adafruit MPR121 and Feather 32u4 Bluefruit
This circuit integrates an Adafruit MPR121 capacitive touch sensor with an Adafruit Feather 32u4 Bluefruit microcontroller. The MPR121 is powered by the Feather and communicates via I2C (SCL and SDA) to detect touch inputs, which can be processed or transmitted wirelessly by the Feather.
Cirkit Designer LogoOpen Project in Cirkit Designer
Image of ALi WTSE: A project utilizing Adafruit MPR121 in a practical application
Adafruit Feather 32u4 Bluefruit with MPR121 Capacitive Touch Sensor Interface
This circuit integrates an Adafruit MPR121 capacitive touch sensor with an Adafruit Feather 32u4 Bluefruit microcontroller. The MPR121 is powered by the 3.3V supply from the Feather and communicates with the microcontroller via I2C, with SCL connected to pin 3 and SDA connected to pin 2 of the Feather. This setup allows the Feather to detect touch inputs from the MPR121 for further processing or wireless communication.
Cirkit Designer LogoOpen Project in Cirkit Designer
Image of smrpe: A project utilizing Adafruit MPR121 in a practical application
Arduino UNO-Based Sensor Data Acquisition System with Bluetooth and Wi-Fi Connectivity
This circuit is a multi-sensor data acquisition system with wireless communication capabilities. It utilizes an Arduino UNO to interface with an MPU-6050 gyroscope, an Adafruit ADXL345 accelerometer, an Adafruit MPR121 capacitive touch sensor, and a SparkFun Electret Microphone for audio input. The system can transmit sensor data via an HC-05 Bluetooth module and an ESP8266 WiFi module, and it includes a bi-directional logic level converter for voltage level matching between devices. The circuit is powered by a 9V battery connected to the Arduino's Vin pin.
Cirkit Designer LogoOpen Project in Cirkit Designer
Image of 自适应乐器: A project utilizing Adafruit MPR121 in a practical application
Arduino UNO R4 WiFi Capacitive Touch MIDI Controller with Visual Feedback and Sound Playback
This circuit is an interactive touch-based MIDI controller and audio player. It uses an Arduino UNO R4 WiFi to interface with an MPR121 capacitive touch sensor for input, a MAX7219 8-digit 7-segment display for visual feedback, and a DFPlayer MINI for audio output through a loudspeaker. The system detects touch inputs, plays corresponding sounds, and sends MIDI notes.
Cirkit Designer LogoOpen Project in Cirkit Designer

Common Applications and Use Cases

  • Touch-sensitive controls for consumer electronics
  • Interactive art installations
  • Custom computer peripherals
  • Prototyping user interfaces
  • DIY projects and educational purposes

Technical Specifications

Key Technical Details

  • Operating Voltage: 2.5V to 3.6V
  • Supply Current: 29uA (run mode), 3uA (stop mode)
  • Number of Inputs: 12 capacitive touch inputs
  • Communication: I2C interface
  • I2C Addresses: 0x5A (default), 0x5B, 0x5C, 0x5D (selectable with jumpers)
  • Sensitivity: Adjustable with internal registers
  • Response Time: < 8ms (touch detection)
  • Onboard LED indicator for touch detection

Pin Configuration and Descriptions

Pin Number Name Description
1 VIN Supply voltage (2.5V to 3.6V)
2 3Vo 3.3V output from the onboard regulator
3 GND Ground connection
4 SDA I2C data line
5 SCL I2C clock line
6 IRQ Interrupt output (active low)
7-18 0-11 Capacitive touch input pins

Usage Instructions

Integration into a Circuit

  1. Connect the VIN pin to a 2.5V to 3.6V power supply.
  2. Connect the GND pin to the ground of the power supply.
  3. Connect the SDA and SCL pins to the I2C data and clock lines of your microcontroller, respectively.
  4. Optionally, connect the IRQ pin to an interrupt-capable pin on your microcontroller to detect touch events.
  5. Connect any of the touch input pins (0-11) to the conductive material or object you wish to use as a touch sensor.

Important Considerations and Best Practices

  • Ensure that the power supply voltage does not exceed the maximum rating of 3.6V.
  • Use pull-up resistors on the I2C lines if your microcontroller does not have them built-in.
  • Avoid running long wires to the touch inputs as they can pick up noise and affect sensitivity.
  • Calibrate the sensitivity of the touch inputs using the MPR121's internal registers for your specific application.
  • Keep the touch sensor area clean and free from moisture to prevent false triggering.

Example Code for Arduino UNO

#include <Wire.h>
#include <Adafruit_MPR121.h>

// You can have up to 4 on one i2c bus (connecting ADDR to 3V, 
// setting the jumpers to different combinations of connecting them to ground)
Adafruit_MPR121 cap = Adafruit_MPR121();

void setup() {
  Serial.begin(9600);
  while (!Serial) { // Needed to start serial on some platforms
    delay(10);
  }
  
  if (!cap.begin(0x5A)) {
    Serial.println("MPR121 not found, check wiring?");
    while (1);
  }
  Serial.println("MPR121 found!");
}

void loop() {
  // Get the currently touched pads
  currtouched = cap.touched();
  
  for (uint8_t i=0; i<12; i++) {
    // it if *is* touched and *wasnt* touched before, alert!
    if ((currtouched & _BV(i)) && !(lasttouched & _BV(i)) ) {
      Serial.print(i); Serial.println(" touched");
    }
    // if it *was* touched and now *isnt*, alert!
    if (!(currtouched & _BV(i)) && (lasttouched & _BV(i)) ) {
      Serial.print(i); Serial.println(" released");
    }
  }

  // reset our state
  lasttouched = currtouched;
  
  // comment out this line for detailed data from the sensor!
  delay(100);
}

Troubleshooting and FAQs

Common Issues

  • Sensor not responding: Ensure that the I2C connections are correct and that the correct I2C address is being used in your code.
  • False touch detections: Adjust the sensitivity settings and ensure that the touch pads are not too close to each other or to conductive materials.
  • No touch detection: Check the connections to the touch input pins and ensure that they are connected to a conductive surface.

Solutions and Tips for Troubleshooting

  • Use the onboard LED as an indicator to confirm touch detection.
  • If using long wires to the touch inputs, consider adding a low-pass filter to reduce noise.
  • Check the power supply voltage with a multimeter to ensure it is within the specified range.
  • Use the serial monitor to debug and check the status of the touch inputs.

FAQs

Q: Can I use the MPR121 with a 5V microcontroller? A: Yes, but ensure that the MPR121 module is powered with a voltage within its operating range (2.5V to 3.6V). Use level shifters if necessary for the I2C lines.

Q: How can I change the sensitivity of the touch inputs? A: Sensitivity can be adjusted by writing to the MPR121's internal registers. Refer to the MPR121 datasheet for detailed register settings.

Q: How many MPR121 modules can I connect to a single I2C bus? A: You can connect up to 4 MPR121 modules to a single I2C bus by setting different I2C addresses using the address jumpers on the back of the module.