How to Use TP4100 With DC Jack: Examples, Pinouts, and Specs

 Design with TP4100 With DC Jack in Cirkit Designer
Introduction
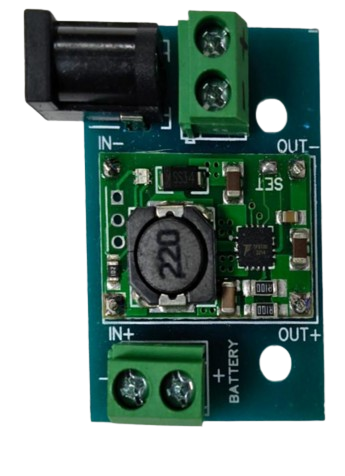
The TP4100 is a versatile power management integrated circuit (IC) designed for efficient voltage regulation and battery charging. It features a built-in DC jack, making it convenient for applications requiring a reliable and straightforward power input interface. The TP4100 is widely used in battery-powered devices, portable electronics, and embedded systems due to its high efficiency and robust design.
Explore Projects Built with TP4100 With DC Jack

 Open Project in Cirkit Designer
 Open Project in Cirkit Designer
 Open Project in Cirkit Designer
 Open Project in Cirkit Designer
Explore Projects Built with TP4100 With DC Jack

 Open Project in Cirkit Designer
 Open Project in Cirkit Designer
 Open Project in Cirkit Designer
 Open Project in Cirkit Designer
Common Applications and Use Cases
- Lithium-ion (Li-ion) and lithium-polymer (LiPo) battery charging
- Power supply regulation for embedded systems
- Portable electronic devices
- DIY electronics projects
- Applications requiring a DC jack for easy power input
Technical Specifications
Key Technical Details
- Input Voltage Range: 5V to 26V DC
- Charging Voltage: Configurable up to 4.2V (single-cell Li-ion/LiPo batteries)
- Charging Current: Adjustable up to 2A
- Efficiency: Up to 92%
- Built-in Protections: Overvoltage, overcurrent, and thermal protection
- Operating Temperature Range: -40°C to +85°C
- DC Jack Input: Standard 5.5mm x 2.1mm barrel jack
Pin Configuration and Descriptions
The TP4100 IC typically comes in a compact package with the following pinout:
| Pin Number | Pin Name | Description |
|---|---|---|
| 1 | VIN | Input voltage pin (5V to 26V DC). |
| 2 | GND | Ground connection. |
| 3 | BAT+ | Positive terminal of the battery. |
| 4 | BAT- | Negative terminal of the battery (ground). |
| 5 | PROG | Charging current programming pin (via resistor). |
| 6 | STAT | Charging status indicator (open-drain output). |
| 7 | EN | Enable pin to turn the IC on/off. |
Usage Instructions
How to Use the TP4100 in a Circuit
- Power Input: Connect a DC power source (5V to 26V) to the DC jack or directly to the VIN pin. Ensure the power source can supply sufficient current for the charging process.
- Battery Connection: Connect the positive terminal of the battery to the BAT+ pin and the negative terminal to the BAT- pin.
- Programming Charging Current: Use a resistor between the PROG pin and ground to set the desired charging current. Refer to the datasheet for the resistor value corresponding to your required current.
- Status Monitoring: Connect an LED (with a current-limiting resistor) to the STAT pin to monitor the charging status:
- LED ON: Charging in progress.
- LED OFF: Charging complete or no battery connected.
- Enable/Disable: Use the EN pin to enable or disable the IC. Pull the pin high to enable and low to disable.
Important Considerations and Best Practices
- Heat Dissipation: Ensure proper heat dissipation, especially when charging at high currents. Use a heatsink or place the IC on a PCB with good thermal management.
- Battery Compatibility: Verify that the battery's voltage and chemistry are compatible with the TP4100's charging profile.
- Input Voltage: Avoid exceeding the maximum input voltage of 26V to prevent damage to the IC.
- Safety: Always include a fuse or other protection mechanism in the circuit to prevent overcurrent conditions.
Example: Using TP4100 with Arduino UNO
The TP4100 can be used to charge a battery that powers an Arduino UNO. Below is an example of how to monitor the charging status using the STAT pin:
// TP4100 Charging Status Monitoring with Arduino UNO

const int statPin = 2; // Connect the STAT pin of TP4100 to digital pin 2
const int ledPin = 13; // Built-in LED on Arduino UNO

void setup() {
  pinMode(statPin, INPUT); // Set STAT pin as input
  pinMode(ledPin, OUTPUT); // Set LED pin as output
  digitalWrite(ledPin, LOW); // Turn off LED initially
  Serial.begin(9600); // Initialize serial communication
}

void loop() {
  int chargingStatus = digitalRead(statPin); // Read the STAT pin

  if (chargingStatus == LOW) {
    // STAT pin LOW indicates charging in progress
    digitalWrite(ledPin, HIGH); // Turn on LED
    Serial.println("Battery is charging...");
  } else {
    // STAT pin HIGH indicates charging complete or no battery
    digitalWrite(ledPin, LOW); // Turn off LED
    Serial.println("Charging complete or no battery connected.");
  }

  delay(1000); // Wait for 1 second before checking again
}
Troubleshooting and FAQs
Common Issues and Solutions
IC Overheating
- Cause: High charging current or insufficient heat dissipation.
- Solution: Reduce the charging current by adjusting the resistor on the PROG pin. Improve heat dissipation with a heatsink or better PCB design.
Battery Not Charging
- Cause: Incorrect battery connection or incompatible battery.
- Solution: Verify the battery connections and ensure the battery's voltage and chemistry are supported.
STAT Pin Not Responding
- Cause: Faulty connection or damaged IC.
- Solution: Check the wiring to the STAT pin. Replace the IC if necessary.
No Output Voltage
- Cause: Disabled IC or insufficient input voltage.
- Solution: Ensure the EN pin is pulled high and the input voltage is within the specified range.
FAQs
Can the TP4100 charge multiple batteries in series? No, the TP4100 is designed for single-cell batteries. For multi-cell configurations, use a dedicated multi-cell charger IC.
What happens if the input voltage exceeds 26V? Exceeding 26V can permanently damage the IC. Always use a regulated power supply within the specified range.
Can I use the TP4100 without a DC jack? Yes, you can connect the input voltage directly to the VIN pin if a DC jack is not required.
How do I calculate the resistor value for the PROG pin? Refer to the TP4100 datasheet for the formula and resistor values corresponding to the desired charging current.