Cirkit Designer
Your all-in-one circuit design IDE
Home /
Component Documentation
How to Use Adafruit Bluefruit LE UART Friend: Examples, Pinouts, and Specs
Introduction
The Adafruit Bluefruit LE UART Friend is a versatile Bluetooth Low Energy (BLE) module designed for seamless wireless communication between microcontrollers, such as Arduino boards, and Bluetooth 4.0 (and later) enabled devices, including smartphones and tablets. This module can operate as either a BLE server (peripheral) or client (central), making it suitable for a wide range of applications such as remote control, data logging, and sensor monitoring.
Explore Projects Built with Adafruit Bluefruit LE UART Friend
Adafruit Circuit Playground Bluefruit and Crickit-Based Smart RGB LED and Temperature Monitoring System
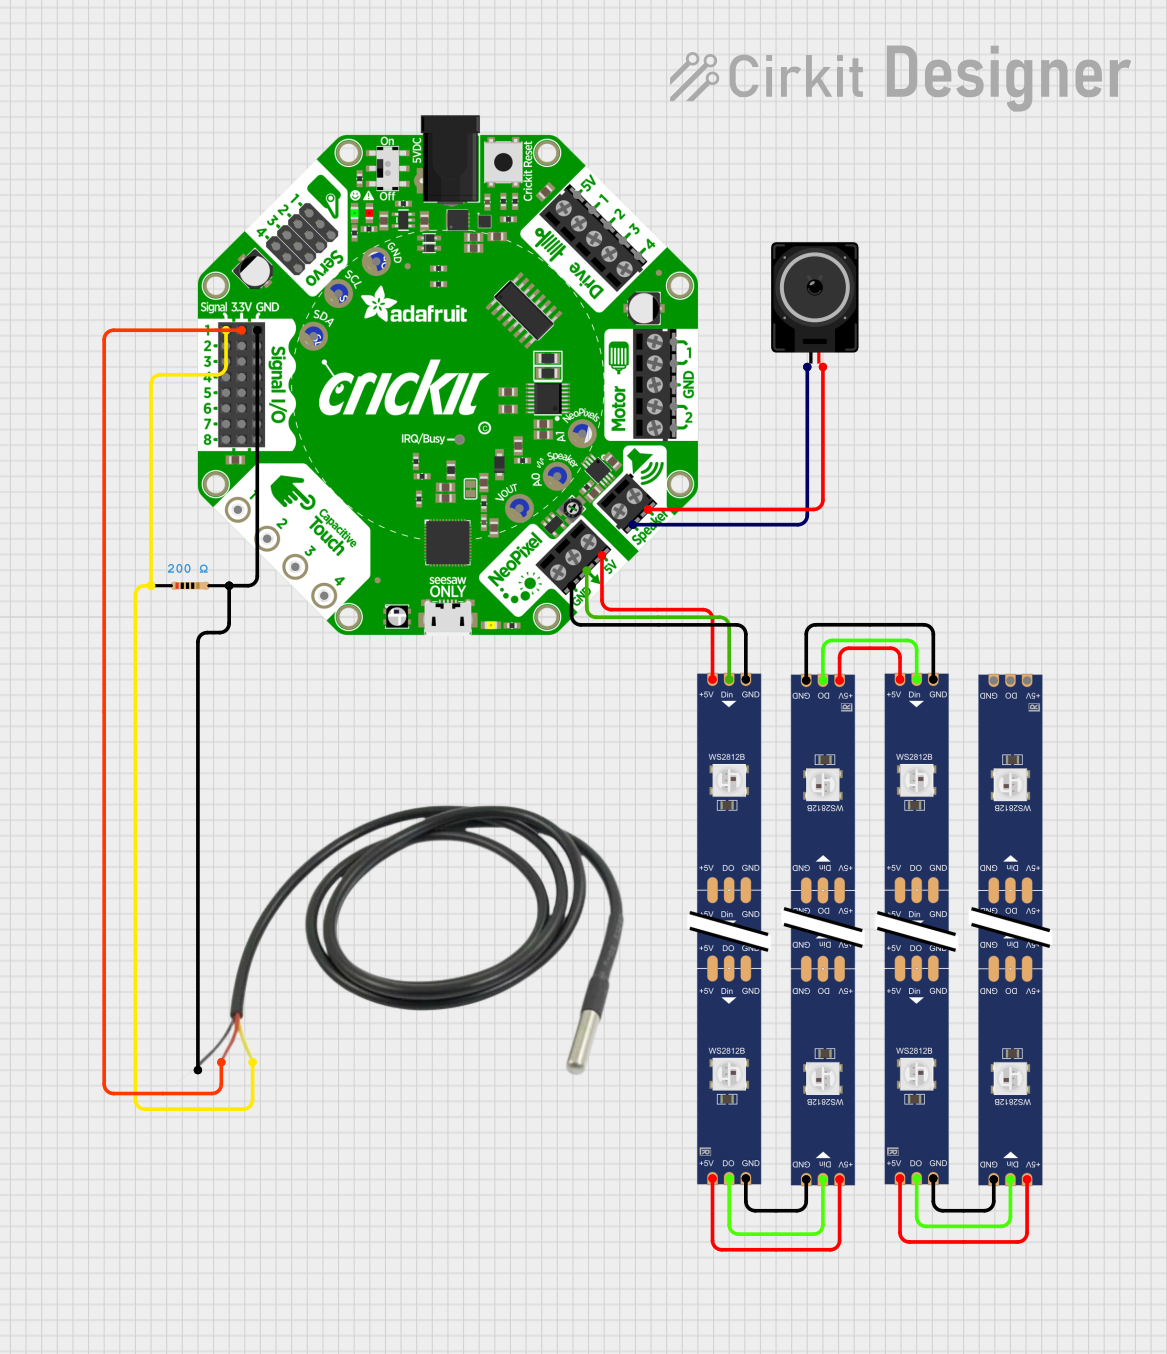
This circuit integrates an Adafruit Circuit Playground Bluefruit with an Adafruit Crickit for Circuit Playground Express to control a temperature sensor, a loudspeaker, and a series of WS2812 RGB LED strips. The Crickit board reads temperature data, drives the loudspeaker, and controls the LED strips to create visual effects based on the sensor input.
STM32F103C8T6 Bluetooth-Controlled Arcade Joystick Interface
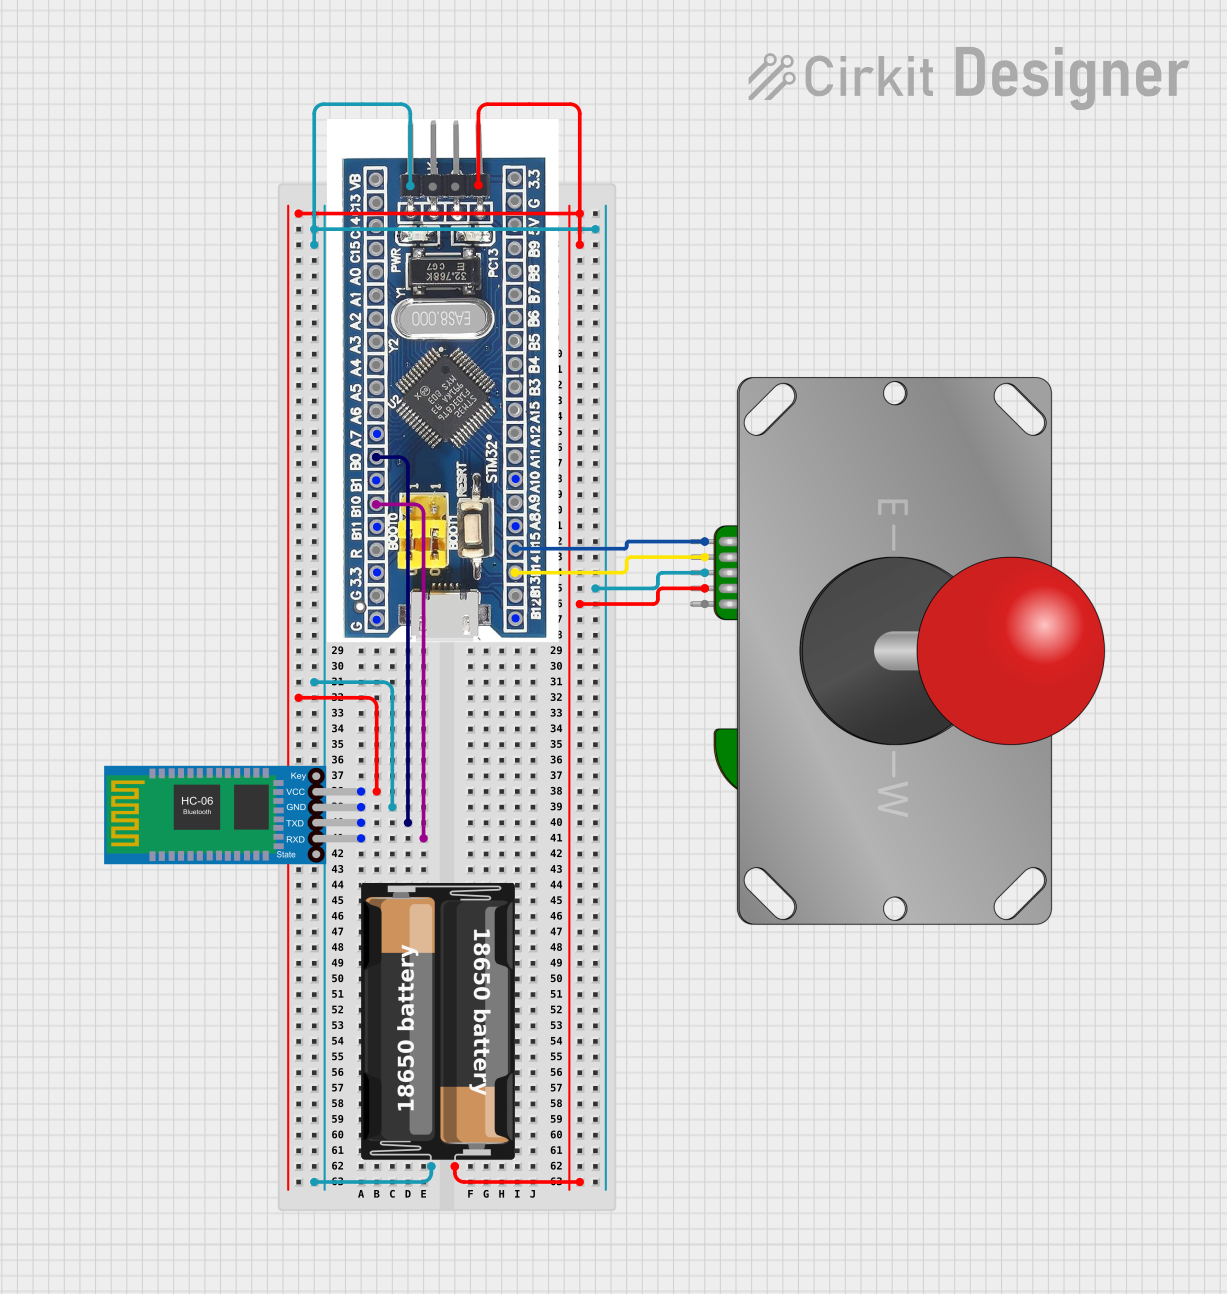
This circuit features an STM32F103C8T6 microcontroller interfaced with a Bluetooth HC-06 module for wireless communication and an Adafruit Arcade Joystick for user input. The microcontroller's pins B0 and B10 are connected to the TXD and RXD pins of the Bluetooth module, enabling serial communication, while pins B14 and B15 interface with the joystick's directional controls. The circuit is powered by a battery, with power distribution managed through the microcontroller's 3.3V pin and common ground connections.
ESP8266 WiFi Module Serial Interface with Pushbutton Control

This circuit features an ESP8266 ESP-01 WiFi module interfaced with an Adafruit FTDI Friend for serial communication. The ESP8266's TXD and RXD pins are connected to the FTDI's RX and TX pins respectively, allowing for data exchange between the microcontroller and a computer. Additionally, a pushbutton is connected to the ESP8266's reset pin, enabling manual resets of the module.
Touch-Sensitive Interface with Adafruit MPR121 and Feather 32u4 Bluefruit

This circuit integrates an Adafruit MPR121 capacitive touch sensor with an Adafruit Feather 32u4 Bluefruit microcontroller. The MPR121 is powered by the Feather and communicates via I2C (SCL and SDA) to detect touch inputs, which can be processed or transmitted wirelessly by the Feather.
Explore Projects Built with Adafruit Bluefruit LE UART Friend
Adafruit Circuit Playground Bluefruit and Crickit-Based Smart RGB LED and Temperature Monitoring System
This circuit integrates an Adafruit Circuit Playground Bluefruit with an Adafruit Crickit for Circuit Playground Express to control a temperature sensor, a loudspeaker, and a series of WS2812 RGB LED strips. The Crickit board reads temperature data, drives the loudspeaker, and controls the LED strips to create visual effects based on the sensor input.
STM32F103C8T6 Bluetooth-Controlled Arcade Joystick Interface
This circuit features an STM32F103C8T6 microcontroller interfaced with a Bluetooth HC-06 module for wireless communication and an Adafruit Arcade Joystick for user input. The microcontroller's pins B0 and B10 are connected to the TXD and RXD pins of the Bluetooth module, enabling serial communication, while pins B14 and B15 interface with the joystick's directional controls. The circuit is powered by a battery, with power distribution managed through the microcontroller's 3.3V pin and common ground connections.
ESP8266 WiFi Module Serial Interface with Pushbutton Control
This circuit features an ESP8266 ESP-01 WiFi module interfaced with an Adafruit FTDI Friend for serial communication. The ESP8266's TXD and RXD pins are connected to the FTDI's RX and TX pins respectively, allowing for data exchange between the microcontroller and a computer. Additionally, a pushbutton is connected to the ESP8266's reset pin, enabling manual resets of the module.
Touch-Sensitive Interface with Adafruit MPR121 and Feather 32u4 Bluefruit
This circuit integrates an Adafruit MPR121 capacitive touch sensor with an Adafruit Feather 32u4 Bluefruit microcontroller. The MPR121 is powered by the Feather and communicates via I2C (SCL and SDA) to detect touch inputs, which can be processed or transmitted wirelessly by the Feather.
Common Applications and Use Cases
- Wireless sensor data collection
- Smartphone-controlled gadgets and robotics
- BLE-based home automation systems
- DIY fitness trackers and health monitors
- Interactive art and wearable technology
Technical Specifications
Key Technical Details
- Bluetooth Version: Bluetooth 4.0 Low Energy (BLE)
- Frequency: 2.4 GHz ISM band
- Voltage Supply: 3.3V to 5V (with onboard voltage regulator)
- Current Consumption: 6mA (average), 26mA (peak during transmission)
- Baud Rate: 9600 bps (default, configurable up to 115200 bps)
- Range: Up to 100 meters (line of sight)
- Antenna: Built-in PCB antenna
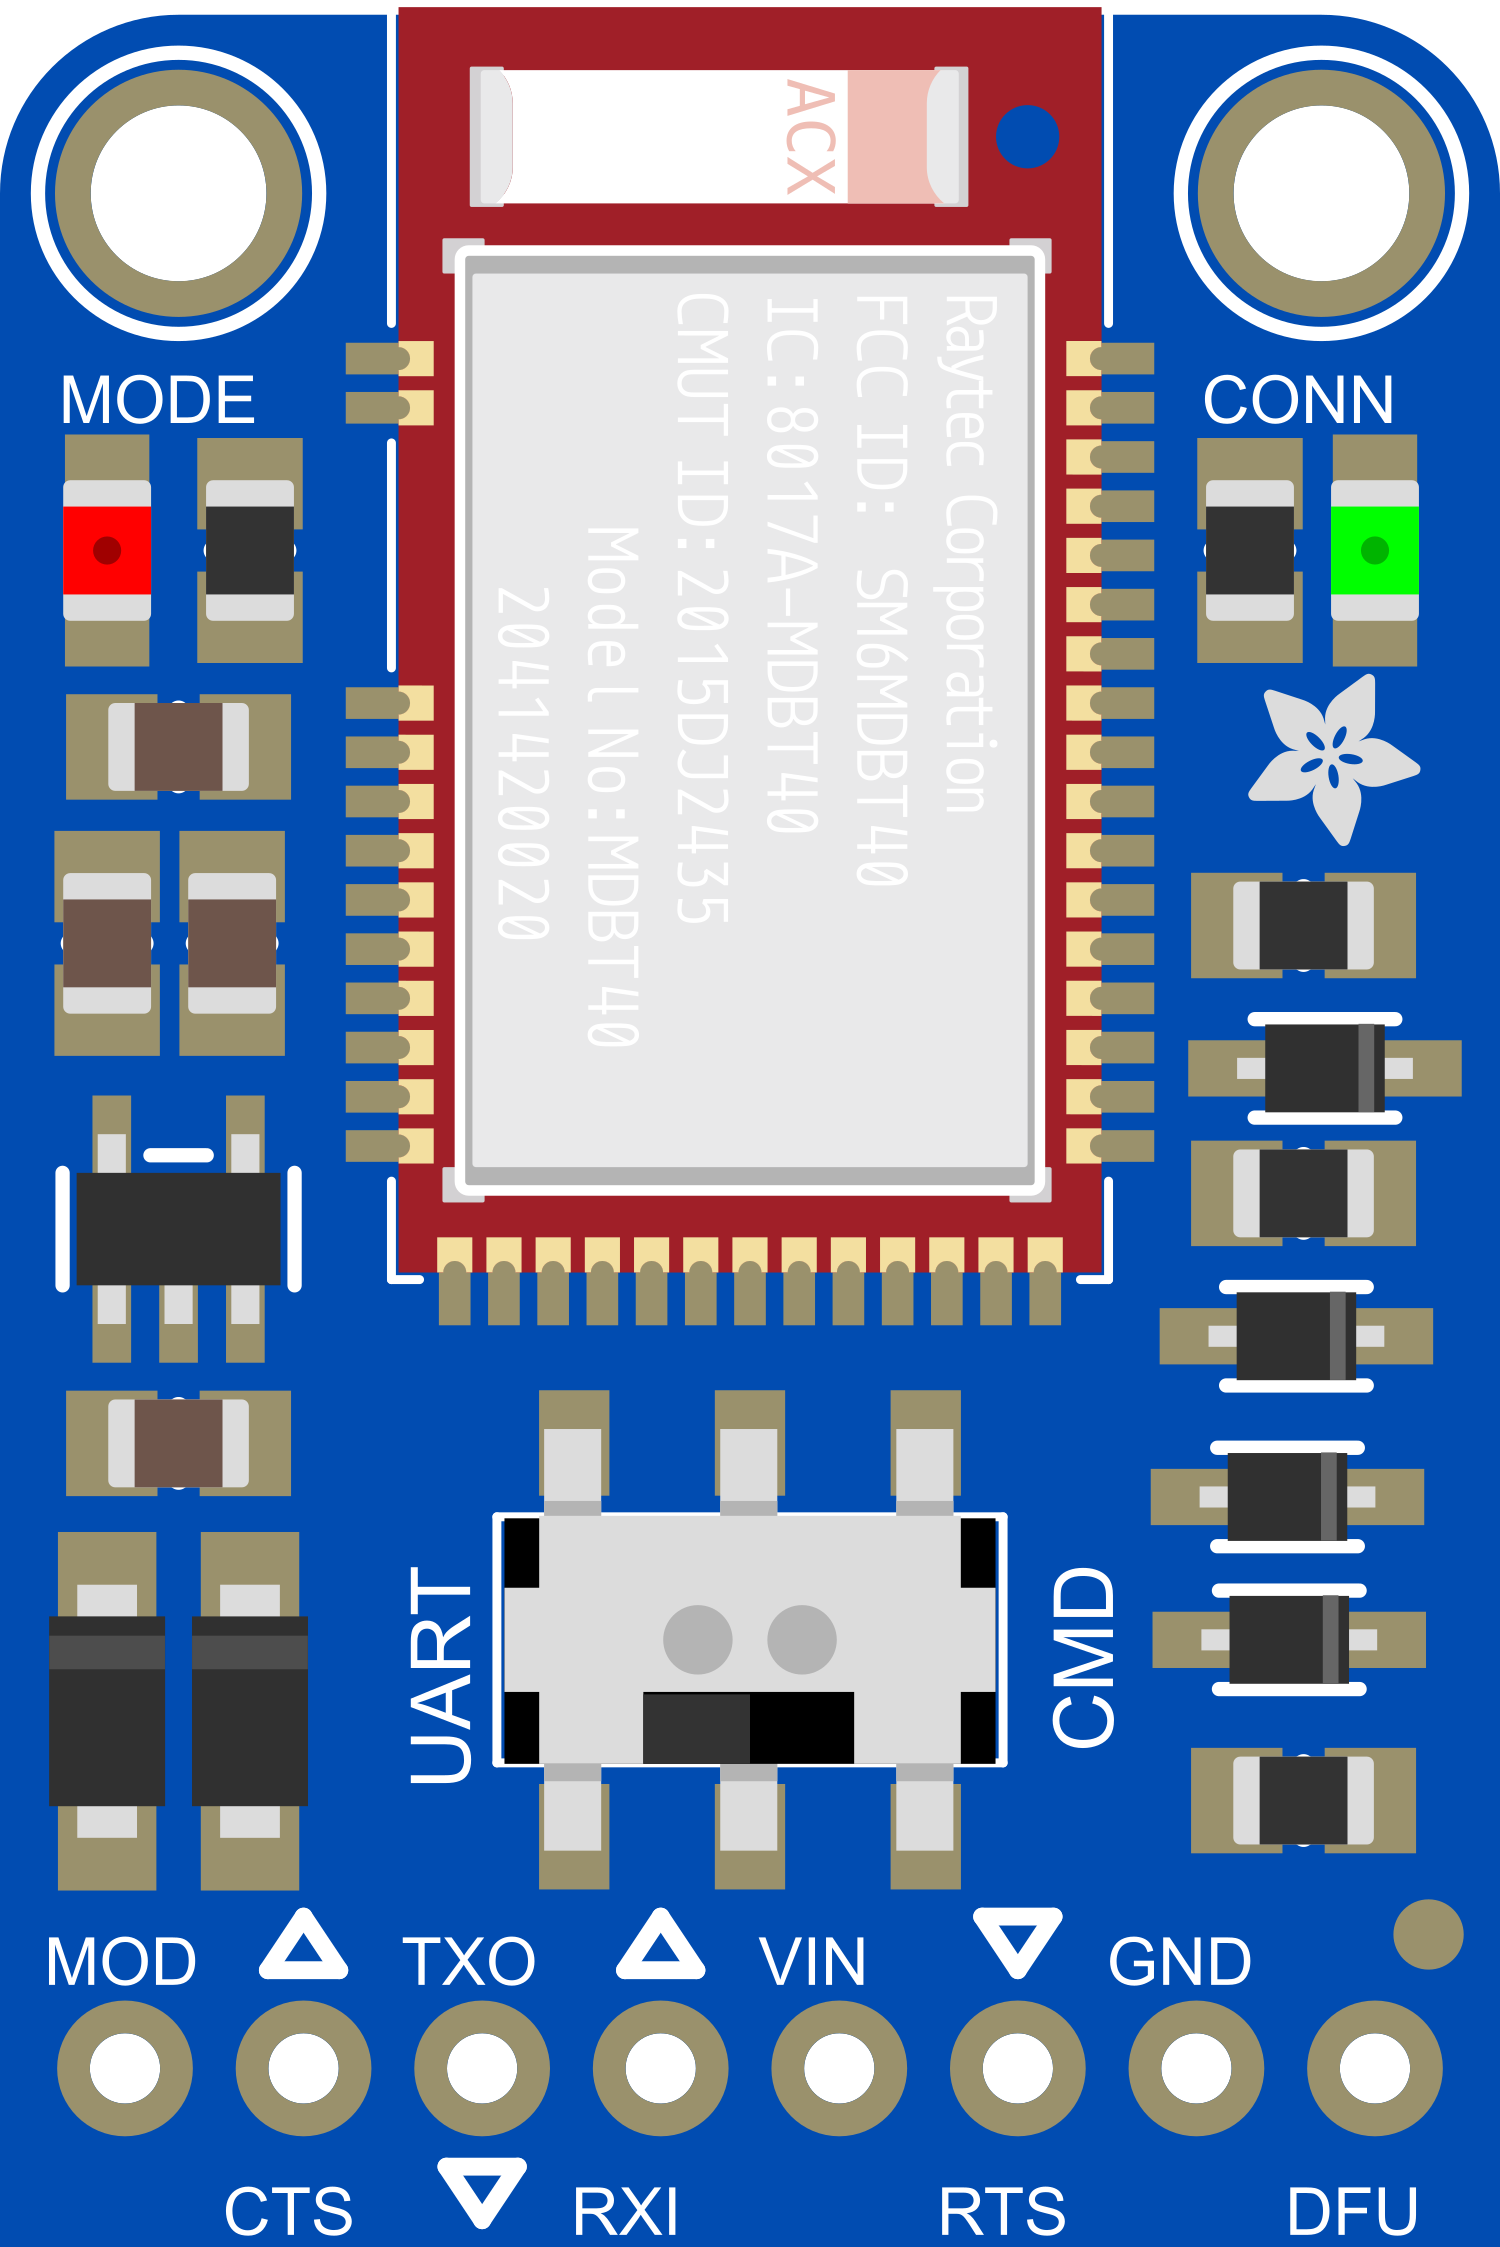
Pin Configuration and Descriptions
| Pin Number | Name | Description |
|---|---|---|
| 1 | VIN | Power supply input (3.3V to 5V) |
| 2 | GND | Ground connection |
| 3 | TXO | UART transmit output (connect to microcontroller RX) |
| 4 | RXI | UART receive input (connect to microcontroller TX) |
| 5 | RTS | Request to Send (optional flow control) |
| 6 | CTS | Clear to Send (optional flow control) |
| 7 | DTR | Data Terminal Ready (used for mode selection) |
| 8 | MODE | Mode selection (pull high for COMMAND mode) |
Usage Instructions
How to Use the Component in a Circuit
- Powering the Module: Connect the VIN pin to a 3.3V to 5V power supply, and the GND pin to the ground.
- UART Communication: Connect the TXO pin of the module to the RX pin of your microcontroller, and the RXI pin to the TX pin.
- Optional Flow Control: If required, connect the RTS and CTS pins for hardware flow control.
- Mode Selection: The MODE pin can be pulled high to enter COMMAND mode for configuration. Otherwise, it operates in DATA mode for transparent UART communication.
Important Considerations and Best Practices
- Ensure that the power supply is within the specified voltage range to prevent damage.
- Use a common ground between the Bluefruit LE UART Friend and the microcontroller.
- For reliable communication, consider using hardware flow control by connecting the RTS and CTS pins.
- When using with an Arduino UNO, remember to disconnect the RX and TX pins during the programming of the Arduino to avoid conflicts.
Troubleshooting and FAQs
Common Issues Users Might Face
- Module Not Powering On: Check the power connections and ensure the voltage is within the specified range.
- No Communication: Verify that the TX and RX connections are correct and that the baud rate matches the configuration of both devices.
- Intermittent Connection: Ensure there are no sources of interference nearby and that the antenna area is not obstructed.
Solutions and Tips for Troubleshooting
- Reset the Module: Sometimes simply resetting the module can resolve communication issues.
- Check LED Indicators: The onboard LEDs can provide useful information about the status of the module.
- Update Firmware: Ensure the module is running the latest firmware available from Adafruit.
Relevant Arduino Code Example
#include <SoftwareSerial.h>

// Create a software serial object to communicate with the Bluefruit LE module
SoftwareSerial bluefruitSerial(10, 11); // RX, TX

void setup() {
  // Set up the serial port for debugging
  Serial.begin(9600);
  // Start communication with the Bluefruit LE module
  bluefruitSerial.begin(9600);
  Serial.println("Bluefruit LE UART Friend example");
}

void loop() {
  // Forward any data from the hardware serial to the Bluefruit LE module
  if (Serial.available()) {
    bluefruitSerial.write(Serial.read());
  }
  // Forward any data from the Bluefruit LE module to the hardware serial
  if (bluefruitSerial.available()) {
    Serial.write(bluefruitSerial.read());
  }
}
Note: The above code uses pins 10 and 11 for software serial communication with the Bluefruit LE UART Friend. Adjust the pin numbers as needed for your specific setup. Ensure that the baud rate set in bluefruitSerial.begin() matches the configured baud rate of the Bluefruit LE module.