Cirkit Designer
Your all-in-one circuit design IDE
Home /
Component Documentation
How to Use HC-SR05: Examples, Pinouts, and Specs

 Design with HC-SR05 in Cirkit Designer
Introduction
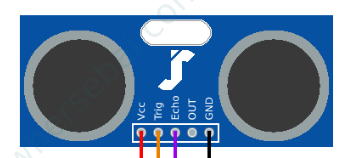
The HC-SR05 is an ultrasonic sensor used for distance measurement. It emits an ultrasonic wave and measures the time it takes for the echo to return, allowing it to calculate the distance to an object. This sensor is widely used in various applications such as robotics, obstacle avoidance systems, and distance measurement tools.
Explore Projects Built with HC-SR05
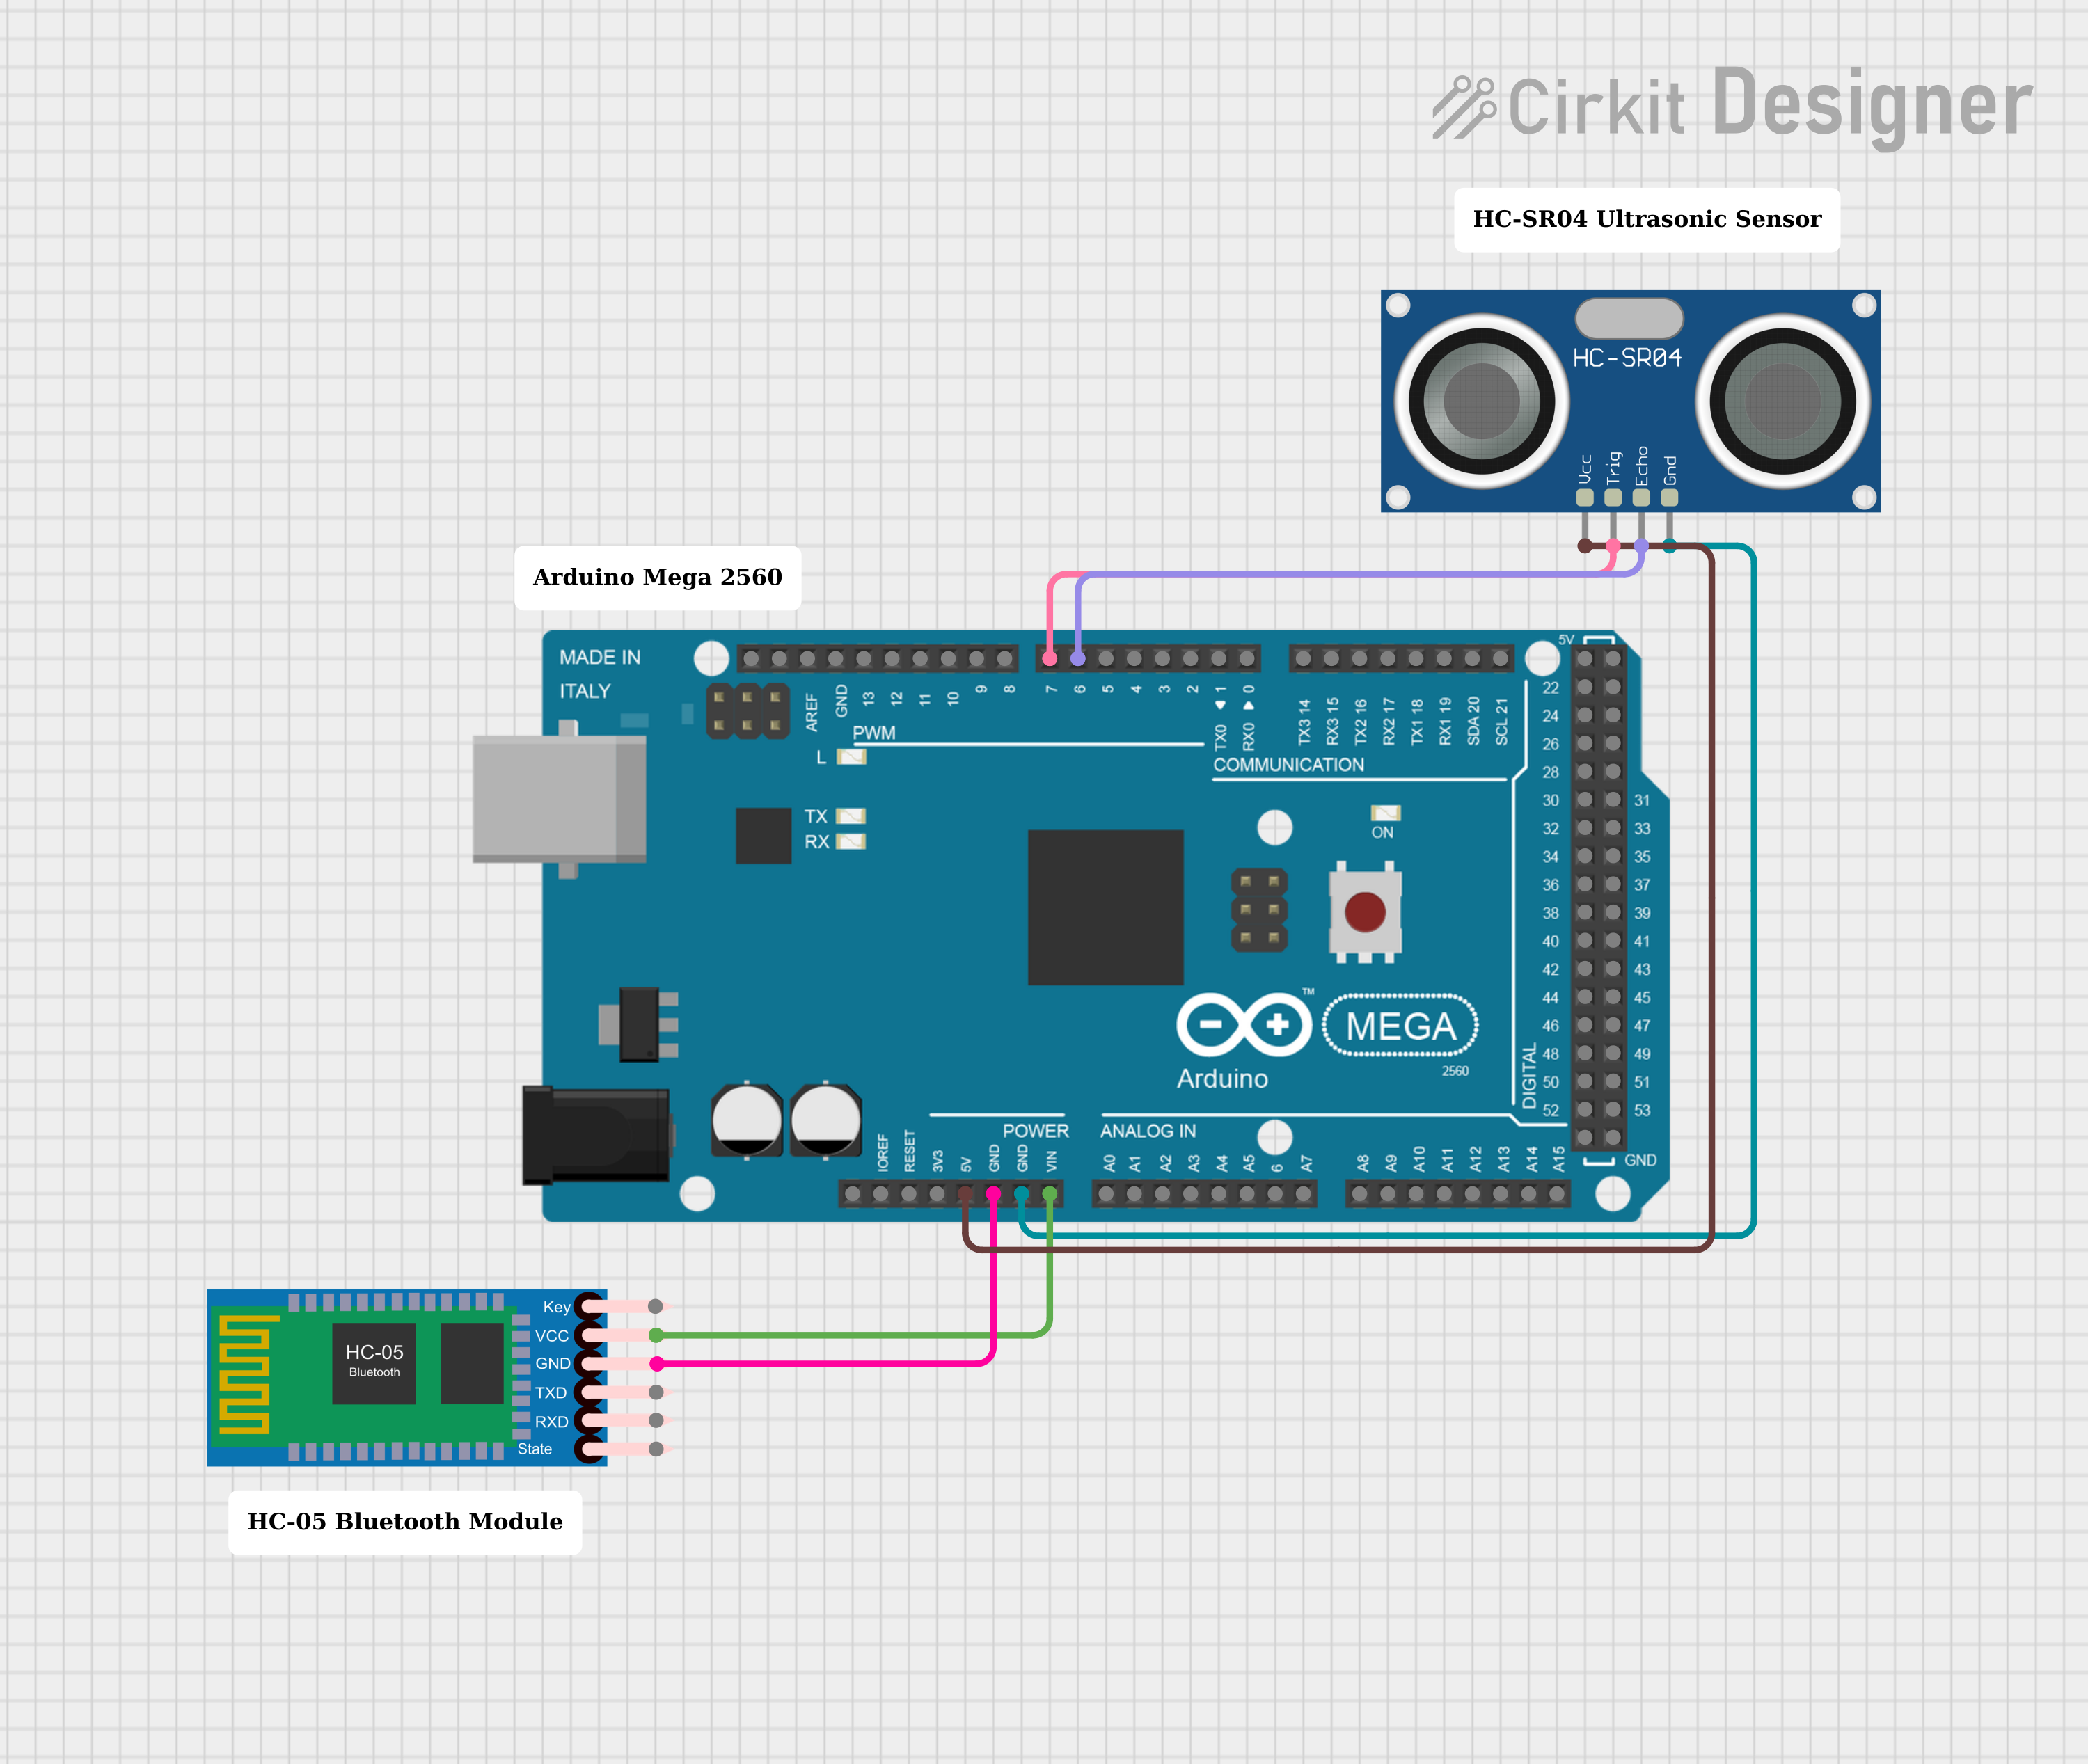
Arduino Mega 2560 Bluetooth-Controlled Ultrasonic Distance Measurement

This circuit features an Arduino Mega 2560 microcontroller interfaced with an HC-05 Bluetooth Module and an HC-SR04 Ultrasonic Sensor. The HC-05 is powered by the Arduino's VIN pin and is grounded to the Arduino's GND, enabling wireless communication capabilities. The HC-SR04 is powered by the Arduino's 5V output and uses two digital PWM pins (D7 for TRIG and D6 for ECHO) to measure distances via ultrasonic waves.
 Open Project in Cirkit Designer
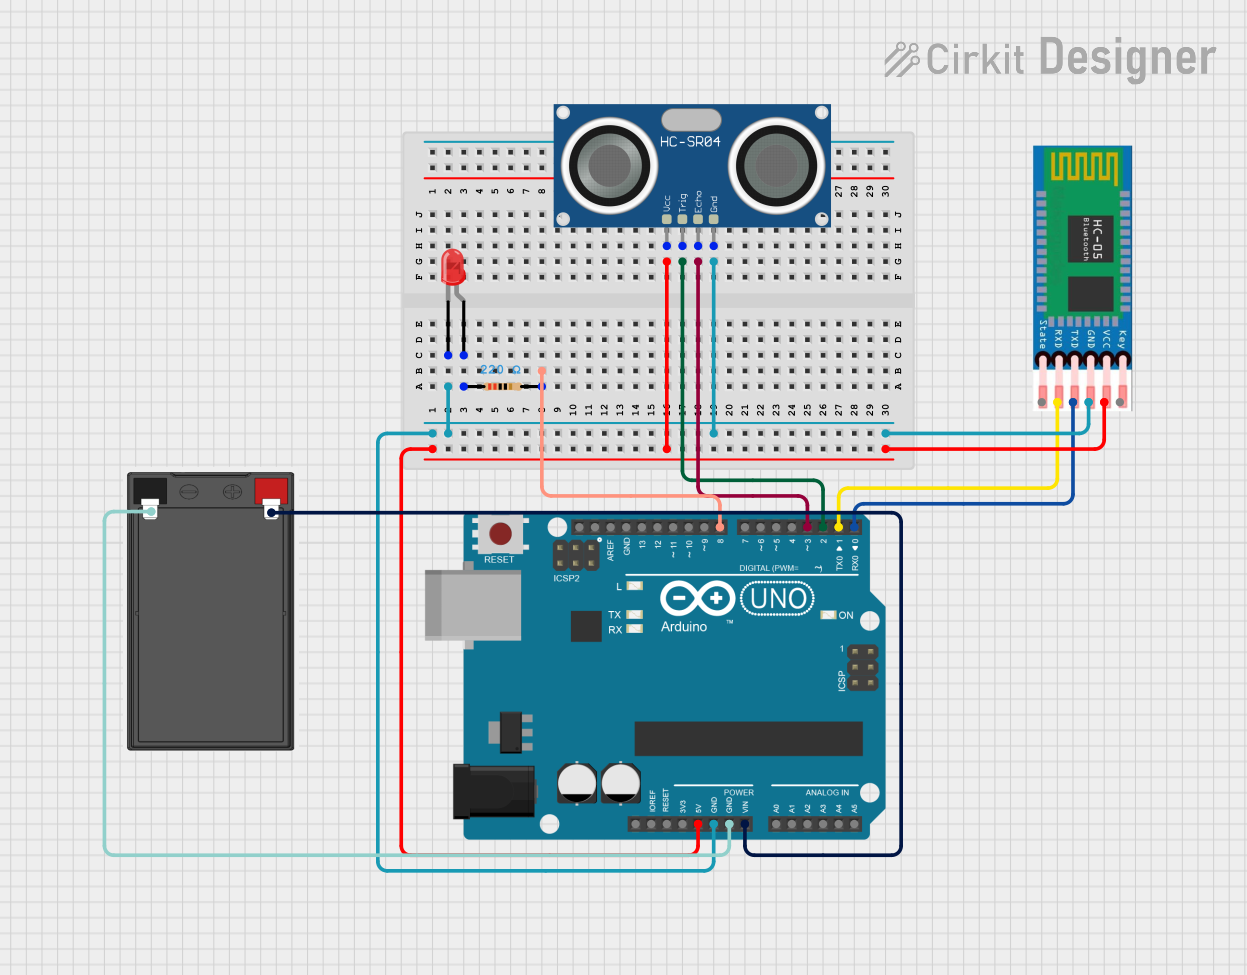
Arduino UNO-Based Ultrasonic Distance Sensor with Bluetooth and LED Indicator

This circuit uses an Arduino UNO to interface with an HC-SR04 ultrasonic sensor for distance measurement and an HC-05 Bluetooth module for wireless communication. Additionally, a red LED is controlled via a resistor to indicate status or provide visual feedback.
 Open Project in Cirkit Designer
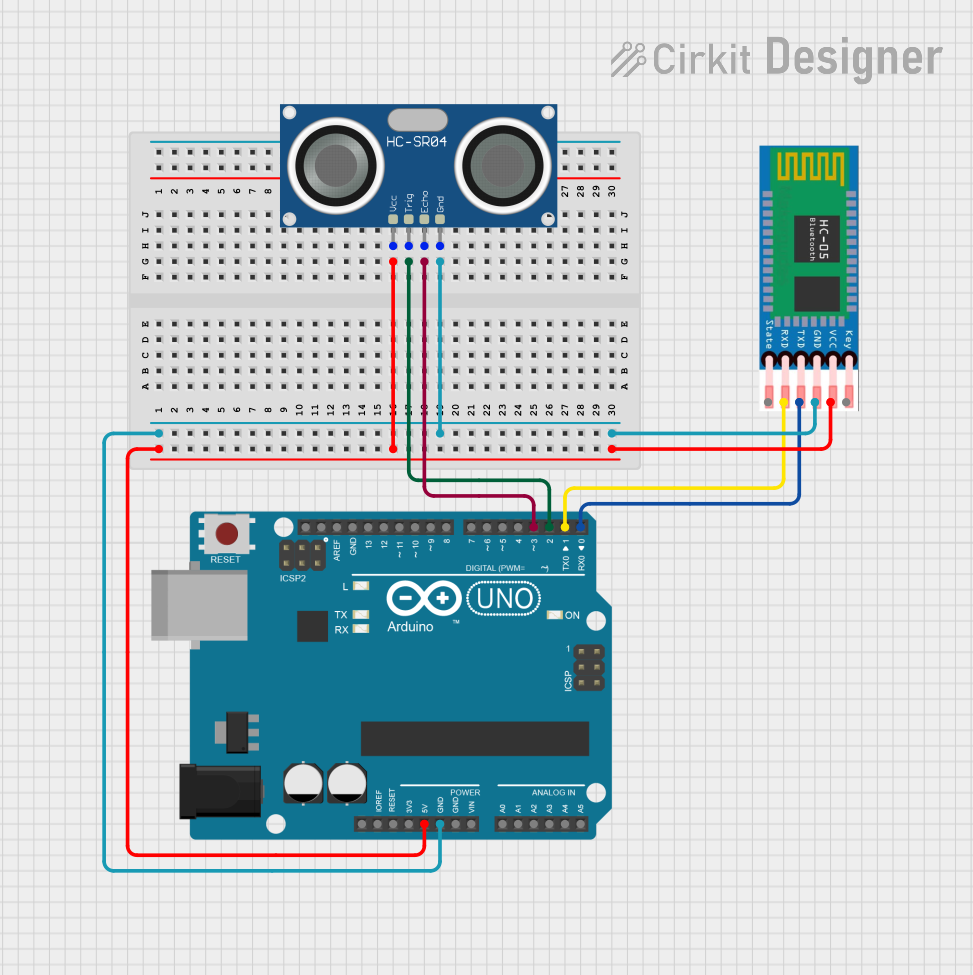
Arduino UNO Based Ultrasonic Distance Measurement with HC-SR04 and Bluetooth Communication via HC-05

This circuit features an Arduino UNO microcontroller interfaced with an HC-SR04 Ultrasonic Sensor and an HC-05 Bluetooth module. The Arduino is configured to trigger the ultrasonic sensor to measure distance and communicate the data wirelessly via the HC-05 module. Power is supplied to both the sensor and the Bluetooth module from the Arduino's 5V output, and ground connections are shared among all components.
 Open Project in Cirkit Designer
Arduino UNO-Based Smart Irrigation System with Motion Detection and Bluetooth Connectivity

This circuit is a microcontroller-based control and monitoring system. It uses an Arduino UNO to read from a DHT22 temperature and humidity sensor and an HC-SR501 motion sensor, display data on an LCD, and control a water pump and an LED through a relay. The HC-05 Bluetooth module allows for wireless communication.
 Open Project in Cirkit Designer
Explore Projects Built with HC-SR05

Arduino Mega 2560 Bluetooth-Controlled Ultrasonic Distance Measurement
This circuit features an Arduino Mega 2560 microcontroller interfaced with an HC-05 Bluetooth Module and an HC-SR04 Ultrasonic Sensor. The HC-05 is powered by the Arduino's VIN pin and is grounded to the Arduino's GND, enabling wireless communication capabilities. The HC-SR04 is powered by the Arduino's 5V output and uses two digital PWM pins (D7 for TRIG and D6 for ECHO) to measure distances via ultrasonic waves.
 Open Project in Cirkit Designer
Arduino UNO-Based Ultrasonic Distance Sensor with Bluetooth and LED Indicator
This circuit uses an Arduino UNO to interface with an HC-SR04 ultrasonic sensor for distance measurement and an HC-05 Bluetooth module for wireless communication. Additionally, a red LED is controlled via a resistor to indicate status or provide visual feedback.
 Open Project in Cirkit Designer
Arduino UNO Based Ultrasonic Distance Measurement with HC-SR04 and Bluetooth Communication via HC-05
This circuit features an Arduino UNO microcontroller interfaced with an HC-SR04 Ultrasonic Sensor and an HC-05 Bluetooth module. The Arduino is configured to trigger the ultrasonic sensor to measure distance and communicate the data wirelessly via the HC-05 module. Power is supplied to both the sensor and the Bluetooth module from the Arduino's 5V output, and ground connections are shared among all components.
 Open Project in Cirkit Designer
Arduino UNO-Based Smart Irrigation System with Motion Detection and Bluetooth Connectivity
This circuit is a microcontroller-based control and monitoring system. It uses an Arduino UNO to read from a DHT22 temperature and humidity sensor and an HC-SR501 motion sensor, display data on an LCD, and control a water pump and an LED through a relay. The HC-05 Bluetooth module allows for wireless communication.
 Open Project in Cirkit Designer
Technical Specifications
Key Technical Details
| Parameter | Value |
|---|---|
| Operating Voltage | 5V DC |
| Operating Current | 15mA |
| Measuring Range | 2cm to 400cm |
| Measuring Angle | 15 degrees |
| Frequency | 40kHz |
| Resolution | 0.3cm |
| Trigger Input Pin | 10µs TTL pulse |
| Echo Output Pin | Output pulse width proportional to distance |
Pin Configuration and Descriptions
| Pin Name | Pin Number | Description |
|---|---|---|
| VCC | 1 | Power supply (5V) |
| Trig | 2 | Trigger input pin |
| Echo | 3 | Echo output pin |
| GND | 4 | Ground |
Usage Instructions
How to Use the Component in a Circuit
- Power Supply: Connect the VCC pin to a 5V power supply and the GND pin to the ground.
- Trigger Pin: Connect the Trig pin to a digital output pin on your microcontroller (e.g., Arduino).
- Echo Pin: Connect the Echo pin to a digital input pin on your microcontroller.
Important Considerations and Best Practices
- Ensure that the sensor is placed in a position where it has a clear line of sight to the object being measured.
- Avoid placing the sensor near sources of ultrasonic noise, as this can interfere with measurements.
- Use a stable power supply to ensure accurate readings.
- Implement proper error handling in your code to manage cases where no echo is received.
Sample Arduino Code
// Define pins for the HC-SR05 sensor
const int trigPin = 9;
const int echoPin = 10;

// Define variables for duration and distance
long duration;
int distance;

void setup() {
  // Initialize serial communication at 9600 baud rate
  Serial.begin(9600);

  // Set trigPin as OUTPUT and echoPin as INPUT
  pinMode(trigPin, OUTPUT);
  pinMode(echoPin, INPUT);
}

void loop() {
  // Clear the trigPin by setting it LOW
  digitalWrite(trigPin, LOW);
  delayMicroseconds(2);

  // Set the trigPin HIGH for 10 microseconds
  digitalWrite(trigPin, HIGH);
  delayMicroseconds(10);
  digitalWrite(trigPin, LOW);

  // Read the echoPin, returns the sound wave travel time in microseconds
  duration = pulseIn(echoPin, HIGH);

  // Calculate the distance
  distance = duration * 0.034 / 2;

  // Print the distance on the Serial Monitor
  Serial.print("Distance: ");
  Serial.print(distance);
  Serial.println(" cm");

  // Wait for 60 milliseconds before the next loop
  delay(60);
}
Troubleshooting and FAQs
Common Issues Users Might Face
- No Echo Received: The sensor might not receive an echo if the object is too far or too close, or if the object is not within the sensor's measuring angle.
- Inaccurate Readings: This can be caused by electrical noise, unstable power supply, or incorrect sensor placement.
Solutions and Tips for Troubleshooting
- No Echo Received: Ensure the object is within the sensor's range (2cm to 400cm) and within the 15-degree measuring angle. Check connections and ensure the sensor is powered correctly.
- Inaccurate Readings: Use a stable power supply and ensure the sensor is placed in a stable environment. Avoid placing the sensor near sources of ultrasonic noise. Implement averaging in your code to smooth out readings.
By following these guidelines and best practices, you can effectively use the HC-SR05 ultrasonic sensor in your projects for accurate distance measurement.