How to Use powerbank 18650: Examples, Pinouts, and Specs
Introduction
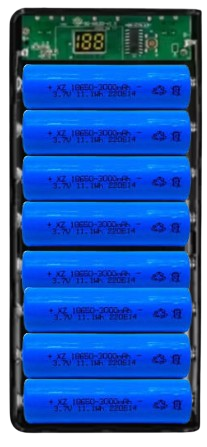
The Powerbank 18650 by Arduino (Part ID: powerbank 18650) is a portable battery pack designed to store and provide power using 18650 lithium-ion cells. This versatile component is ideal for charging devices such as smartphones, tablets, and small electronic projects. Its compact design and rechargeable nature make it a reliable power source for on-the-go applications.
Explore Projects Built with powerbank 18650


Explore Projects Built with powerbank 18650
Common Applications and Use Cases
- Charging mobile devices (e.g., smartphones, tablets, smartwatches)
- Powering small electronic projects and development boards (e.g., Arduino, Raspberry Pi)
- Emergency backup power for portable devices
- DIY portable power solutions
Technical Specifications
The following table outlines the key technical details of the Powerbank 18650:
| Parameter | Specification |
|---|---|
| Input Voltage | 5V DC (via Micro-USB or USB-C port) |
| Output Voltage | 5V DC (via USB-A port) |
| Output Current | Up to 2.1A (depending on load) |
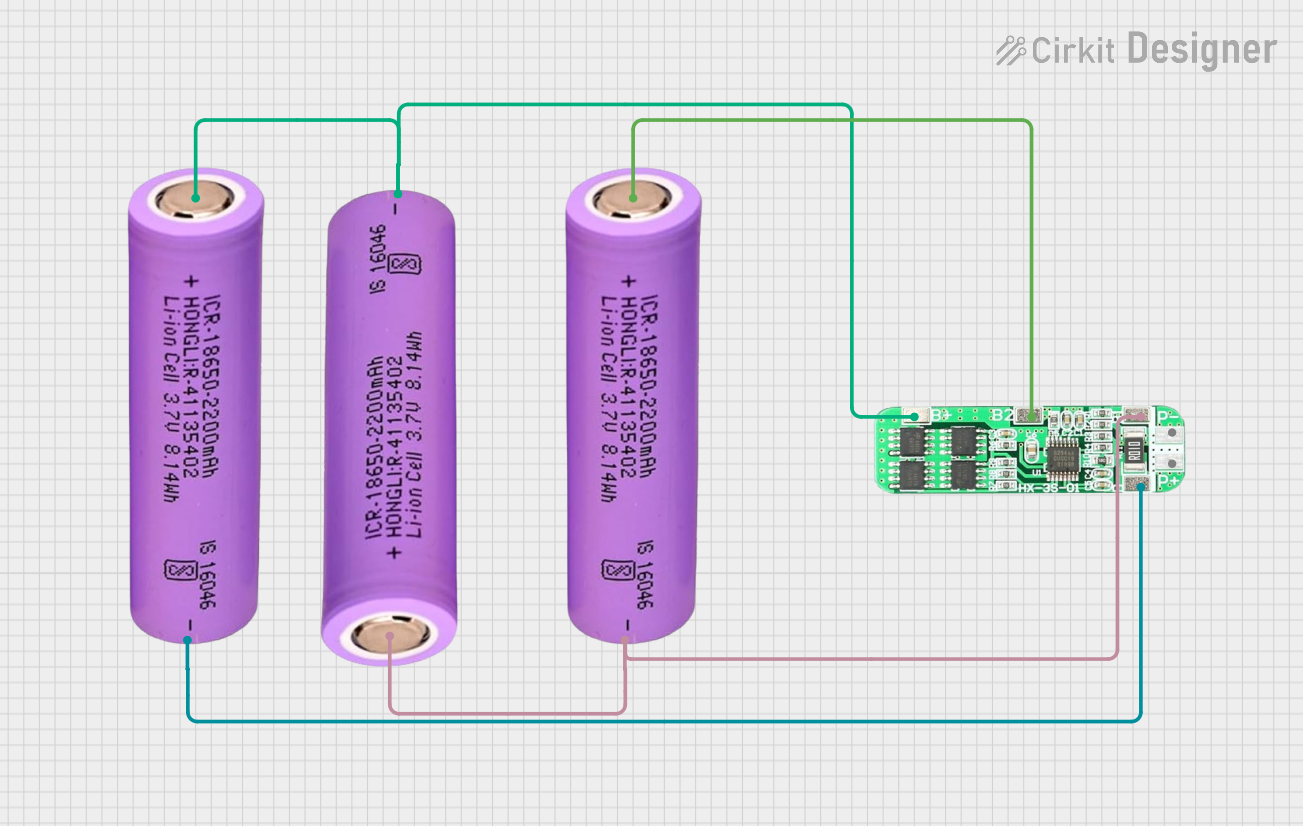
| Battery Type | 18650 Lithium-Ion Cells (not included) |
| Battery Capacity | Depends on installed 18650 cells (e.g., 2600mAh per cell) |
| Number of Cells | 1 to 2 cells supported |
| Charging Method | Constant Current/Constant Voltage (CC/CV) |
| Protection Features | Overcharge, Over-discharge, Short Circuit |
| Dimensions | 96mm x 24mm x 22mm (approx.) |
| Weight | ~30g (without batteries) |
Pin Configuration and Descriptions
The Powerbank 18650 does not have traditional pins but includes the following ports and interfaces:
| Port/Interface | Description |
|---|---|
| Micro-USB Input | Used to charge the 18650 cells inside the powerbank. |
| USB-C Input | Alternative input for charging the powerbank. |
| USB-A Output | Provides 5V DC output for powering external devices. |
| Battery Terminals | Internal slots for 18650 lithium-ion cells. |
Usage Instructions
How to Use the Powerbank 18650 in a Circuit
- Install 18650 Cells: Insert one or two 18650 lithium-ion cells into the battery slots, ensuring correct polarity (+/-).
- Charge the Powerbank: Connect a 5V DC power source (e.g., USB charger) to the Micro-USB or USB-C input port. The internal charging circuit will manage the charging process.
- Power External Devices: Connect your device to the USB-A output port using a USB cable. The powerbank will automatically supply 5V DC to the connected device.
Important Considerations and Best Practices
- Battery Selection: Use high-quality, protected 18650 cells with a capacity of at least 2000mAh for optimal performance.
- Polarity Check: Ensure the correct polarity when inserting the batteries to avoid damage to the powerbank.
- Charging Safety: Do not leave the powerbank charging unattended for extended periods.
- Load Limit: Avoid connecting devices that draw more than 2.1A, as this may trigger the overcurrent protection.
- Temperature: Operate the powerbank within a temperature range of 0°C to 40°C to prevent overheating.
Example: Powering an Arduino UNO
The Powerbank 18650 can be used to power an Arduino UNO via its USB-A output. Below is an example of how to connect and use it:
- Connect the USB-A output of the powerbank to the Arduino UNO's USB port using a USB cable.
- The Arduino UNO will automatically power on and operate as usual.
Here is a simple Arduino sketch to blink an LED while powered by the Powerbank 18650:
// Simple LED Blink Example
// This sketch blinks the built-in LED on pin 13 of the Arduino UNO.

void setup() {
  pinMode(13, OUTPUT); // Set pin 13 as an output
}

void loop() {
  digitalWrite(13, HIGH); // Turn the LED on
  delay(1000);            // Wait for 1 second
  digitalWrite(13, LOW);  // Turn the LED off
  delay(1000);            // Wait for 1 second
}
Troubleshooting and FAQs
Common Issues and Solutions
Powerbank Not Charging
- Cause: Faulty USB cable or power source.
- Solution: Check the USB cable and ensure the power source provides 5V DC.
No Output Power
- Cause: Batteries are not installed or are discharged.
- Solution: Install fully charged 18650 cells and ensure correct polarity.
Device Not Charging
- Cause: Device requires more than 2.1A or incompatible cable.
- Solution: Use a compatible device and cable. Ensure the device's power requirements are within the powerbank's limits.
Overheating
- Cause: Prolonged use at high current or high ambient temperature.
- Solution: Allow the powerbank to cool down before further use. Avoid using it in hot environments.
FAQs
Q1: Can I use unprotected 18650 cells with this powerbank?
A1: It is recommended to use protected 18650 cells to ensure safety and prevent overcharging or over-discharging.
Q2: How long does it take to fully charge the powerbank?
A2: Charging time depends on the capacity of the installed 18650 cells and the input current. For example, with a 1A charger and two 2600mAh cells, it may take approximately 6-8 hours.
Q3: Can I charge the powerbank and use it to power a device simultaneously?
A3: Yes, the powerbank supports pass-through charging, but this may reduce the charging efficiency.
Q4: What happens if I insert the batteries incorrectly?
A4: The powerbank includes reverse polarity protection, but it is always best to double-check the polarity to avoid potential damage.