
How to Use DCM01 Reflective Blood Sensor: Examples, Pinouts, and Specs
 Design with DCM01 Reflective Blood Sensor in Cirkit Designer
Introduction
The DCM01 Reflective Blood Sensor is a compact and efficient optical sensor designed to measure blood properties using light reflection. It is commonly used in medical and fitness devices to monitor parameters such as oxygen saturation (SpO2), heart rate, and blood flow. The sensor operates by emitting light into the skin and detecting the reflected light, which varies based on blood characteristics.
Explore Projects Built with DCM01 Reflective Blood Sensor
 Open Project in Cirkit Designer
 Open Project in Cirkit Designer
 Open Project in Cirkit Designer
 Open Project in Cirkit Designer
Explore Projects Built with DCM01 Reflective Blood Sensor
Open Project in Cirkit DesignerOpen Project in Cirkit DesignerOpen Project in Cirkit DesignerOpen Project in Cirkit DesignerCommon Applications and Use Cases
- Pulse oximeters for measuring blood oxygen levels
- Fitness trackers and smartwatches for heart rate monitoring
- Medical devices for non-invasive blood analysis
- Research and development in biomedical engineering
Technical Specifications
The DCM01 Reflective Blood Sensor is designed for precision and ease of integration into various systems. Below are its key technical details:
General Specifications
| Parameter | Value |
|---|---|
| Operating Voltage | 3.3V to 5V |
| Operating Current | 10mA (typical), 20mA (max) |
| Wavelengths | Red: 660nm, Infrared: 940nm |
| Detection Range | 0.5mm to 5mm |
| Output Type | Analog |
| Operating Temperature | -20°C to 70°C |
| Dimensions | 10mm x 10mm x 3mm |
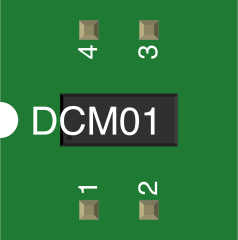
Pin Configuration and Descriptions
| Pin Number | Pin Name | Description |
|---|---|---|
| 1 | VCC | Power supply input (3.3V to 5V) |
| 2 | GND | Ground connection |
| 3 | OUT | Analog output signal proportional to reflection |
| 4 | LED_CTRL | Input to control the LED (active HIGH) |
Usage Instructions
The DCM01 Reflective Blood Sensor is straightforward to use in a circuit. Below are the steps and best practices for integrating it into your project:
Circuit Connection
- Connect the VCC pin to a 3.3V or 5V power supply.
- Connect the GND pin to the ground of your circuit.
- Connect the OUT pin to an analog input pin of your microcontroller or ADC (Analog-to-Digital Converter).
- Use the LED_CTRL pin to enable or disable the internal LED. Drive this pin HIGH to activate the LED.
Important Considerations
- Ensure the sensor is placed close to the skin for accurate readings (0.5mm to 5mm distance).
- Avoid ambient light interference by shielding the sensor from external light sources.
- Use a low-pass filter on the analog output to reduce noise in the signal.
- Calibrate the sensor for your specific application to improve accuracy.
Example Code for Arduino UNO
Below is an example of how to use the DCM01 Reflective Blood Sensor with an Arduino UNO to read analog values:
// DCM01 Reflective Blood Sensor Example Code
// Connect the OUT pin to A0 on the Arduino UNO
// Connect LED_CTRL to pin 7 for LED control

const int sensorPin = A0;  // Analog pin connected to OUT
const int ledCtrlPin = 7;  // Digital pin connected to LED_CTRL
int sensorValue = 0;       // Variable to store sensor reading

void setup() {
  pinMode(ledCtrlPin, OUTPUT);  // Set LED_CTRL pin as output
  digitalWrite(ledCtrlPin, HIGH);  // Turn on the sensor LED
  Serial.begin(9600);  // Initialize serial communication
}

void loop() {
  sensorValue = analogRead(sensorPin);  // Read analog value from sensor
  Serial.print("Sensor Value: ");
  Serial.println(sensorValue);  // Print the sensor value to the Serial Monitor
  delay(500);  // Wait for 500ms before the next reading
}
Best Practices
- Use a stable power supply to avoid fluctuations in readings.
- Regularly clean the sensor surface to maintain accuracy.
- If using the sensor in a wearable device, ensure it is securely attached to minimize motion artifacts.
Troubleshooting and FAQs
Common Issues and Solutions
No Output Signal
- Ensure the sensor is powered correctly (check VCC and GND connections).
- Verify that the LED_CTRL pin is set HIGH to activate the LED.
Inconsistent Readings
- Check for ambient light interference and shield the sensor if necessary.
- Ensure the sensor is placed at the correct distance from the skin.
Low Signal Strength
- Verify that the sensor surface is clean and free of obstructions.
- Ensure proper contact with the skin for optimal reflection.
High Noise in Output
- Add a low-pass filter to the analog output to reduce noise.
- Use software averaging to smooth the signal.
Frequently Asked Questions
Q: Can the DCM01 sensor measure SpO2 directly?
A: The sensor provides raw analog data. To calculate SpO2, you need to process the data using algorithms that compare the red and infrared light absorption.
Q: Is the sensor waterproof?
A: No, the DCM01 is not waterproof. Avoid exposing it to liquids or high humidity.
Q: Can I use the sensor with a 3.3V microcontroller?
A: Yes, the sensor operates within a voltage range of 3.3V to 5V, making it compatible with 3.3V systems.
Q: How do I improve accuracy in wearable applications?
A: Ensure the sensor is securely attached to minimize motion artifacts and calibrate it for the specific application.
By following this documentation, you can effectively integrate and use the DCM01 Reflective Blood Sensor in your projects.