Cirkit Designer
Your all-in-one circuit design IDE
Home /
Component Documentation
How to Use Solenoid Valve 5/2: Examples, Pinouts, and Specs
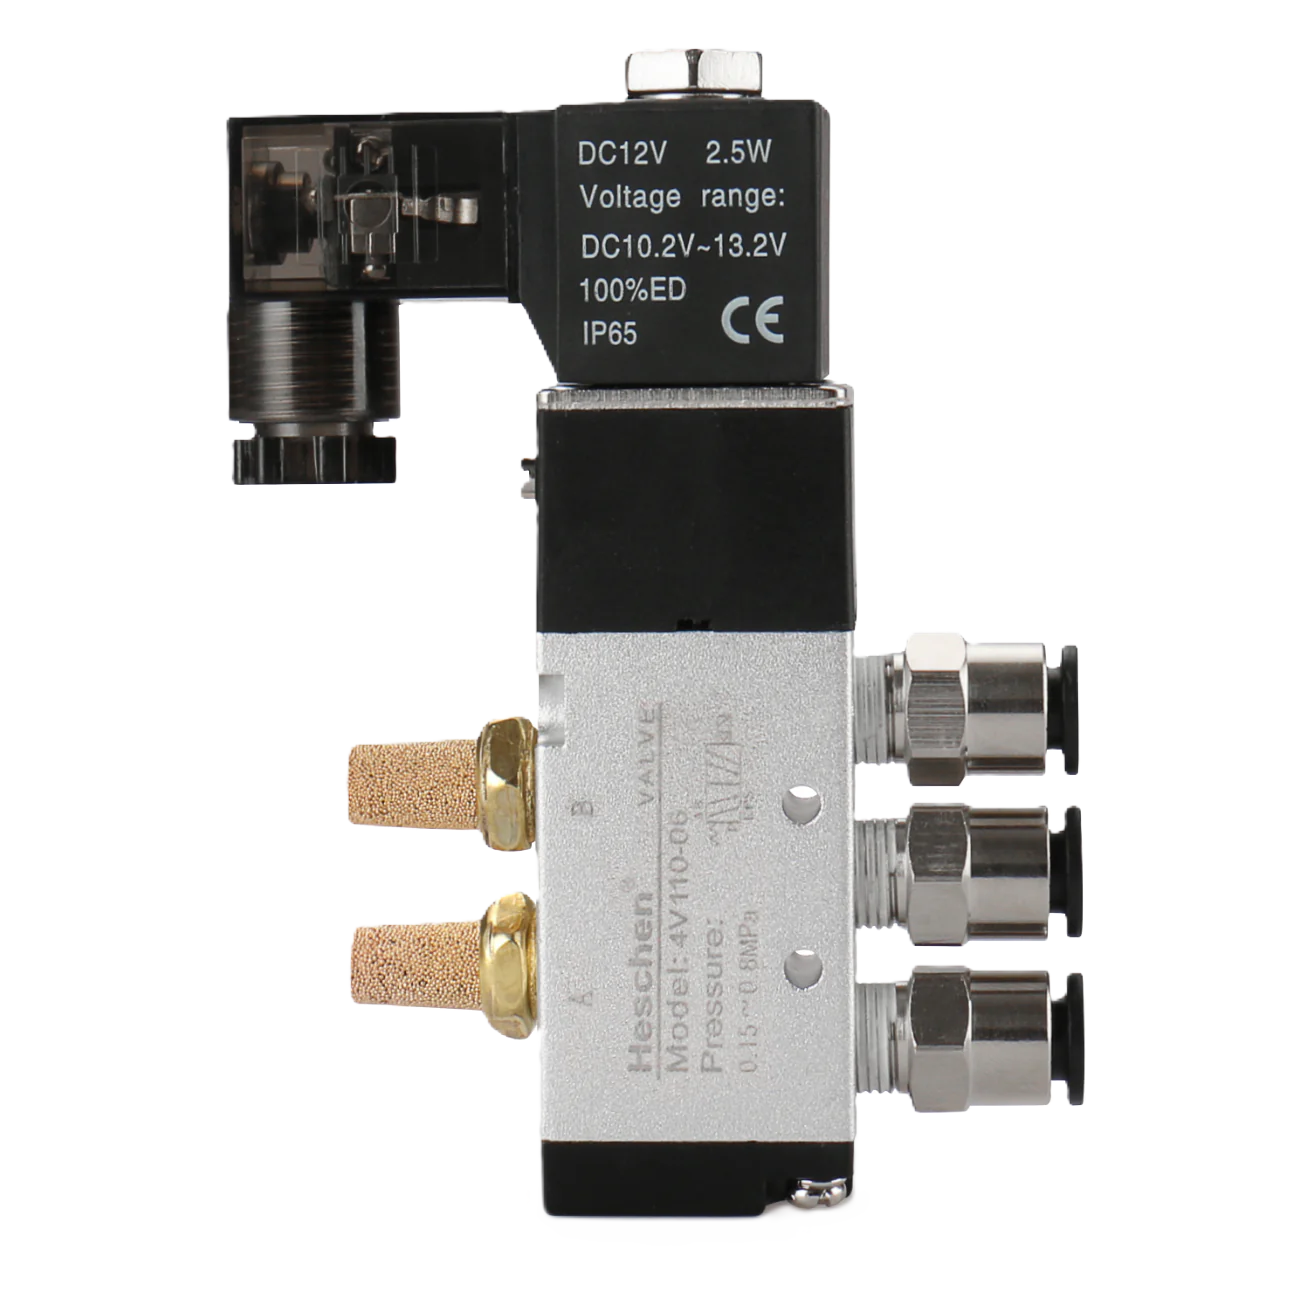
Introduction
The Solenoid Valve 5/2 is an electromechanically operated valve with five ports and two positions. It is designed to control the flow of fluids or gases in a system by electrically actuating the valve. This type of valve is commonly used in pneumatic and hydraulic systems, automation, and industrial applications where precise control of fluid or gas flow is required.
Explore Projects Built with Solenoid Valve 5/2
Wi-Fi Controlled Solenoid Valve and Servo Motor System
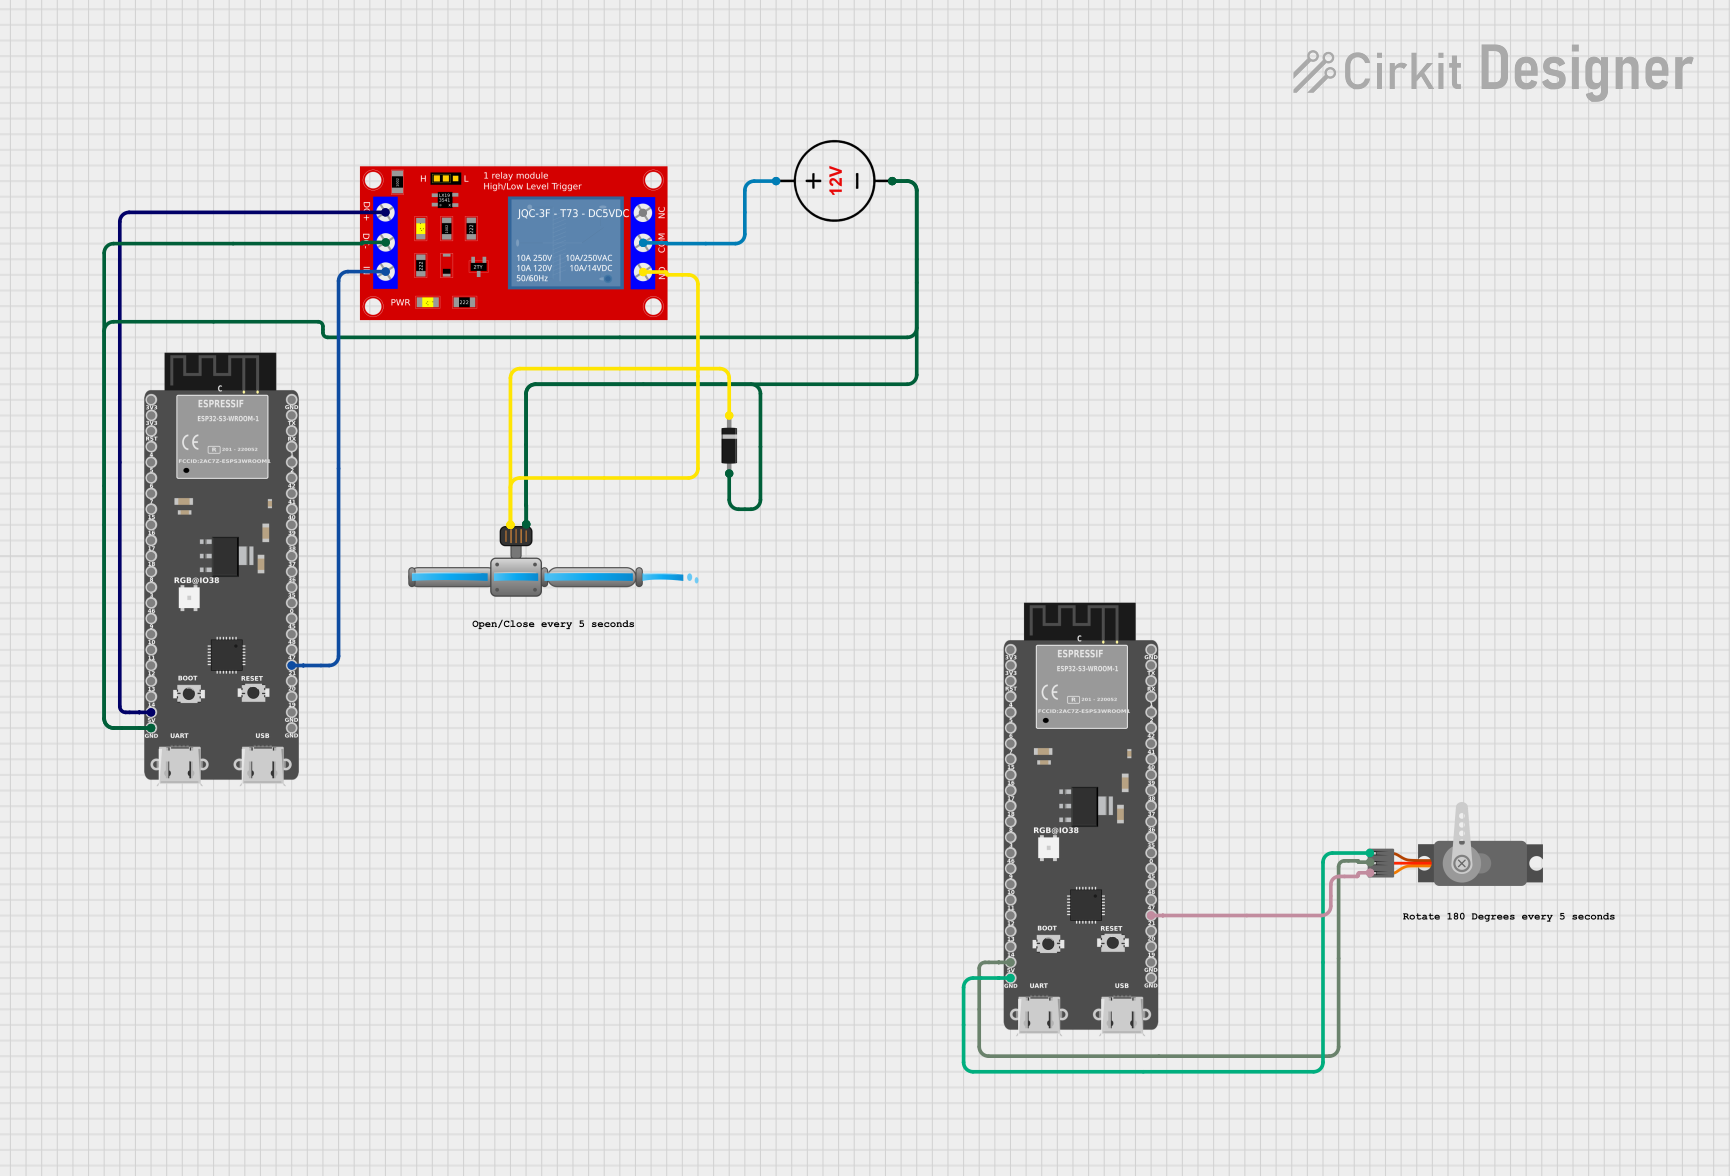
This circuit utilizes an ESP32-S3 microcontroller to control a solenoid irrigation valve and a servo motor. The solenoid valve is activated through a relay module, allowing it to open and close every 5 seconds, while the servo motor is smoothly rotated between 0 and 180 degrees. Both components are powered and controlled via GPIO pins on the ESP32-S3.
Arduino and GSM-Controlled Solenoid Valve System
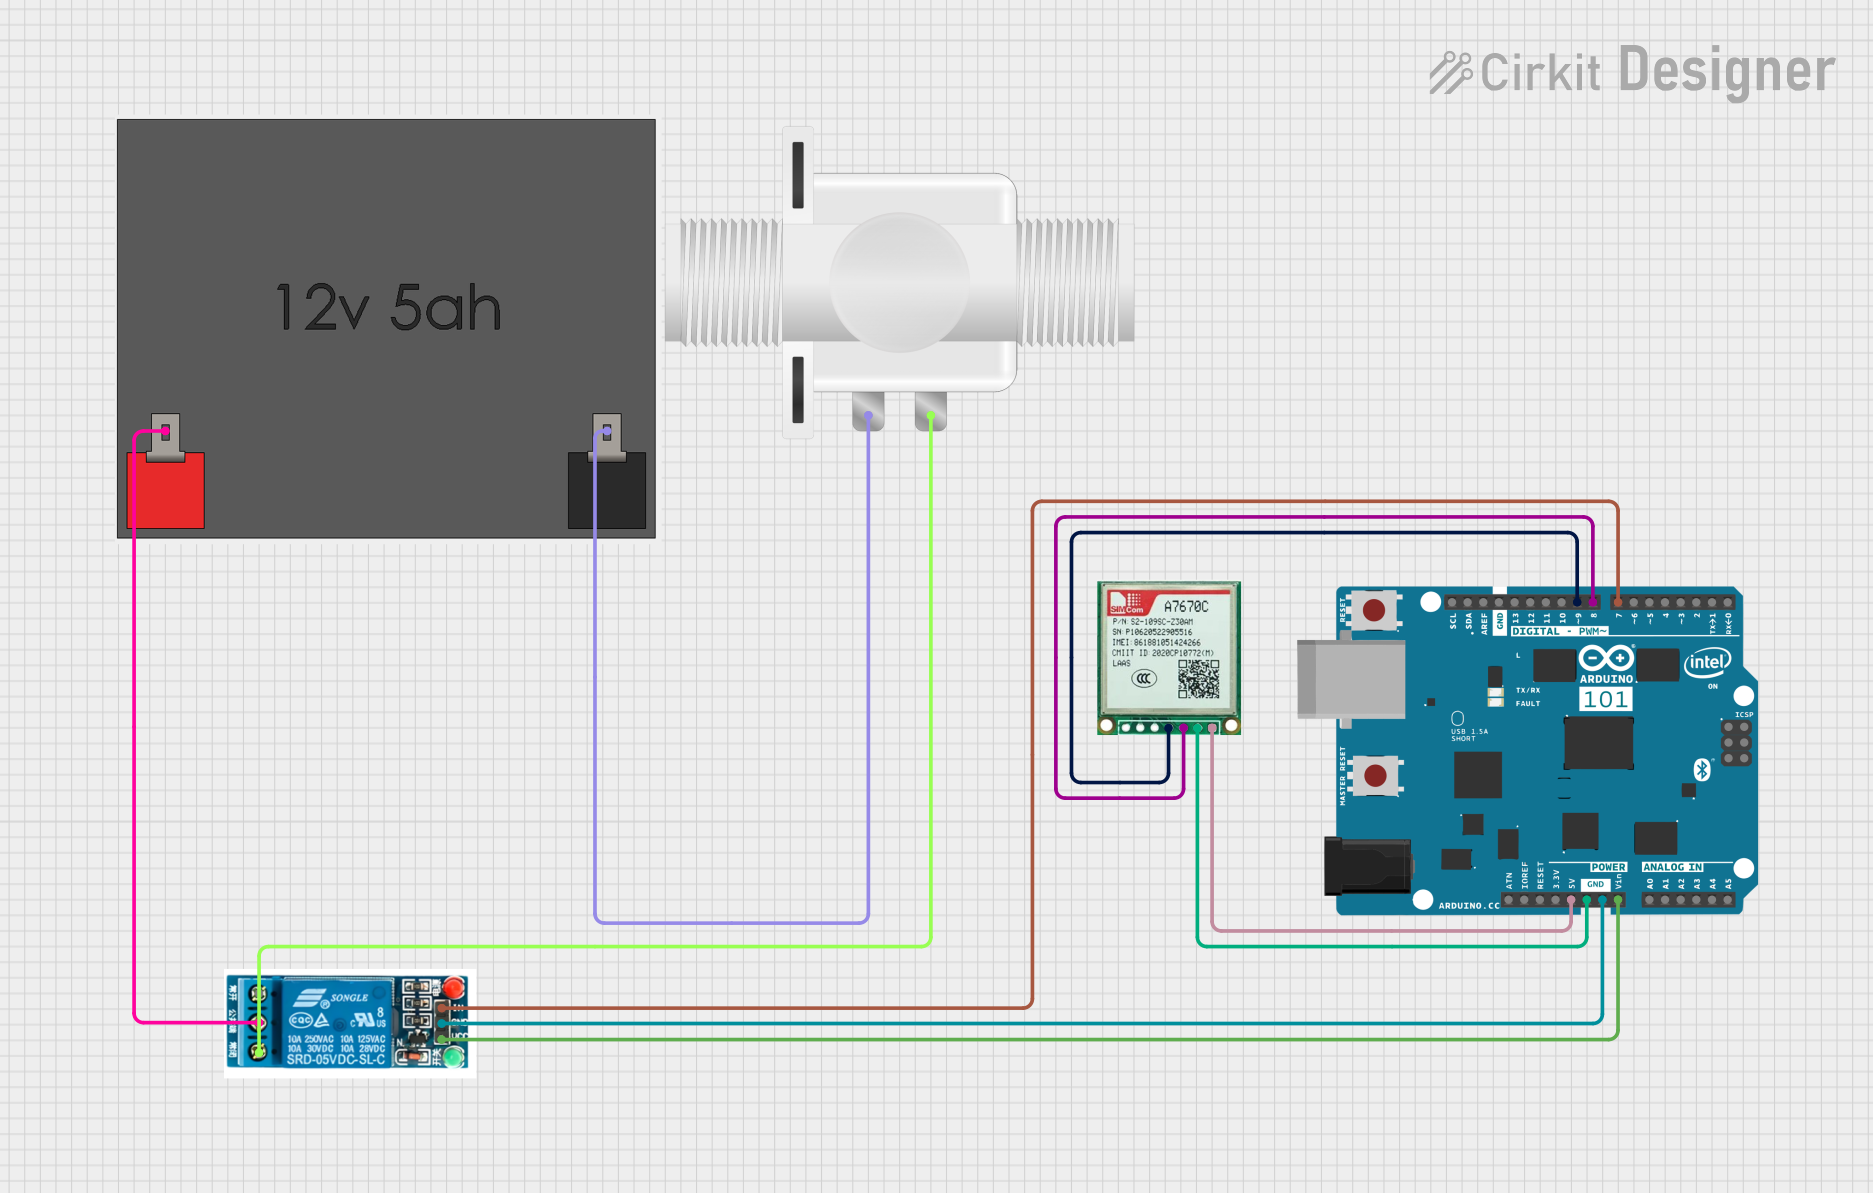
This circuit uses an Arduino 101 to control a solenoid valve via a 5V relay, based on commands received from a GSM module (Sim A7670c). When the Arduino receives an SMS with the text 'ON', it activates the relay to open the solenoid valve for 2 seconds and sends confirmation messages back through the GSM module.
Arduino Mega 2560 Controlled Solenoid with 5V Relay
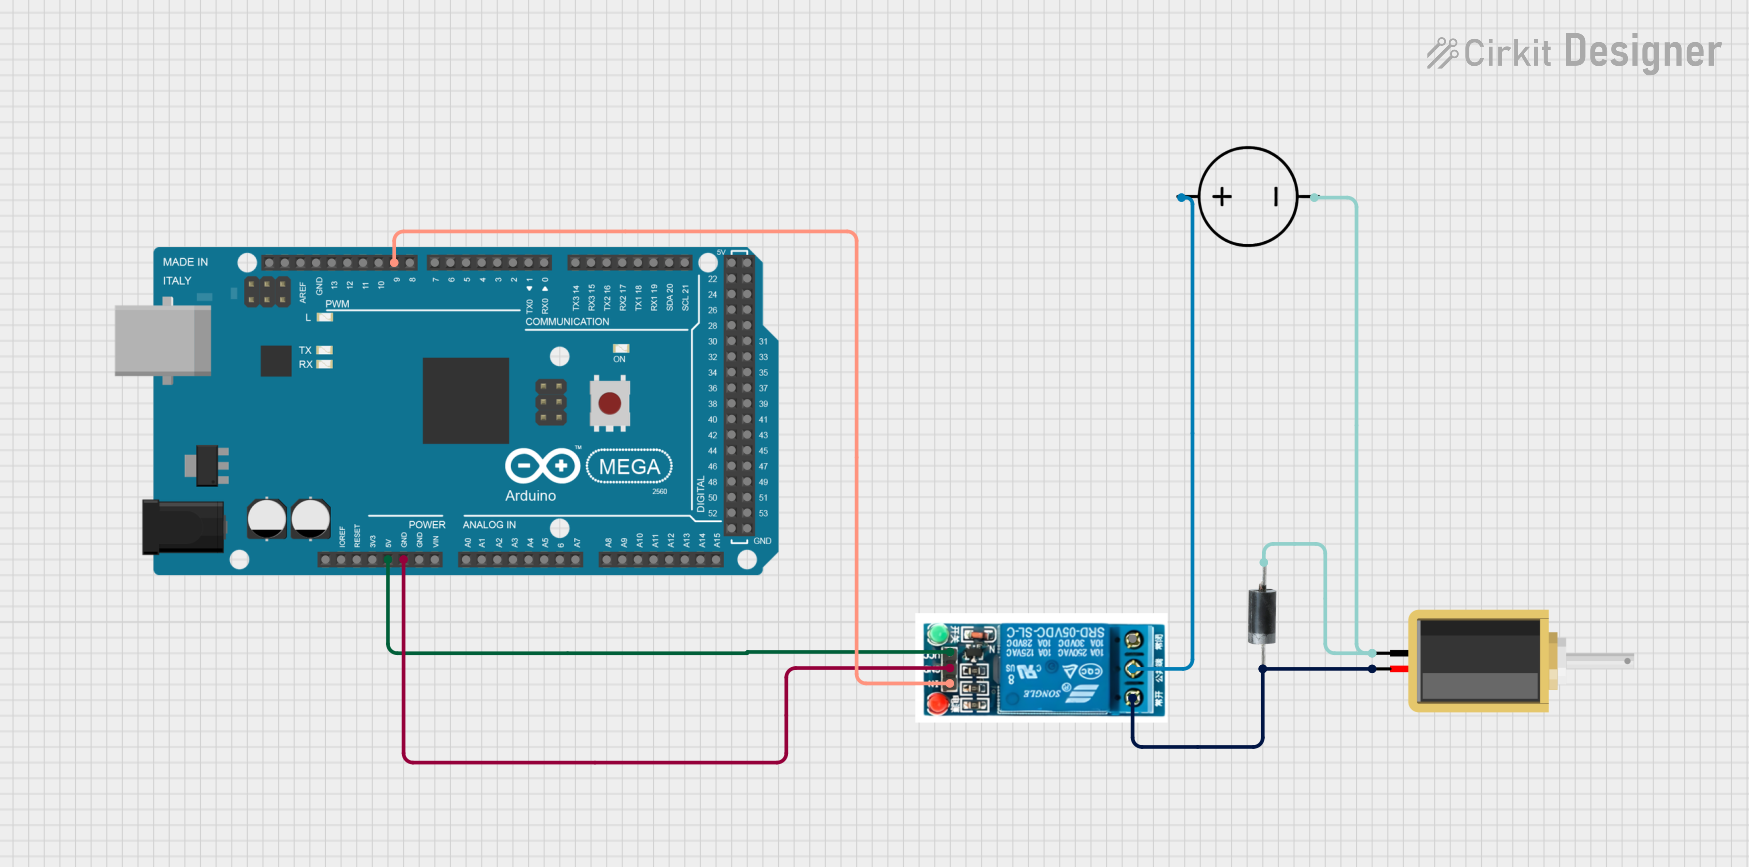
This circuit uses an Arduino Mega 2560 to control a 5V relay, which in turn operates a solenoid. The relay is powered by the Arduino and a DC power source, and the solenoid is connected through a diode for protection against back EMF.
Arduino-Controlled Automated Weighing and Water Dispensing System
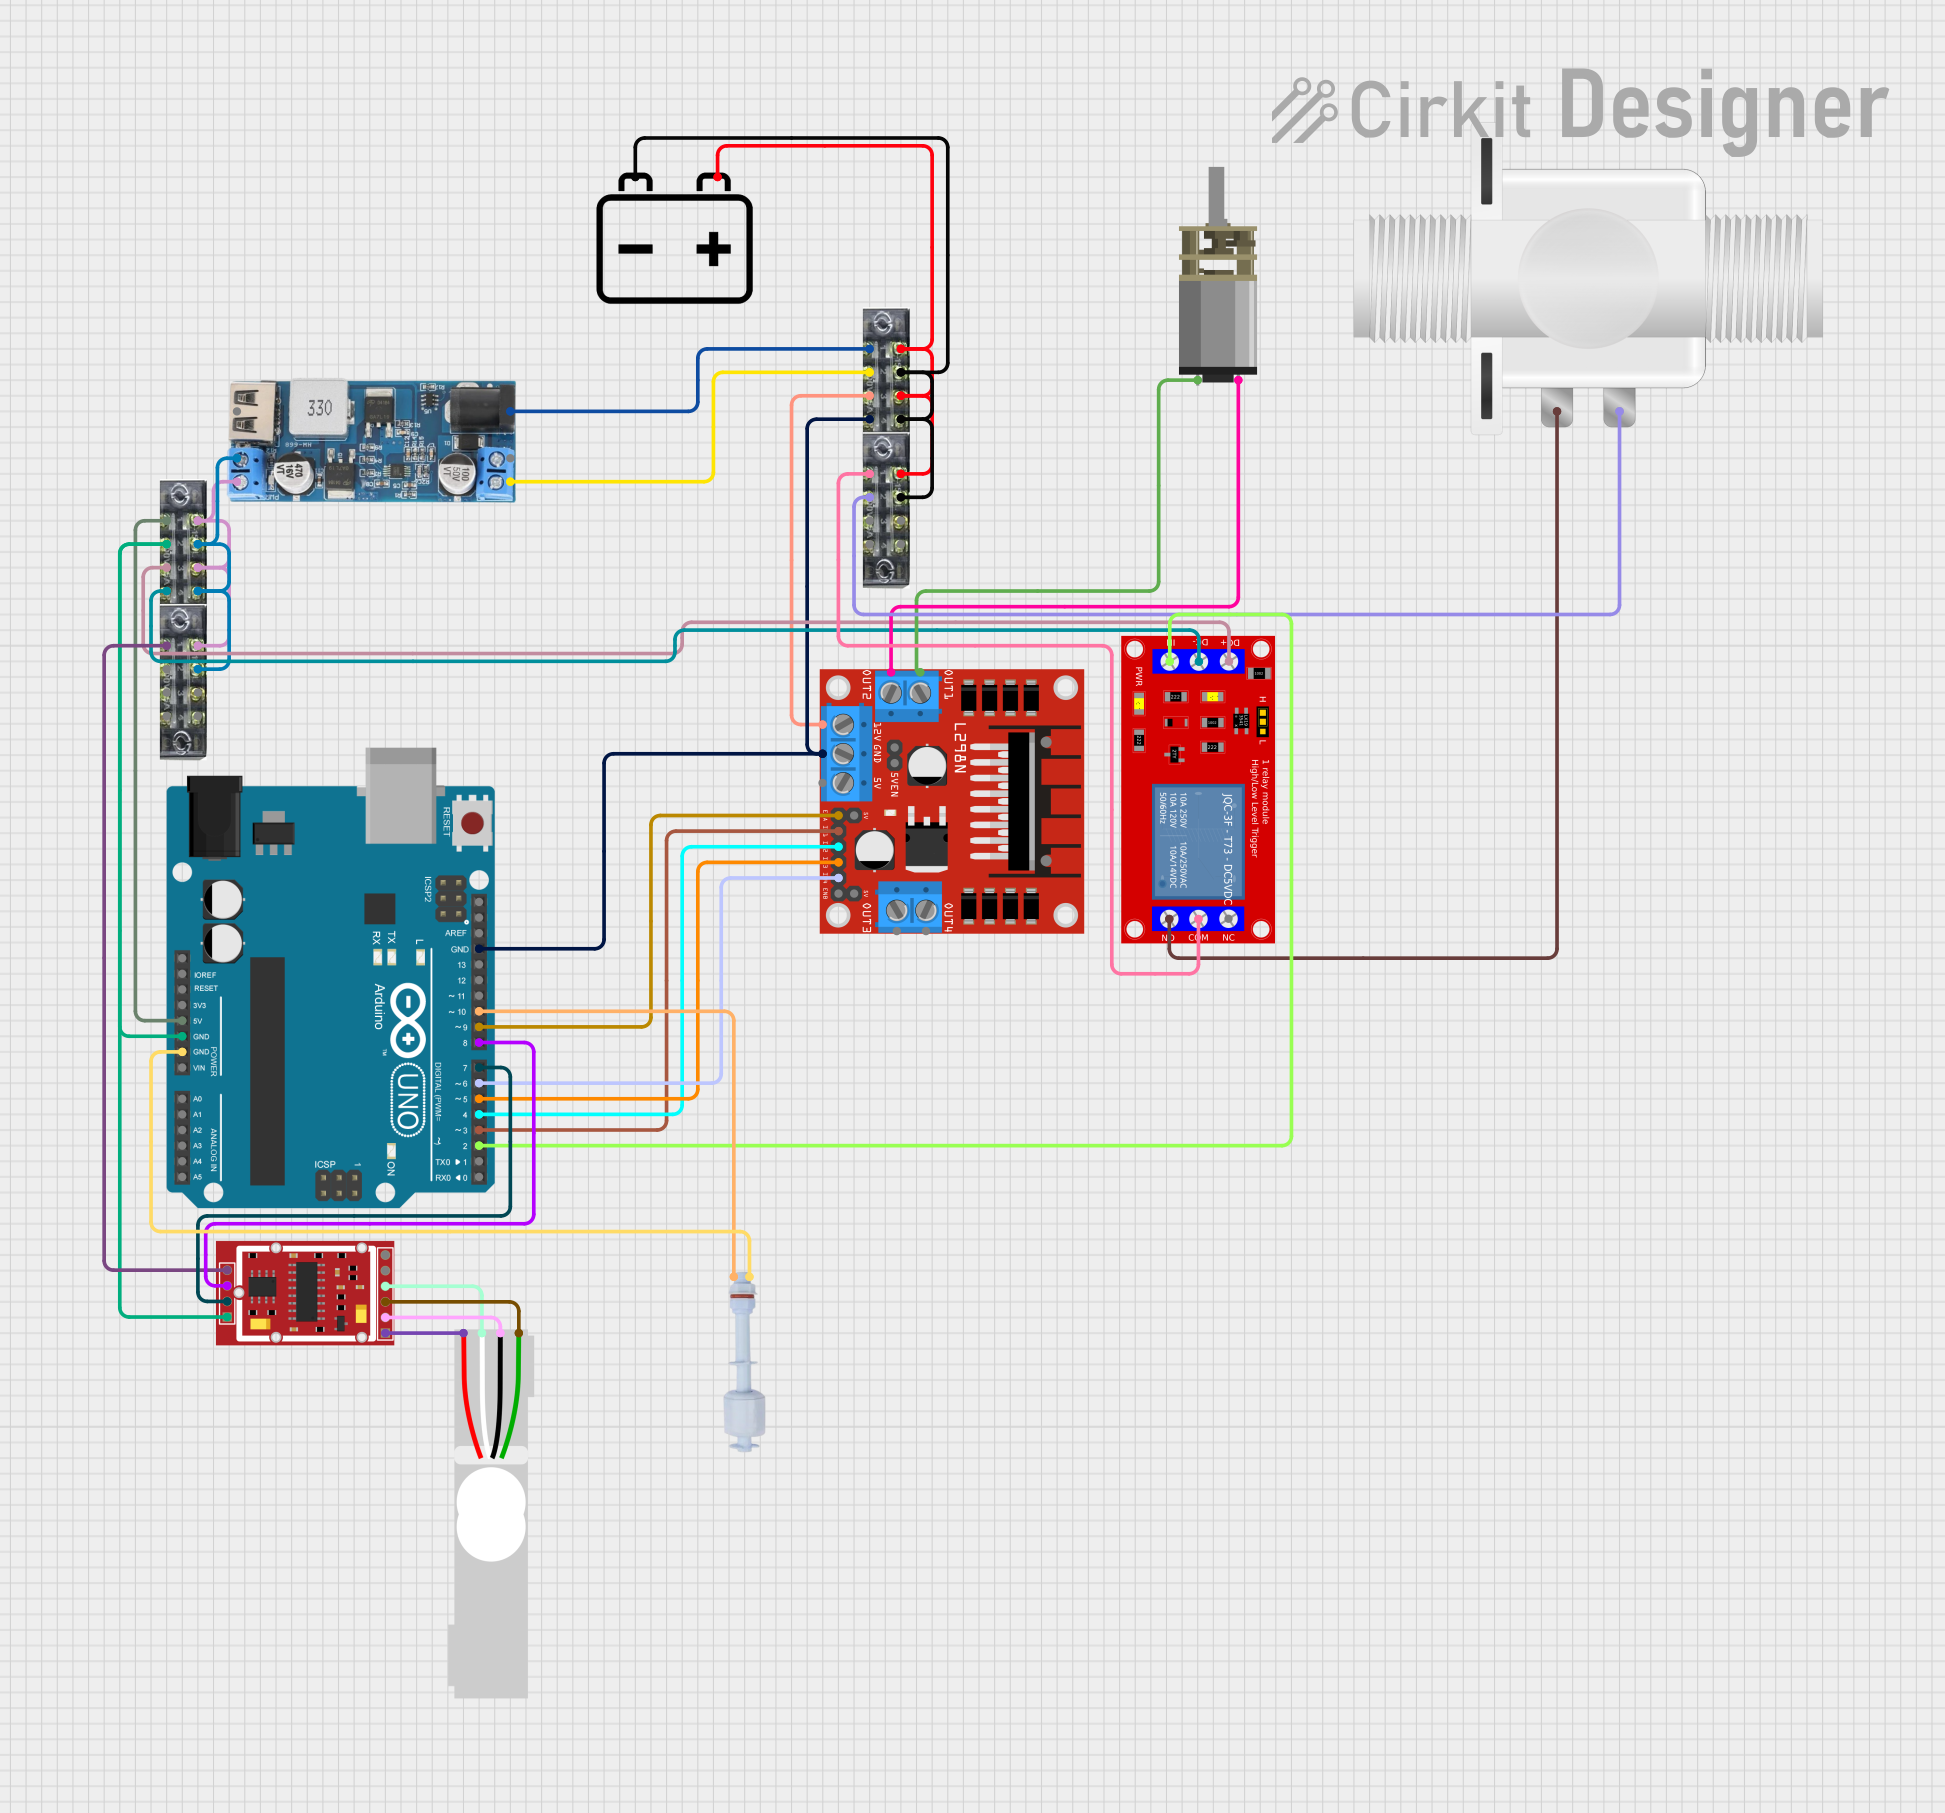
This circuit is designed to control a DC motor and a solenoid valve using an Arduino UNO microcontroller. It includes a 12V to 5V step-down converter to power the 5V components, a motor driver to control the motor's direction and speed, and a relay to switch the solenoid valve. Additionally, it features a load cell connected to an HX711 module for weight measurement and a float switch for detecting liquid level.
Explore Projects Built with Solenoid Valve 5/2
Wi-Fi Controlled Solenoid Valve and Servo Motor System
This circuit utilizes an ESP32-S3 microcontroller to control a solenoid irrigation valve and a servo motor. The solenoid valve is activated through a relay module, allowing it to open and close every 5 seconds, while the servo motor is smoothly rotated between 0 and 180 degrees. Both components are powered and controlled via GPIO pins on the ESP32-S3.
Arduino and GSM-Controlled Solenoid Valve System
This circuit uses an Arduino 101 to control a solenoid valve via a 5V relay, based on commands received from a GSM module (Sim A7670c). When the Arduino receives an SMS with the text 'ON', it activates the relay to open the solenoid valve for 2 seconds and sends confirmation messages back through the GSM module.
Arduino Mega 2560 Controlled Solenoid with 5V Relay
This circuit uses an Arduino Mega 2560 to control a 5V relay, which in turn operates a solenoid. The relay is powered by the Arduino and a DC power source, and the solenoid is connected through a diode for protection against back EMF.
Arduino-Controlled Automated Weighing and Water Dispensing System
This circuit is designed to control a DC motor and a solenoid valve using an Arduino UNO microcontroller. It includes a 12V to 5V step-down converter to power the 5V components, a motor driver to control the motor's direction and speed, and a relay to switch the solenoid valve. Additionally, it features a load cell connected to an HX711 module for weight measurement and a float switch for detecting liquid level.
Common Applications and Use Cases
- Pneumatic Systems: Used to control the direction of air flow in pneumatic actuators.
- Hydraulic Systems: Controls the flow of hydraulic fluid in various machinery.
- Automation: Integral in automated systems for controlling fluid or gas flow.
- Industrial Machinery: Used in various industrial machines for precise control of fluids or gases.
Technical Specifications
Key Technical Details
| Parameter | Value |
|---|---|
| Operating Voltage | 12V DC / 24V DC / 110V AC |
| Current Rating | 0.5A (DC) / 0.2A (AC) |
| Power Consumption | 6W (DC) / 22VA (AC) |
| Pressure Range | 0.15 to 0.8 MPa |
| Response Time | 20 ms |
| Operating Temperature | -10°C to 50°C |
| Port Size | 1/4" NPT |
| Material | Aluminum Alloy |
Pin Configuration and Descriptions
| Pin Number | Description |
|---|---|
| 1 | Coil 1 (Positive) |
| 2 | Coil 1 (Negative) |
| 3 | Coil 2 (Positive) |
| 4 | Coil 2 (Negative) |
| 5 | Common (Ground) |
Usage Instructions
How to Use the Component in a Circuit
- Power Supply: Connect the solenoid valve to an appropriate power supply based on its operating voltage (e.g., 12V DC).
- Control Signal: Use a microcontroller (e.g., Arduino UNO) to send control signals to the solenoid valve.
- Connections:
- Connect Pin 1 to the positive terminal of the power supply.
- Connect Pin 2 to the negative terminal of the power supply.
- Connect Pin 3 to the positive terminal of the second power supply (if using dual coil).
- Connect Pin 4 to the negative terminal of the second power supply.
- Connect Pin 5 to the common ground.
Important Considerations and Best Practices
- Voltage Matching: Ensure the power supply voltage matches the solenoid valve's operating voltage.
- Current Rating: Verify that the power supply can provide sufficient current for the solenoid valve.
- Heat Dissipation: Allow for adequate ventilation to prevent overheating.
- Polarity: Observe correct polarity when connecting the coils to avoid damage.
- Debouncing: Implement debouncing in your control circuit to prevent erratic operation.
Example Code for Arduino UNO
/*
 * Example code to control a 5/2 solenoid valve using Arduino UNO.
 * This code assumes the use of a relay module to handle the higher
 * current required by the solenoid valve.
 */

const int relayPin1 = 7; // Relay connected to pin 7
const int relayPin2 = 8; // Relay connected to pin 8

void setup() {
  pinMode(relayPin1, OUTPUT); // Set relayPin1 as an output
  pinMode(relayPin2, OUTPUT); // Set relayPin2 as an output
}

void loop() {
  digitalWrite(relayPin1, HIGH); // Activate first coil
  delay(1000); // Wait for 1 second
  digitalWrite(relayPin1, LOW); // Deactivate first coil
  delay(1000); // Wait for 1 second

  digitalWrite(relayPin2, HIGH); // Activate second coil
  delay(1000); // Wait for 1 second
  digitalWrite(relayPin2, LOW); // Deactivate second coil
  delay(1000); // Wait for 1 second
}
Troubleshooting and FAQs
Common Issues Users Might Face
Valve Not Actuating:
- Solution: Check the power supply voltage and current. Ensure connections are secure and polarity is correct.
Erratic Operation:
- Solution: Implement debouncing in the control circuit. Check for loose connections.
Overheating:
- Solution: Ensure adequate ventilation. Verify that the power supply is not exceeding the current rating.
No Response from Valve:
- Solution: Verify that the control signals from the microcontroller are being sent correctly. Check the relay module if used.
Solutions and Tips for Troubleshooting
- Check Connections: Ensure all connections are secure and correctly oriented.
- Verify Power Supply: Make sure the power supply matches the voltage and current requirements of the solenoid valve.
- Use Relays: If the solenoid valve requires more current than the microcontroller can provide, use a relay module.
- Test Coils Individually: Test each coil separately to ensure they are functioning correctly.
By following this documentation, users should be able to effectively integrate and troubleshoot the Solenoid Valve 5/2 in their projects.