How to Use ASR PRO: Examples, Pinouts, and Specs
Introduction
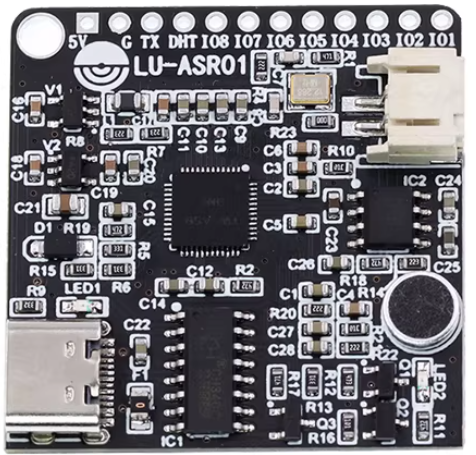
The ASR PRO, developed by Arduino, is an advanced automatic speech recognition system designed to deliver high accuracy in transcribing spoken language into text. This component is ideal for applications requiring reliable voice-to-text conversion, such as voice assistants, transcription services, and real-time communication systems. Its compact design and robust performance make it a versatile choice for both hobbyists and professionals working on speech-based projects.
Common applications of the ASR PRO include:
- Voice-controlled home automation systems
- Real-time transcription for meetings or lectures
- Interactive voice response (IVR) systems
- Assistive technologies for accessibility
- Voice-based search and command systems
Explore Projects Built with ASR PRO

Explore Projects Built with ASR PRO
Technical Specifications
The ASR PRO is a highly capable module with the following technical specifications:
| Parameter | Value |
|---|---|
| Operating Voltage | 3.3V to 5V |
| Power Consumption | 50mA (typical) |
| Audio Input | Mono microphone (analog input) |
| Recognition Accuracy | Up to 95% (depending on environment) |
| Supported Languages | Multiple (configurable via firmware) |
| Communication Interface | UART (9600 bps default) |
| Dimensions | 30mm x 20mm x 5mm |
| Operating Temperature | -10°C to 50°C |
Pin Configuration and Descriptions
The ASR PRO module features a simple pinout for easy integration into your projects:
| Pin | Name | Description |
|---|---|---|
| 1 | VCC | Power supply input (3.3V to 5V) |
| 2 | GND | Ground connection |
| 3 | RX | UART Receive pin (connect to TX of microcontroller) |
| 4 | TX | UART Transmit pin (connect to RX of microcontroller) |
| 5 | MIC_IN | Analog microphone input |
| 6 | RESET | Reset pin (active low) |
Usage Instructions
How to Use the ASR PRO in a Circuit
- Power the Module: Connect the
VCCpin to a 3.3V or 5V power source and theGNDpin to ground. - Connect UART: Use the
RXandTXpins to establish a UART connection with your microcontroller (e.g., Arduino UNO). Ensure the baud rate is set to 9600 bps by default. - Microphone Input: Attach a compatible analog microphone to the
MIC_INpin for audio input. - Reset: Optionally, connect the
RESETpin to a GPIO pin on your microcontroller for manual or software-controlled resets.
Important Considerations and Best Practices
- Noise Reduction: For optimal performance, use the ASR PRO in a low-noise environment or implement noise-canceling techniques.
- Microphone Placement: Position the microphone close to the sound source to improve recognition accuracy.
- Power Supply: Ensure a stable power supply to avoid performance issues.
- Language Configuration: Configure the module for the desired language using the provided firmware tools.
Example: Connecting ASR PRO to Arduino UNO
Below is an example of how to connect and use the ASR PRO with an Arduino UNO:
Circuit Diagram
- Connect
VCCto the 5V pin on the Arduino. - Connect
GNDto the GND pin on the Arduino. - Connect
RXon the ASR PRO toTX(pin 1) on the Arduino. - Connect
TXon the ASR PRO toRX(pin 0) on the Arduino. - Connect a microphone to the
MIC_INpin.
Arduino Code Example
// ASR PRO Example Code for Arduino UNO
// This code demonstrates basic communication with the ASR PRO module
// via UART to receive transcribed text.

#include <SoftwareSerial.h>

// Define RX and TX pins for SoftwareSerial
SoftwareSerial ASRSerial(10, 11); // RX = pin 10, TX = pin 11

void setup() {
  // Initialize serial communication with the ASR PRO
  ASRSerial.begin(9600); // Set baud rate to 9600
  Serial.begin(9600);    // Initialize Serial Monitor for debugging

  Serial.println("ASR PRO Initialized. Speak into the microphone...");
}

void loop() {
  // Check if data is available from the ASR PRO
  if (ASRSerial.available()) {
    String speechText = "";

    // Read the transcribed text from the ASR PRO
    while (ASRSerial.available()) {
      char c = ASRSerial.read();
      speechText += c;
    }

    // Print the transcribed text to the Serial Monitor
    Serial.println("Recognized Speech: " + speechText);
  }
}
Notes:
- Replace
10and11in theSoftwareSerialdefinition with your preferred pins if needed. - Ensure the microphone is properly connected and the environment is quiet for better results.
Troubleshooting and FAQs
Common Issues and Solutions
No Response from the Module
- Cause: Incorrect wiring or power supply issues.
- Solution: Double-check all connections and ensure the module is powered with 3.3V to 5V.
Low Recognition Accuracy
- Cause: High background noise or poor microphone quality.
- Solution: Use a high-quality microphone and reduce environmental noise.
UART Communication Issues
- Cause: Mismatched baud rate or incorrect RX/TX connections.
- Solution: Verify the baud rate is set to 9600 bps and ensure RX/TX pins are correctly connected.
Module Not Resetting
- Cause: RESET pin not properly connected or used.
- Solution: Ensure the RESET pin is connected to a GPIO pin or manually pull it low to reset.
FAQs
Q: Can the ASR PRO recognize multiple languages simultaneously?
A: No, the ASR PRO can only be configured for one language at a time. You can change the language using the firmware tools provided by Arduino.
Q: What is the maximum distance for microphone input?
A: The recommended distance is 10-20 cm for optimal accuracy. Beyond this range, recognition performance may degrade.
Q: Can I use the ASR PRO with a Raspberry Pi?
A: Yes, the ASR PRO can be used with any device that supports UART communication, including Raspberry Pi.
Q: Is the ASR PRO compatible with digital microphones?
A: No, the ASR PRO is designed for use with analog microphones only.
By following this documentation, you can effectively integrate the ASR PRO into your projects and achieve high-quality speech recognition results.