How to Use RAK19007 WisBlock Base Board 2nd Gen: Examples, Pinouts, and Specs
Introduction
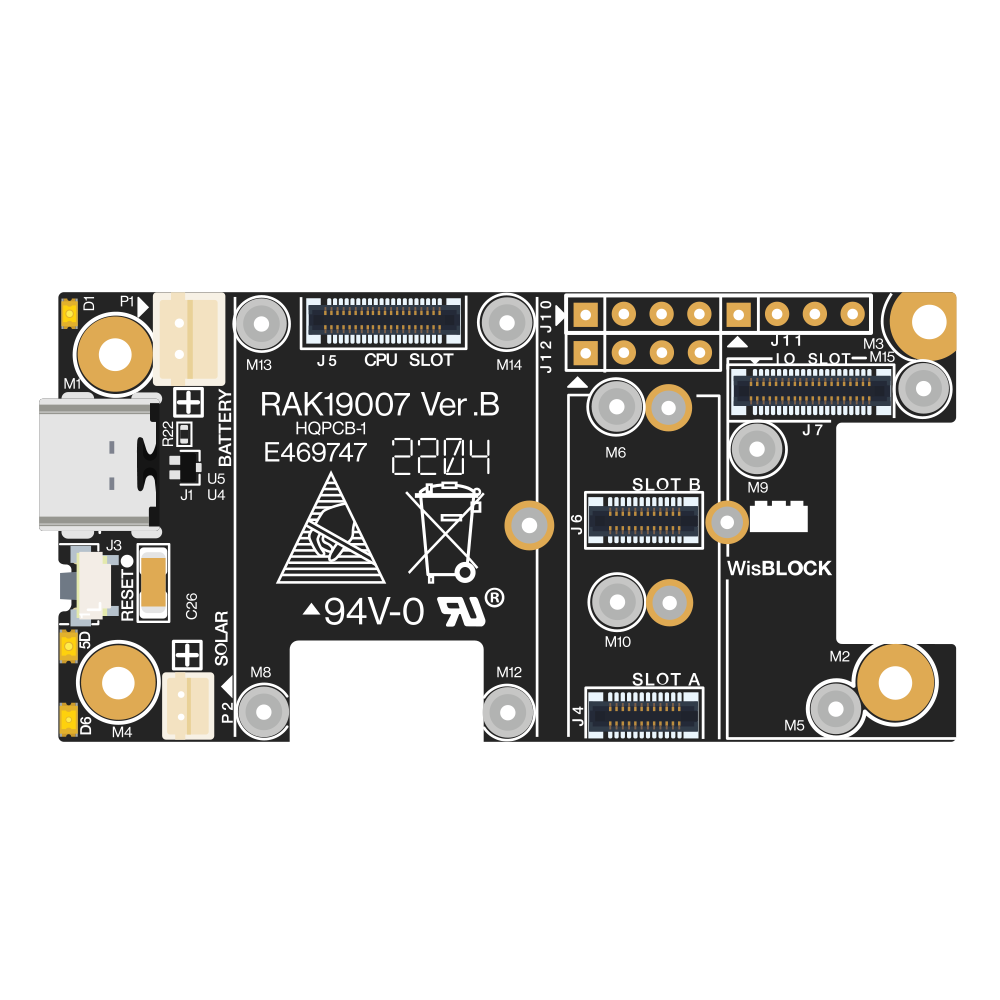
The RAK19007 WisBlock Base Board 2nd Gen is a versatile development board designed for the RAKwireless WisBlock ecosystem. It serves as the foundation for building IoT solutions by providing a compact design, multiple interfaces for connectivity, and support for various sensor and communication modules. This base board is ideal for prototyping and deploying IoT applications in fields such as smart agriculture, industrial automation, environmental monitoring, and more.
Explore Projects Built with RAK19007 WisBlock Base Board 2nd Gen


Explore Projects Built with RAK19007 WisBlock Base Board 2nd Gen
Common Applications and Use Cases
- IoT Prototyping: Rapid development of IoT solutions using modular components.
- Environmental Monitoring: Integration with sensors for temperature, humidity, air quality, etc.
- Smart Agriculture: Deployment of soil moisture, light, and other agricultural sensors.
- Industrial Automation: Use in industrial IoT (IIoT) systems for monitoring and control.
- Smart Cities: Applications such as parking management, waste monitoring, and more.
Technical Specifications
The RAK19007 is designed to provide a robust and flexible platform for IoT development. Below are its key technical details:
Key Technical Details
| Parameter | Specification |
|---|---|
| Manufacturer | RAKwireless |
| Part Number | RAK19007 |
| Power Supply Voltage | 3.3V to 5V (via USB-C or external power source) |
| Interfaces | I2C, UART, GPIO, SPI |
| Connector Type | WisBlock-compatible slots for Core, Sensor, and IO modules |
| Dimensions | 54mm x 25mm |
| Operating Temperature | -40°C to +85°C |
| Mounting Options | Screw holes for secure mounting in enclosures |
| USB Interface | USB-C for power and programming |
| LED Indicators | Power and status LEDs |
Pin Configuration and Descriptions
The RAK19007 features multiple connectors for WisBlock Core, Sensor, and IO modules. Below is a description of the key connectors and pins:
WisBlock Core Slot
| Pin Name | Description |
|---|---|
| VCC | Power supply for the Core module |
| GND | Ground |
| I2C_SCL | I2C clock line for communication |
| I2C_SDA | I2C data line for communication |
| UART_TX | UART transmit line |
| UART_RX | UART receive line |
| GPIO | General-purpose input/output pins |
Sensor and IO Module Slots
| Pin Name | Description |
|---|---|
| VCC | Power supply for Sensor/IO modules |
| GND | Ground |
| I2C_SCL | I2C clock line for communication |
| I2C_SDA | I2C data line for communication |
| GPIO | General-purpose input/output pins |
Usage Instructions
The RAK19007 is designed to simplify the development of IoT solutions. Follow the steps below to use the board effectively:
Step 1: Assembly
- Insert the WisBlock Core Module: Align the Core module with the Core slot on the RAK19007 and press gently until it clicks into place.
- Attach Sensor/IO Modules: Connect compatible WisBlock Sensor or IO modules to the designated slots on the base board.
- Power the Board: Use a USB-C cable to connect the board to a power source (e.g., a computer or USB adapter).
Step 2: Programming
- Install the Arduino IDE or other compatible development environment.
- Install the necessary board definitions and libraries for the WisBlock Core module.
- Connect the RAK19007 to your computer via USB-C.
- Select the appropriate COM port and board type in the IDE.
- Write or upload your code to the Core module.
Step 3: Example Code
Below is an example of how to use the RAK19007 with an I2C sensor module and an Arduino-compatible WisBlock Core:
#include <Wire.h>

// Define I2C address of the sensor
#define SENSOR_ADDR 0x76

void setup() {
  // Initialize serial communication for debugging
  Serial.begin(115200);
  while (!Serial);

  // Initialize I2C communication
  Wire.begin();
  Serial.println("RAK19007 Base Board Initialized");
}

void loop() {
  // Request data from the sensor
  Wire.beginTransmission(SENSOR_ADDR);
  Wire.write(0x00); // Example register address
  Wire.endTransmission();

  // Read data from the sensor
  Wire.requestFrom(SENSOR_ADDR, 2); // Request 2 bytes
  if (Wire.available() == 2) {
    uint8_t msb = Wire.read(); // Most significant byte
    uint8_t lsb = Wire.read(); // Least significant byte
    int sensorData = (msb << 8) | lsb; // Combine bytes
    Serial.print("Sensor Data: ");
    Serial.println(sensorData);
  }

  delay(1000); // Wait 1 second before next reading
}
Important Considerations and Best Practices
- Power Supply: Ensure the board is powered within the specified voltage range (3.3V to 5V).
- Module Compatibility: Only use WisBlock-compatible modules to avoid damage.
- Static Precautions: Handle the board and modules with care to prevent electrostatic discharge (ESD).
- Firmware Updates: Keep the firmware of the Core module up to date for optimal performance.
Troubleshooting and FAQs
Common Issues and Solutions
Board Not Detected by Computer
- Ensure the USB-C cable is properly connected.
- Verify that the correct COM port is selected in the development environment.
- Try a different USB cable or port.
Modules Not Working
- Check that the modules are securely connected to the base board.
- Verify that the modules are compatible with the RAK19007.
- Ensure the correct libraries are installed for the modules.
I2C Communication Fails
- Confirm the I2C address of the connected module.
- Check the wiring and ensure no loose connections.
- Use a logic analyzer or oscilloscope to debug the I2C signals.
FAQs
Q: Can I use non-WisBlock modules with the RAK19007?
A: The RAK19007 is designed specifically for WisBlock modules. Using non-compatible modules may require additional wiring and is not recommended.
Q: What is the maximum number of modules I can connect?
A: The RAK19007 supports one Core module and multiple Sensor/IO modules, depending on the available slots.
Q: Is the RAK19007 suitable for outdoor use?
A: The board itself is not weatherproof. Use an appropriate enclosure for outdoor applications.
Q: How do I update the firmware of the Core module?
A: Connect the board to your computer via USB-C, and use the firmware update tool provided by RAKwireless.
By following this documentation, you can effectively use the RAK19007 WisBlock Base Board 2nd Gen to build and deploy IoT solutions.