How to Use Lithium Ion Battery - 3.7V 10050mAh (10 Ah): Examples, Pinouts, and Specs
Introduction
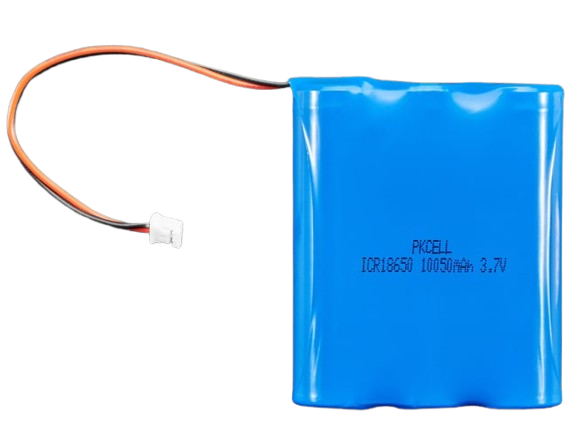
The Adafruit Lithium Ion Battery (Part ID: 5035) is a high-capacity rechargeable battery designed for powering a wide range of electronic devices. With a nominal voltage of 3.7V and a capacity of 10050mAh (10Ah), this battery is ideal for applications requiring long-lasting power in a compact form factor. It is commonly used in portable electronics, IoT devices, robotics, and backup power systems.
Explore Projects Built with Lithium Ion Battery - 3.7V 10050mAh (10 Ah)


Explore Projects Built with Lithium Ion Battery - 3.7V 10050mAh (10 Ah)
Common Applications and Use Cases
- Portable electronic devices (e.g., handheld gadgets, wearables)
- Robotics and drones
- IoT devices and sensors
- Backup power supplies for microcontrollers
- DIY electronics projects
Technical Specifications
Below are the key technical details of the Adafruit Lithium Ion Battery (5035):
| Parameter | Value |
|---|---|
| Nominal Voltage | 3.7V |
| Capacity | 10050mAh (10Ah) |
| Chemistry | Lithium-Ion |
| Maximum Charge Voltage | 4.2V |
| Discharge Cutoff | 3.0V |
| Maximum Discharge Rate | 2C (20A) |
| Recommended Charge Rate | 0.5C (5A) |
| Connector Type | JST-PH 2-pin |
| Dimensions | 90mm x 60mm x 10mm |
| Weight | ~200g |
Pin Configuration and Descriptions
The battery is equipped with a JST-PH 2-pin connector. Below is the pin configuration:
| Pin | Name | Description |
|---|---|---|
| 1 | Positive (+) | Positive terminal of the battery |
| 2 | Negative (-) | Negative terminal of the battery |
Usage Instructions
How to Use the Battery in a Circuit
Connecting the Battery:
- Use the JST-PH 2-pin connector to connect the battery to your circuit or charging module. Ensure the polarity matches the device's input terminals.
- If your device does not have a JST-PH connector, you can use an adapter or solder wires directly to the battery terminals (only if you are experienced with soldering).
Charging the Battery:
- Use a dedicated lithium-ion battery charger with a constant current/constant voltage (CC/CV) charging profile.
- Set the charger to a maximum charge voltage of 4.2V and a recommended charge current of 5A (0.5C).
- Avoid overcharging or charging at a higher current than specified.
Discharging the Battery:
- Ensure the load does not exceed the maximum discharge rate of 20A (2C).
- Do not discharge the battery below 3.0V, as this can damage the cell.
Safety Precautions:
- Do not short-circuit the terminals.
- Avoid puncturing, crushing, or exposing the battery to fire or water.
- Use a battery protection circuit to prevent overcharging, over-discharging, and short circuits.
Example: Using the Battery with an Arduino UNO
To power an Arduino UNO with this battery, follow these steps:
- Connect the battery to a 5V boost converter to step up the voltage from 3.7V to 5V.
- Connect the output of the boost converter to the Arduino UNO's 5V pin and GND pin.
- Optionally, monitor the battery voltage using an analog input pin on the Arduino to prevent over-discharge.
Here is an example Arduino sketch to monitor the battery voltage:
// Define the analog pin connected to the battery voltage divider
const int batteryPin = A0;

// Define the voltage divider ratio (adjust based on your resistor values)
const float voltageDividerRatio = 2.0;

// Define the reference voltage of the Arduino (5V for UNO)
const float referenceVoltage = 5.0;

void setup() {
  Serial.begin(9600); // Initialize serial communication
}

void loop() {
  // Read the raw analog value from the battery pin
  int rawValue = analogRead(batteryPin);

  // Convert the raw value to the actual battery voltage
  float batteryVoltage = (rawValue / 1023.0) * referenceVoltage * voltageDividerRatio;

  // Print the battery voltage to the Serial Monitor
  Serial.print("Battery Voltage: ");
  Serial.print(batteryVoltage);
  Serial.println(" V");

  // Add a delay to avoid flooding the Serial Monitor
  delay(1000);
}
Note: Use a voltage divider circuit to scale down the battery voltage to a safe range (0-5V) for the Arduino's analog input pins.
Important Considerations and Best Practices
- Always use a battery management system (BMS) or protection circuit to ensure safe operation.
- Store the battery in a cool, dry place when not in use.
- Avoid leaving the battery connected to a load or charger for extended periods when not in use.
Troubleshooting and FAQs
Common Issues and Solutions
| Issue | Possible Cause | Solution |
|---|---|---|
| Battery does not charge | Charger not compatible or faulty | Use a charger designed for 3.7V lithium-ion batteries with CC/CV profile. |
| Battery drains too quickly | Load exceeds capacity or high self-discharge | Check the load current and ensure it is within the battery's specifications. |
| Battery voltage drops below 3.0V | Over-discharge | Recharge the battery immediately. Use a BMS to prevent over-discharge. |
| Battery gets hot during use or charging | Overcurrent or faulty charger | Reduce the load current or use a charger with the correct specifications. |
FAQs
Can I use this battery to power a Raspberry Pi?
Yes, but you will need a 5V boost converter to step up the voltage to 5V, as required by the Raspberry Pi.How long will this battery last on a single charge?
The runtime depends on the load current. For example, at a 1A load, the battery can last approximately 10 hours (10050mAh ÷ 1000mA).Can I connect multiple batteries in series or parallel?
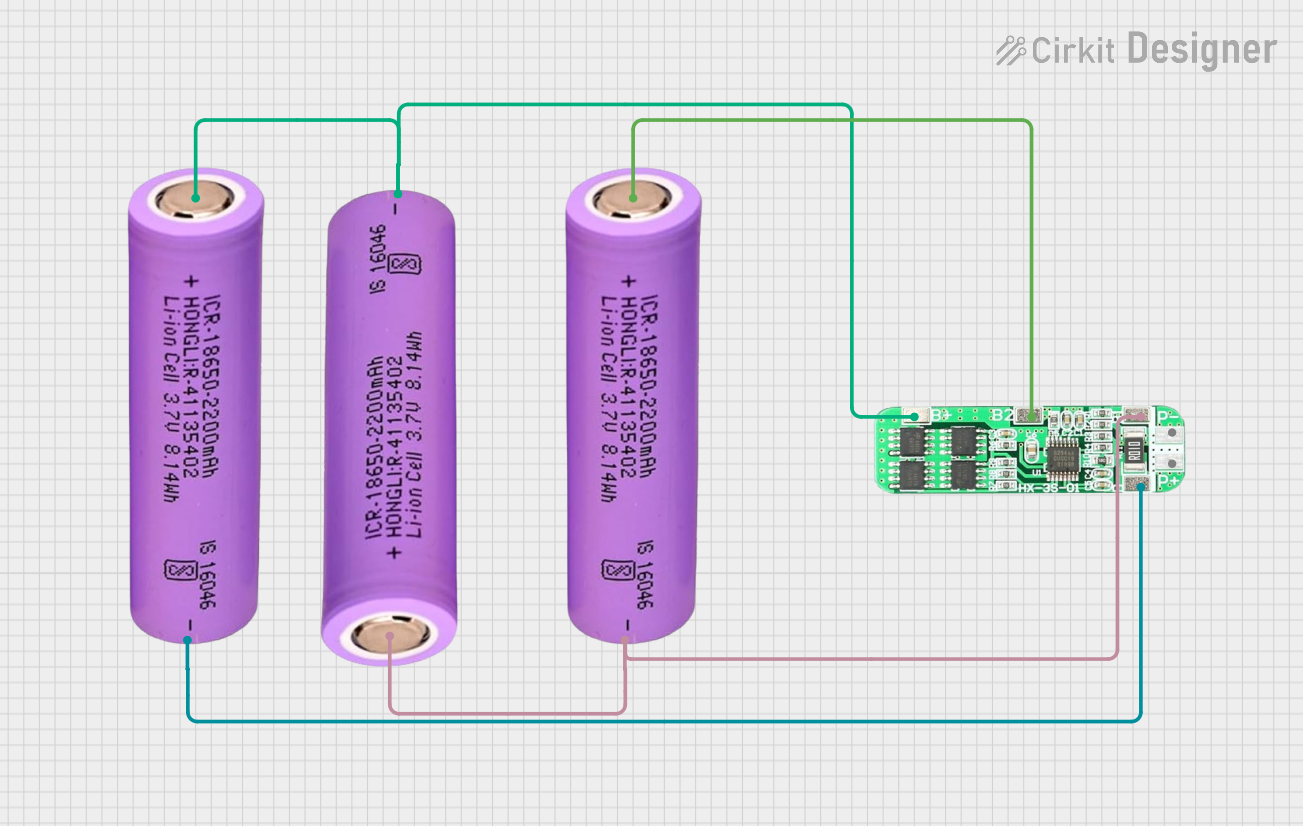
Yes, but ensure you use a proper battery management system (BMS) to balance the cells and prevent overcharging or over-discharging.Is this battery safe for outdoor use?
The battery is not waterproof. Use a protective enclosure if using it outdoors.
By following the guidelines and precautions outlined in this documentation, you can safely and effectively use the Adafruit Lithium Ion Battery (5035) in your projects.