Cirkit Designer Logo
Cirkit Designer
Your all-in-one circuit design IDE
Home / 
Component Documentation

How to Use 3.5in 480x320: Examples, Pinouts, and Specs

Image of 3.5in 480x320
Cirkit Designer LogoDesign with 3.5in 480x320 in Cirkit Designer

Introduction

The 3.5-inch 480x320 TFT LCD Display Module is a compact and versatile display panel used for the visual output of graphical data. With its high-resolution screen, it is suitable for a wide range of applications including embedded systems, user interfaces, portable instruments, and video/game displays. Its compatibility with popular microcontrollers like the Arduino UNO makes it a favorite among hobbyists and professionals alike.

Explore Projects Built with 3.5in 480x320

Use Cirkit Designer to design, explore, and prototype these projects online. Some projects support real-time simulation. Click "Open Project" to start designing instantly!
Arduino Mega 2560 Controlled TFT Touchscreen Interface
Image of Tablero Moto: A project utilizing 3.5in 480x320 in a practical application
This circuit connects an Arduino Mega 2560 microcontroller to a 3.5-inch 480x320 TFT LCD display. The Arduino provides power, ground, and digital signals to control the display, including data lines for pixel information and control lines for reset, write, and command/data selection. The embedded code initializes the display and configures the Arduino's pins for communication, likely to create a user interface or visual output for a project.
Cirkit Designer LogoOpen Project in Cirkit Designer
Arduino Nano and 3.5 TFT LCD Shield Display Interface
Image of BAROMETR BMP280 TFT 9488: A project utilizing 3.5in 480x320 in a practical application
This circuit interfaces an Arduino Nano with a 3.5-inch TFT LCD Shield, allowing the Arduino to control the display and read/write data to it. The connections include data lines, control signals, and power, enabling the Arduino to drive the LCD for various display applications.
Cirkit Designer LogoOpen Project in Cirkit Designer
Bluetooth-Controlled Multi-Function Arduino Nano Gadget
Image of Copy of Smarttt: A project utilizing 3.5in 480x320 in a practical application
This is a portable, microcontroller-driven interactive device featuring Bluetooth connectivity, visual (RGB LED), auditory (loudspeaker), and haptic (vibration motor) feedback, user input (pushbutton), and a rechargeable power system (TP4056 with Li-ion battery).
Cirkit Designer LogoOpen Project in Cirkit Designer
Raspberry Pi 3B Powered 15.6-inch Touchscreen Display with USB Type-C Power Delivery
Image of Pi Touch Screen Kiosk: A project utilizing 3.5in 480x320 in a practical application
This circuit powers a 15.6-inch capacitive touch display and a Raspberry Pi 3B using a USB Type C power delivery breakout and two buck converters. The Raspberry Pi connects to the display via HDMI and USB for touch functionality, while the power delivery breakout provides regulated power to both the display and the Raspberry Pi through the buck converters.
Cirkit Designer LogoOpen Project in Cirkit Designer

Explore Projects Built with 3.5in 480x320

Use Cirkit Designer to design, explore, and prototype these projects online. Some projects support real-time simulation. Click "Open Project" to start designing instantly!
Image of Tablero Moto: A project utilizing 3.5in 480x320 in a practical application
Arduino Mega 2560 Controlled TFT Touchscreen Interface
This circuit connects an Arduino Mega 2560 microcontroller to a 3.5-inch 480x320 TFT LCD display. The Arduino provides power, ground, and digital signals to control the display, including data lines for pixel information and control lines for reset, write, and command/data selection. The embedded code initializes the display and configures the Arduino's pins for communication, likely to create a user interface or visual output for a project.
Cirkit Designer LogoOpen Project in Cirkit Designer
Image of BAROMETR BMP280 TFT 9488: A project utilizing 3.5in 480x320 in a practical application
Arduino Nano and 3.5 TFT LCD Shield Display Interface
This circuit interfaces an Arduino Nano with a 3.5-inch TFT LCD Shield, allowing the Arduino to control the display and read/write data to it. The connections include data lines, control signals, and power, enabling the Arduino to drive the LCD for various display applications.
Cirkit Designer LogoOpen Project in Cirkit Designer
Image of Copy of Smarttt: A project utilizing 3.5in 480x320 in a practical application
Bluetooth-Controlled Multi-Function Arduino Nano Gadget
This is a portable, microcontroller-driven interactive device featuring Bluetooth connectivity, visual (RGB LED), auditory (loudspeaker), and haptic (vibration motor) feedback, user input (pushbutton), and a rechargeable power system (TP4056 with Li-ion battery).
Cirkit Designer LogoOpen Project in Cirkit Designer
Image of Pi Touch Screen Kiosk: A project utilizing 3.5in 480x320 in a practical application
Raspberry Pi 3B Powered 15.6-inch Touchscreen Display with USB Type-C Power Delivery
This circuit powers a 15.6-inch capacitive touch display and a Raspberry Pi 3B using a USB Type C power delivery breakout and two buck converters. The Raspberry Pi connects to the display via HDMI and USB for touch functionality, while the power delivery breakout provides regulated power to both the display and the Raspberry Pi through the buck converters.
Cirkit Designer LogoOpen Project in Cirkit Designer

Technical Specifications

General Features

  • Display Size: 3.5 inches
  • Resolution: 480x320 pixels
  • Display Interface: 8/16-bit parallel interface
  • Touch Screen: Resistive touch (optional models)
  • Onboard Controller: ILI9486/ILI9488 or equivalent
  • Colors: 65K

Electrical Characteristics

  • Operating Voltage: 3.3V to 5V
  • Logic Level: 3.3V (5V tolerant)
  • Current Consumption: Typically 150mA (varies with backlight brightness)

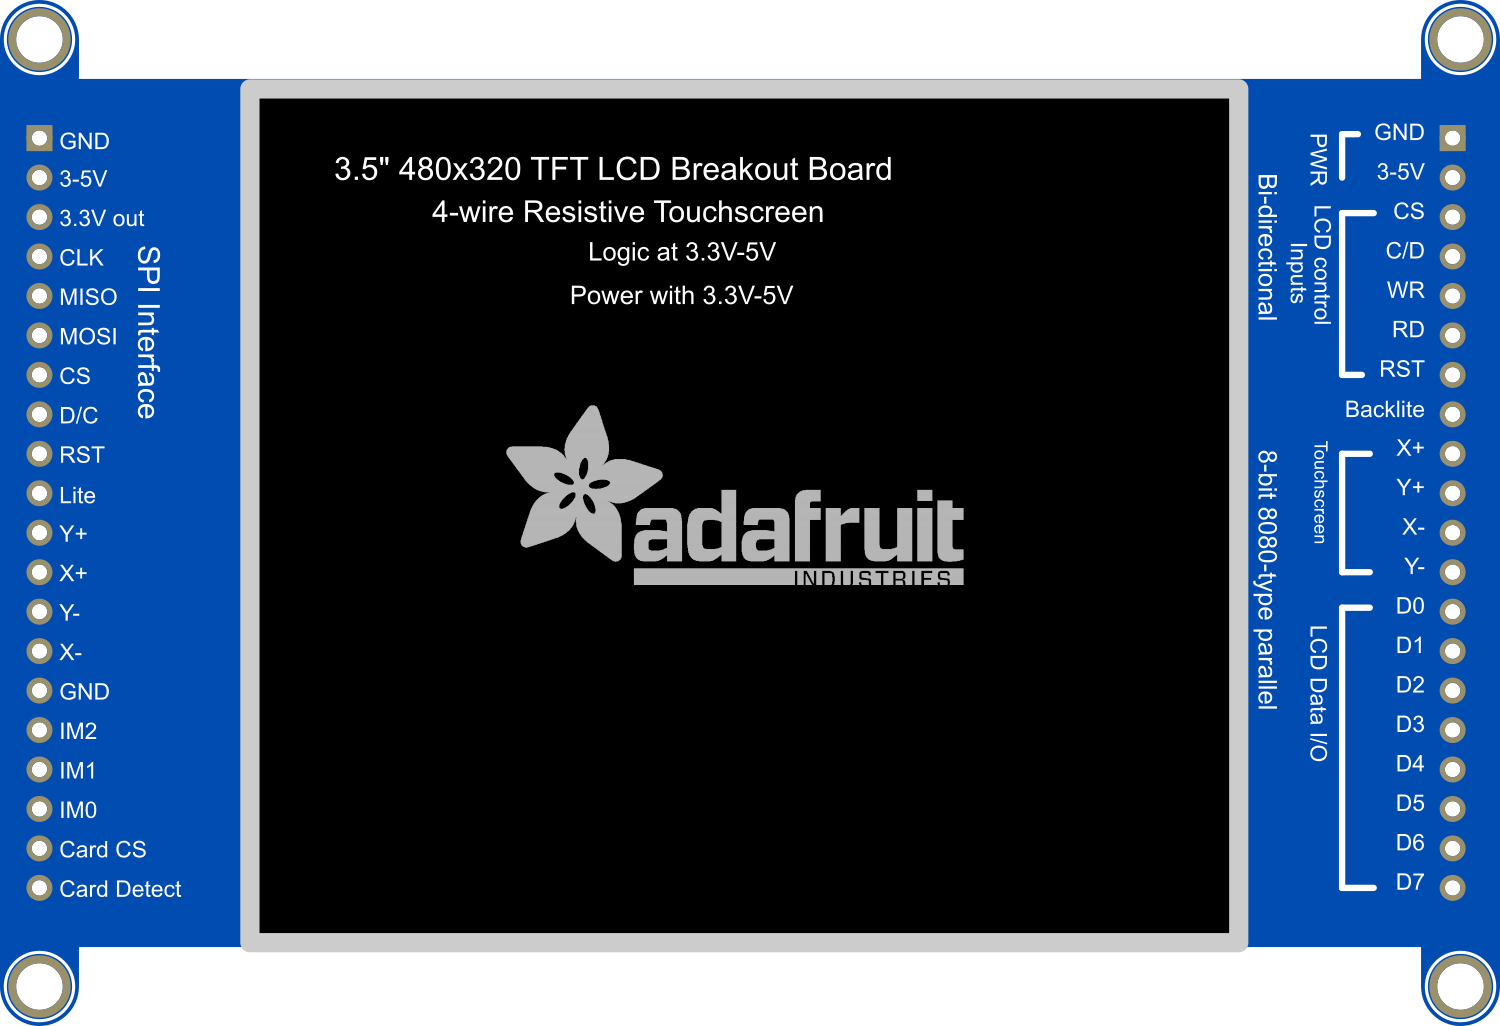
Pin Configuration and Descriptions

Pin Number Pin Name Description
1 VCC Power supply (3.3V-5V)
2 GND Ground
3 CS Chip Select
4 RESET Reset signal
5 D/C Data/Command control
6 SDI(MOSI) Serial Data Input
7 SCK Serial Clock Input
8 LED Backlight control (Anode)
9 SDO(MISO) Serial Data Output (optional)
10 T_CLK Touch Clock (for touch models)
11 T_CS Touch Chip Select (for touch models)
12 T_DIN Touch Data In (for touch models)
13 T_DO Touch Data Out (for touch models)
14 T_IRQ Touch Interrupt (for touch models)
15-22 DB8-DB15 8-bit Data Bus (High Byte for 16-bit mode)
23-30 DB0-DB7 8-bit Data Bus (Low Byte)

Usage Instructions

Connecting to an Arduino UNO

  1. Connect the display module to the Arduino UNO using jumper wires according to the pin configuration.
  2. Ensure that the power supply to the display is stable and within the specified voltage range.
  3. If the display has a touch feature, connect the touch pins accordingly.

Programming the Display

To use the display with an Arduino UNO, you will need to install the appropriate library, such as the Adafruit_GFX library and a driver library for the ILI9486/ILI9488 controller.

#include <Adafruit_GFX.h>    // Core graphics library
#include <MCUFRIEND_kbv.h>   // Hardware-specific library

MCUFRIEND_kbv tft;           // Instantiate a display object

void setup() {
  uint16_t ID = tft.readID(); // Read display driver ID
  tft.begin(ID);              // Initialize the display
  tft.setRotation(1);         // Set display rotation
  tft.fillScreen(TFT_BLACK);  // Clear the screen
}

void loop() {
  // Your code to draw on the display
}

Best Practices

  • Always handle the display with care to avoid physical damage.
  • Avoid exposing the display to extreme temperatures or moisture.
  • Use a level shifter if you are interfacing with a 5V microcontroller to ensure the logic levels are compatible.

Troubleshooting and FAQs

Common Issues

  • Display not powering on: Check the power supply and connections.
  • White screen: Ensure the correct driver library is installed and initialized with the right display driver ID.
  • Touch not responsive: Verify the touch pin connections and calibrate the touch screen if necessary.

FAQs

Q: Can I use this display with a 5V system? A: Yes, the display is 5V tolerant, but it is recommended to use a level shifter for logic level conversion.

Q: How do I adjust the brightness of the backlight? A: The backlight brightness can be controlled by applying a PWM signal to the LED pin.

Q: What libraries do I need for the touch functionality? A: You will need a touch screen library compatible with your display's touch controller, such as the URTouch library for Arduino.

For further assistance, consult the community forums or the manufacturer's support resources.