Cirkit Designer
Your all-in-one circuit design IDE
Home /
Component Documentation
How to Use AK80-9 Tmotor: Examples, Pinouts, and Specs

Introduction
The AK80-9 Tmotor is a high-performance brushless DC motor manufactured by CubeMars. This motor is specifically designed for use in robotics and drone applications, where precision, reliability, and efficiency are paramount. With its lightweight design and high torque output, the AK80-9 Tmotor is ideal for applications that require precise control and responsiveness.
Explore Projects Built with AK80-9 Tmotor
ESP32-Based Wi-Fi Controlled Robotic Car with OLED Display and Laser Shooting
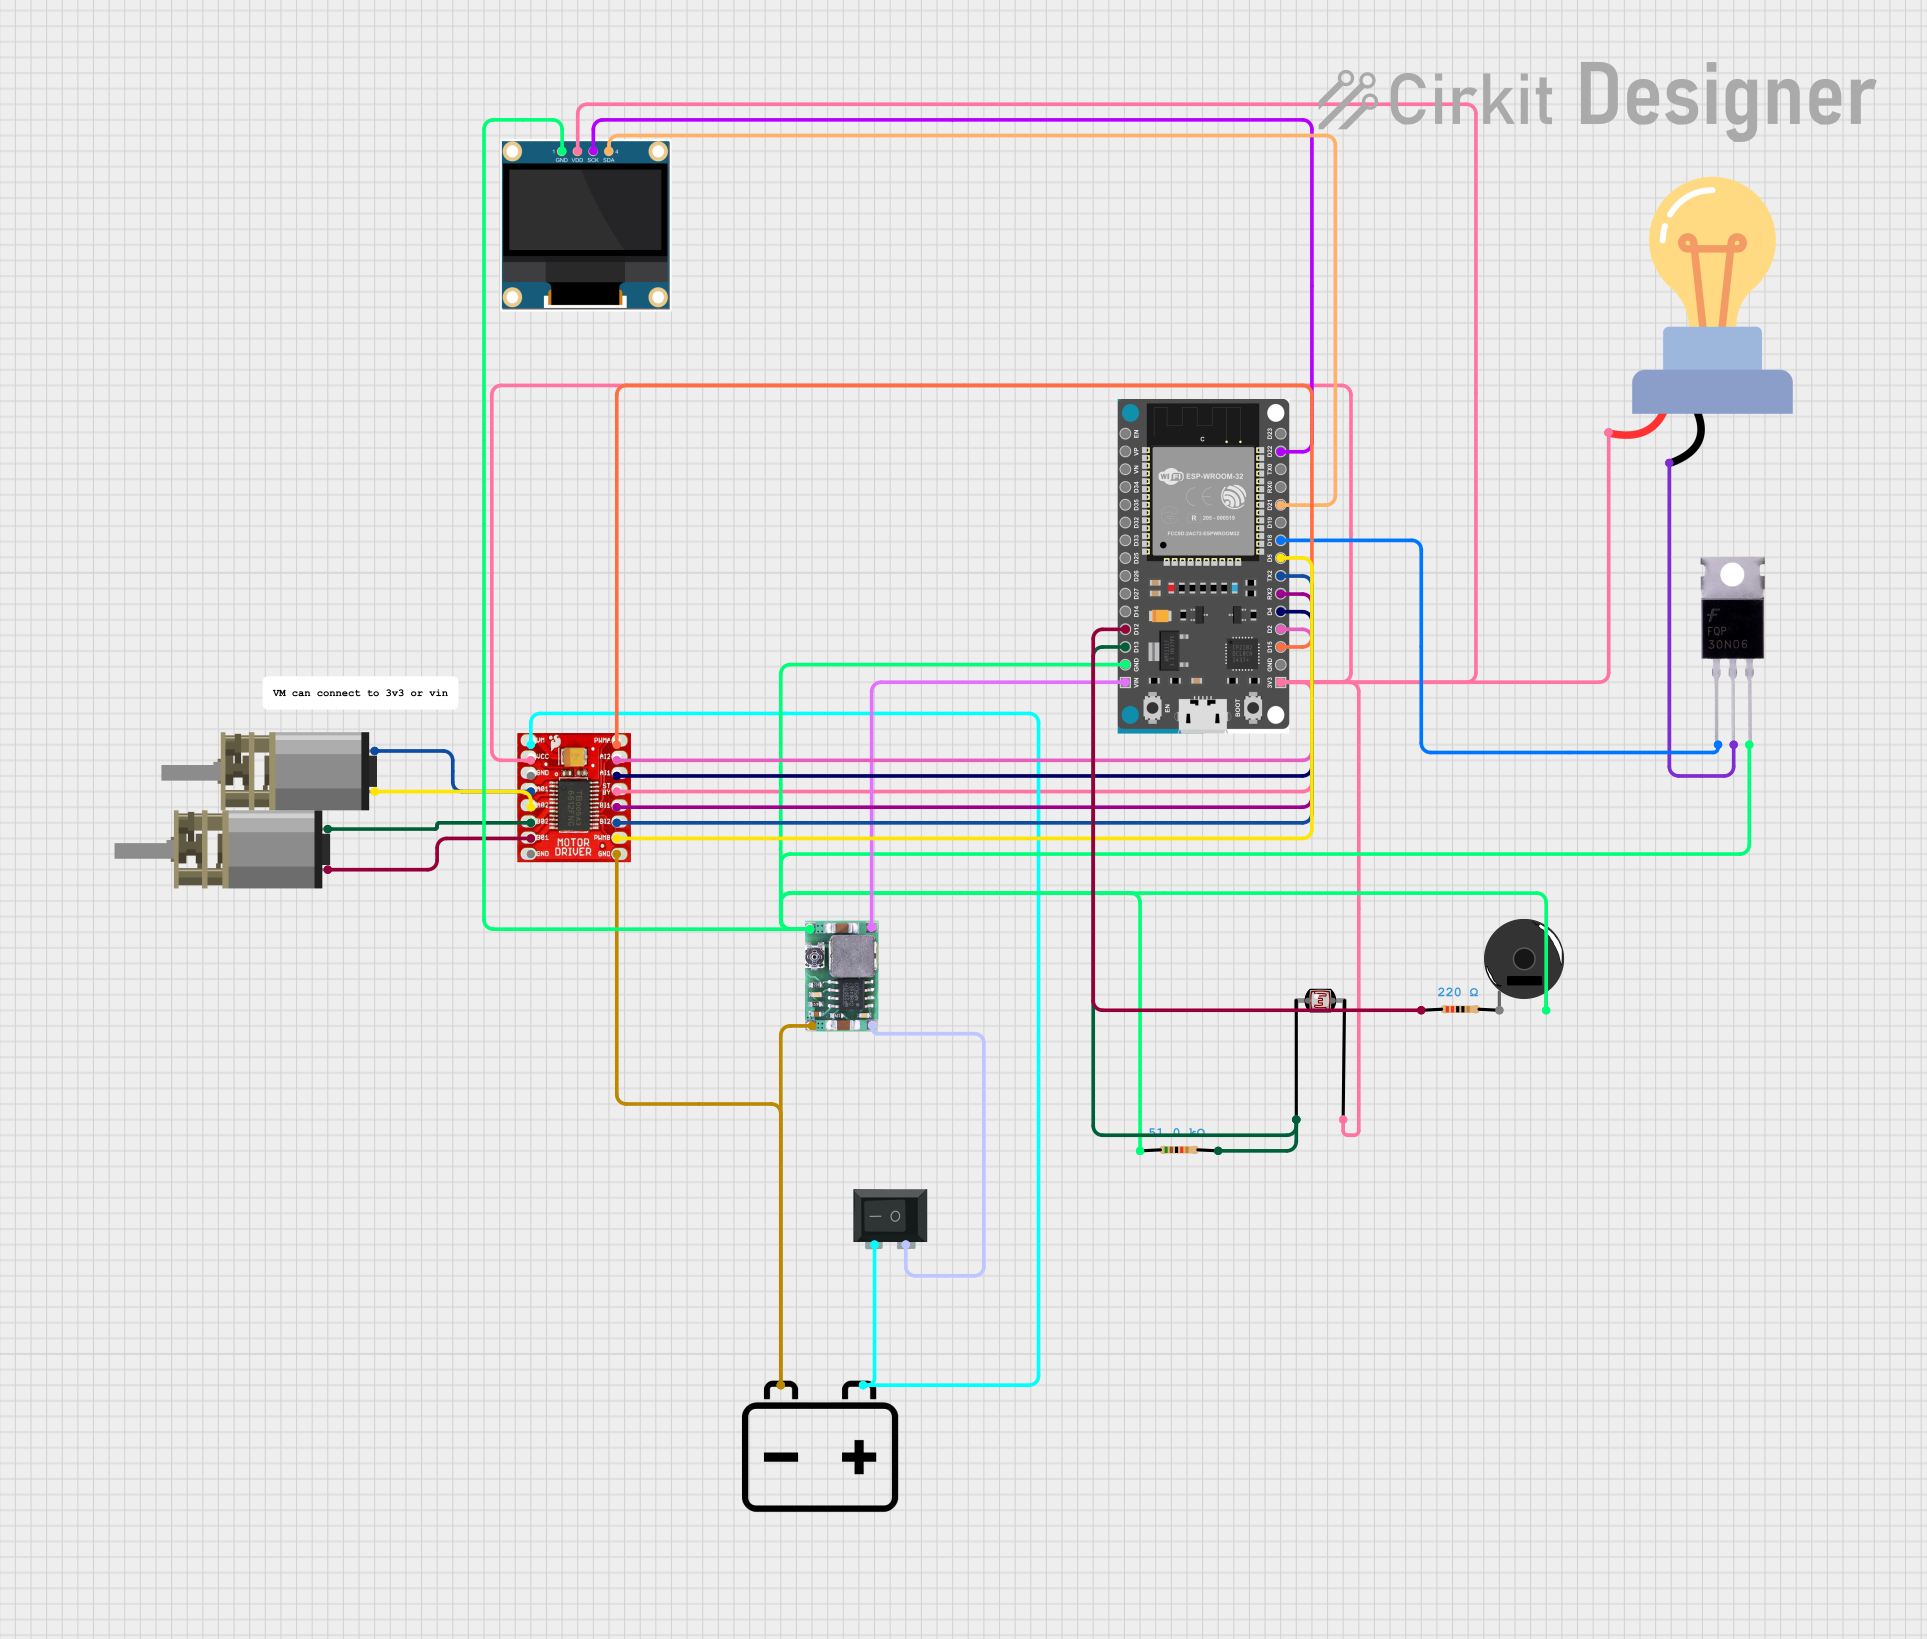
This circuit is a remote-controlled shooting game system using an ESP32 microcontroller, which interfaces with a PS3 controller to control two DC motors via a TB6612FNG motor driver, and a laser for shooting. The system includes an OLED display for game status, a photocell for detecting laser hits, and a piezo buzzer for sound feedback.
ESP32-CAM and T-Display-S3 Based Obstacle-Avoiding Robot
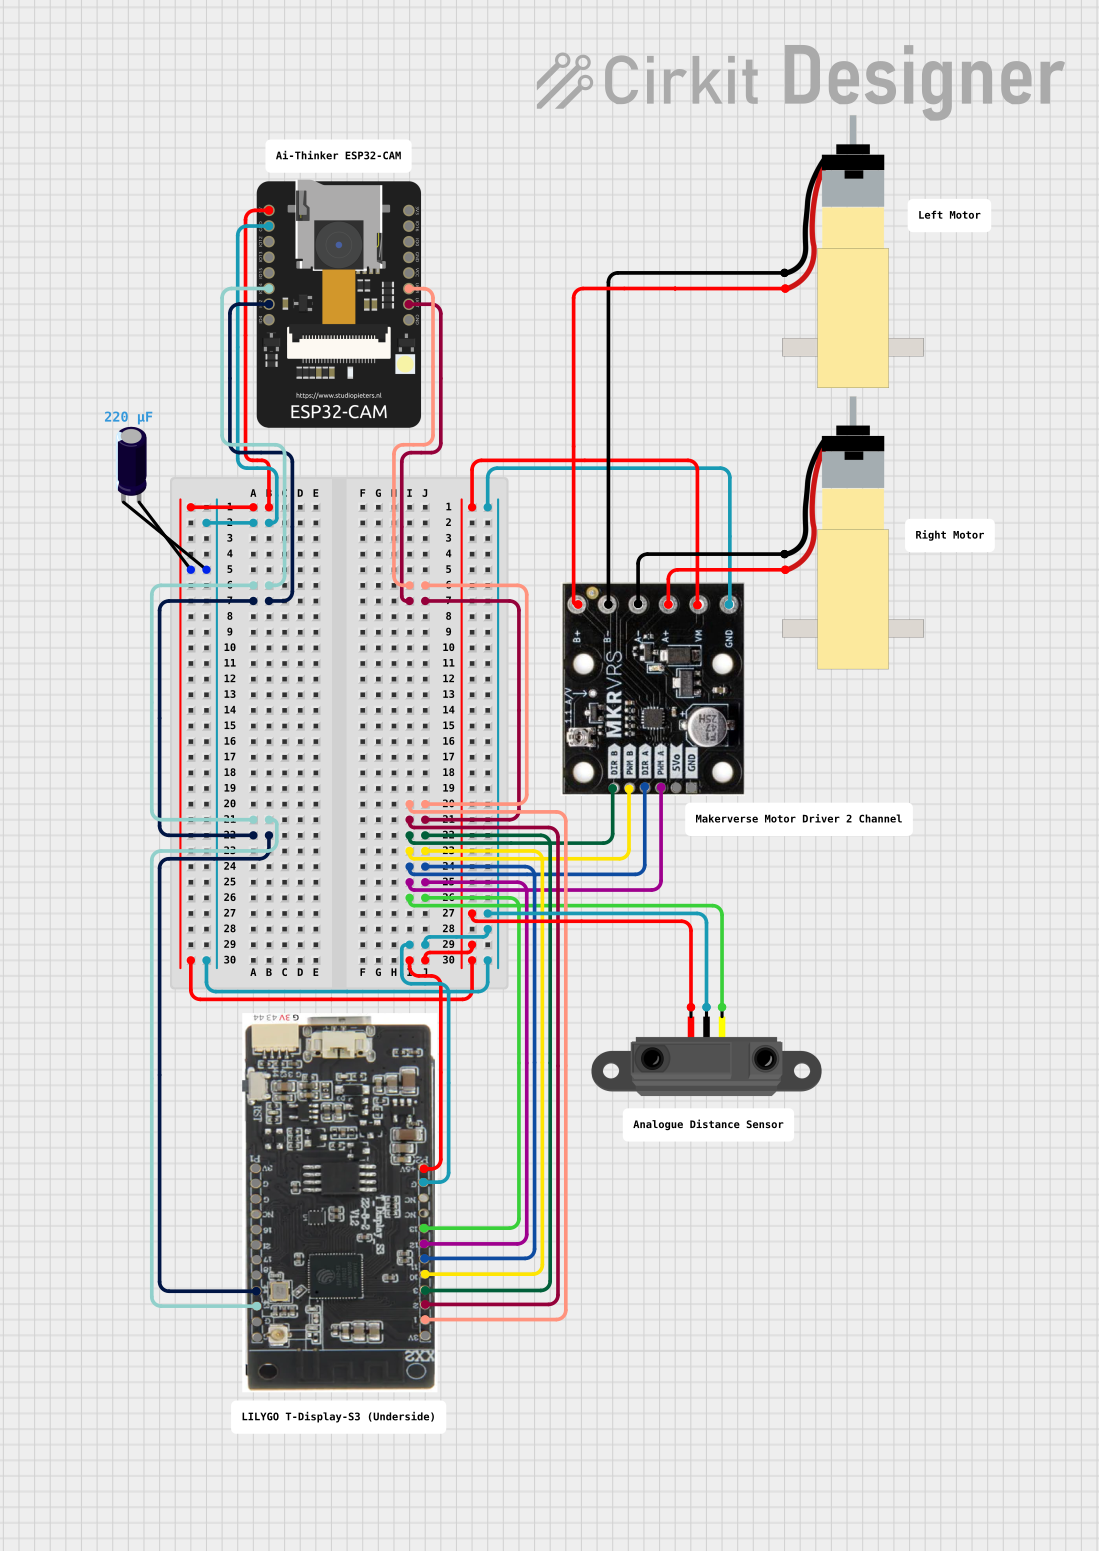
This circuit features an ESP32-CAM module and a T-Display-S3 for user interface, connected to a motor driver controlling two hobby gearmotors. An infrared proximity sensor provides input to the system, likely for obstacle detection or distance measurement. The electrolytic capacitor is used for power supply stabilization, ensuring smooth operation of the motor driver and connected motors.
WiFi-Controlled Basket-Carrying Robot with GPS and GSM Notification
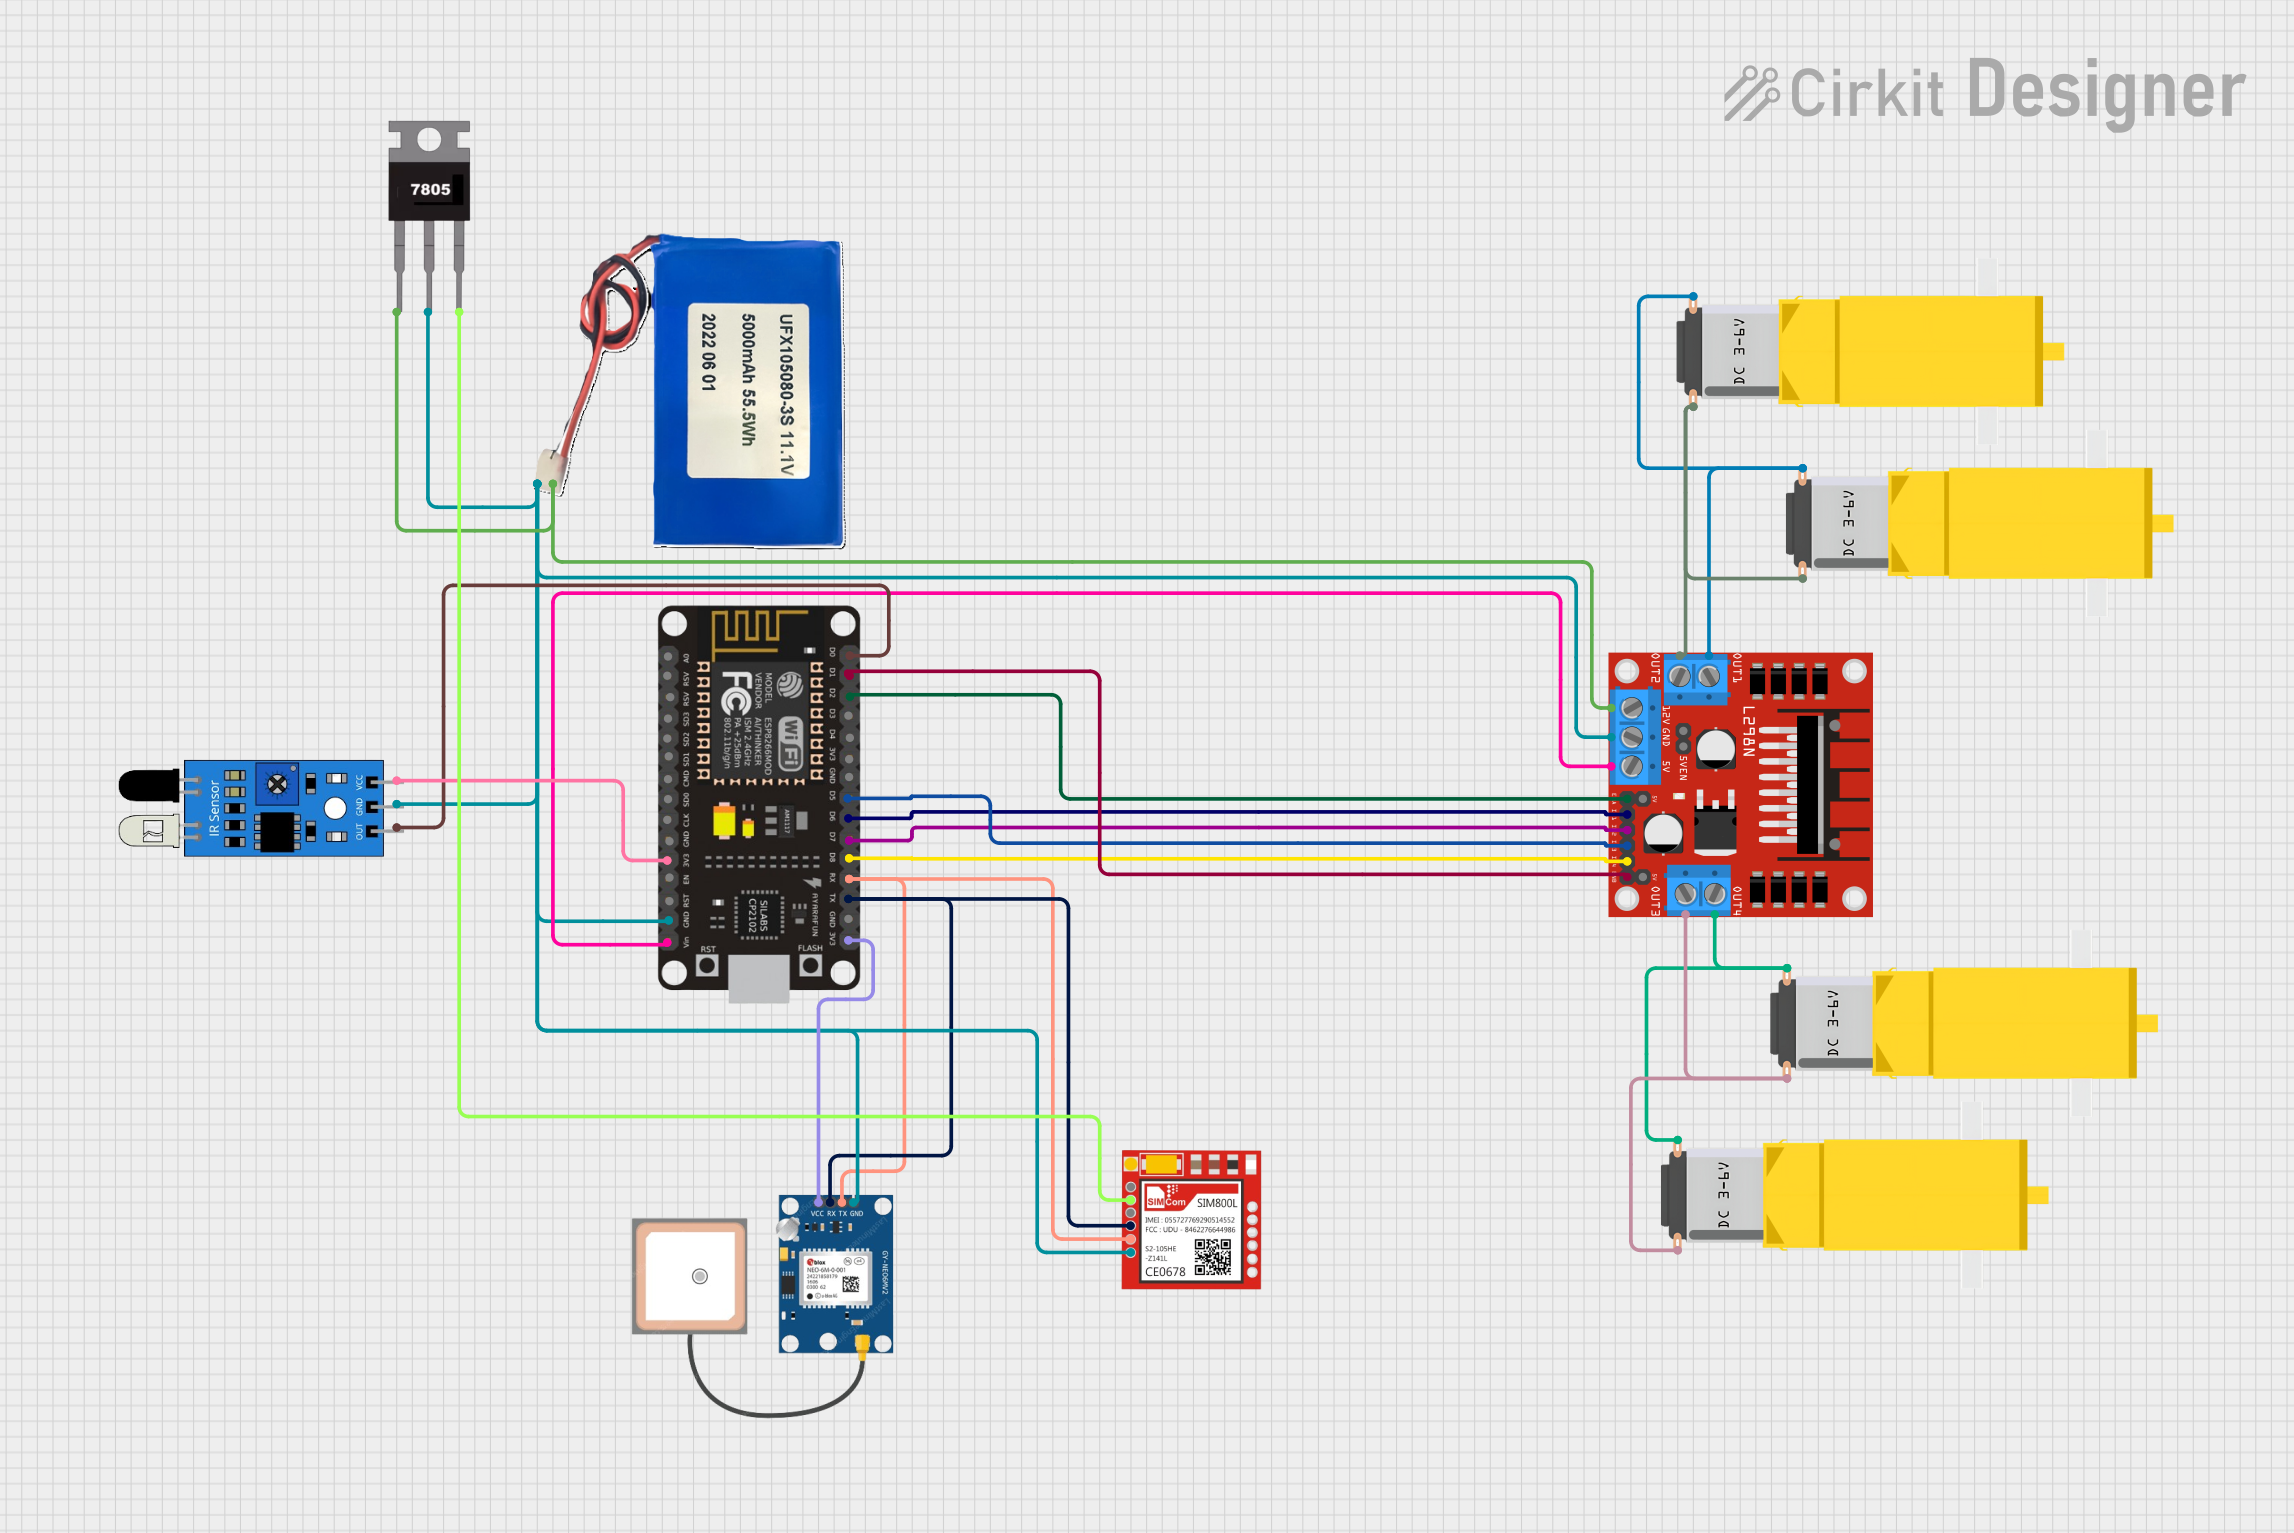
This circuit is designed for a 4-wheeled WiFi-controlled car with a basket, which uses an ESP8266 NodeMCU microcontroller for logic control. It features an IR sensor for basket full detection, a GPS module for location tracking, and a GSM module (Sim800l) for sending SMS notifications. The L298N motor driver controls four DC gearmotors for movement, and the system is powered by a Li-ion battery with a 7805 voltage regulator providing stable power to the GSM module.
Arduino Mega 2560 Battery-Powered Robotic Vehicle with Reflectance Sensor and Motor Control
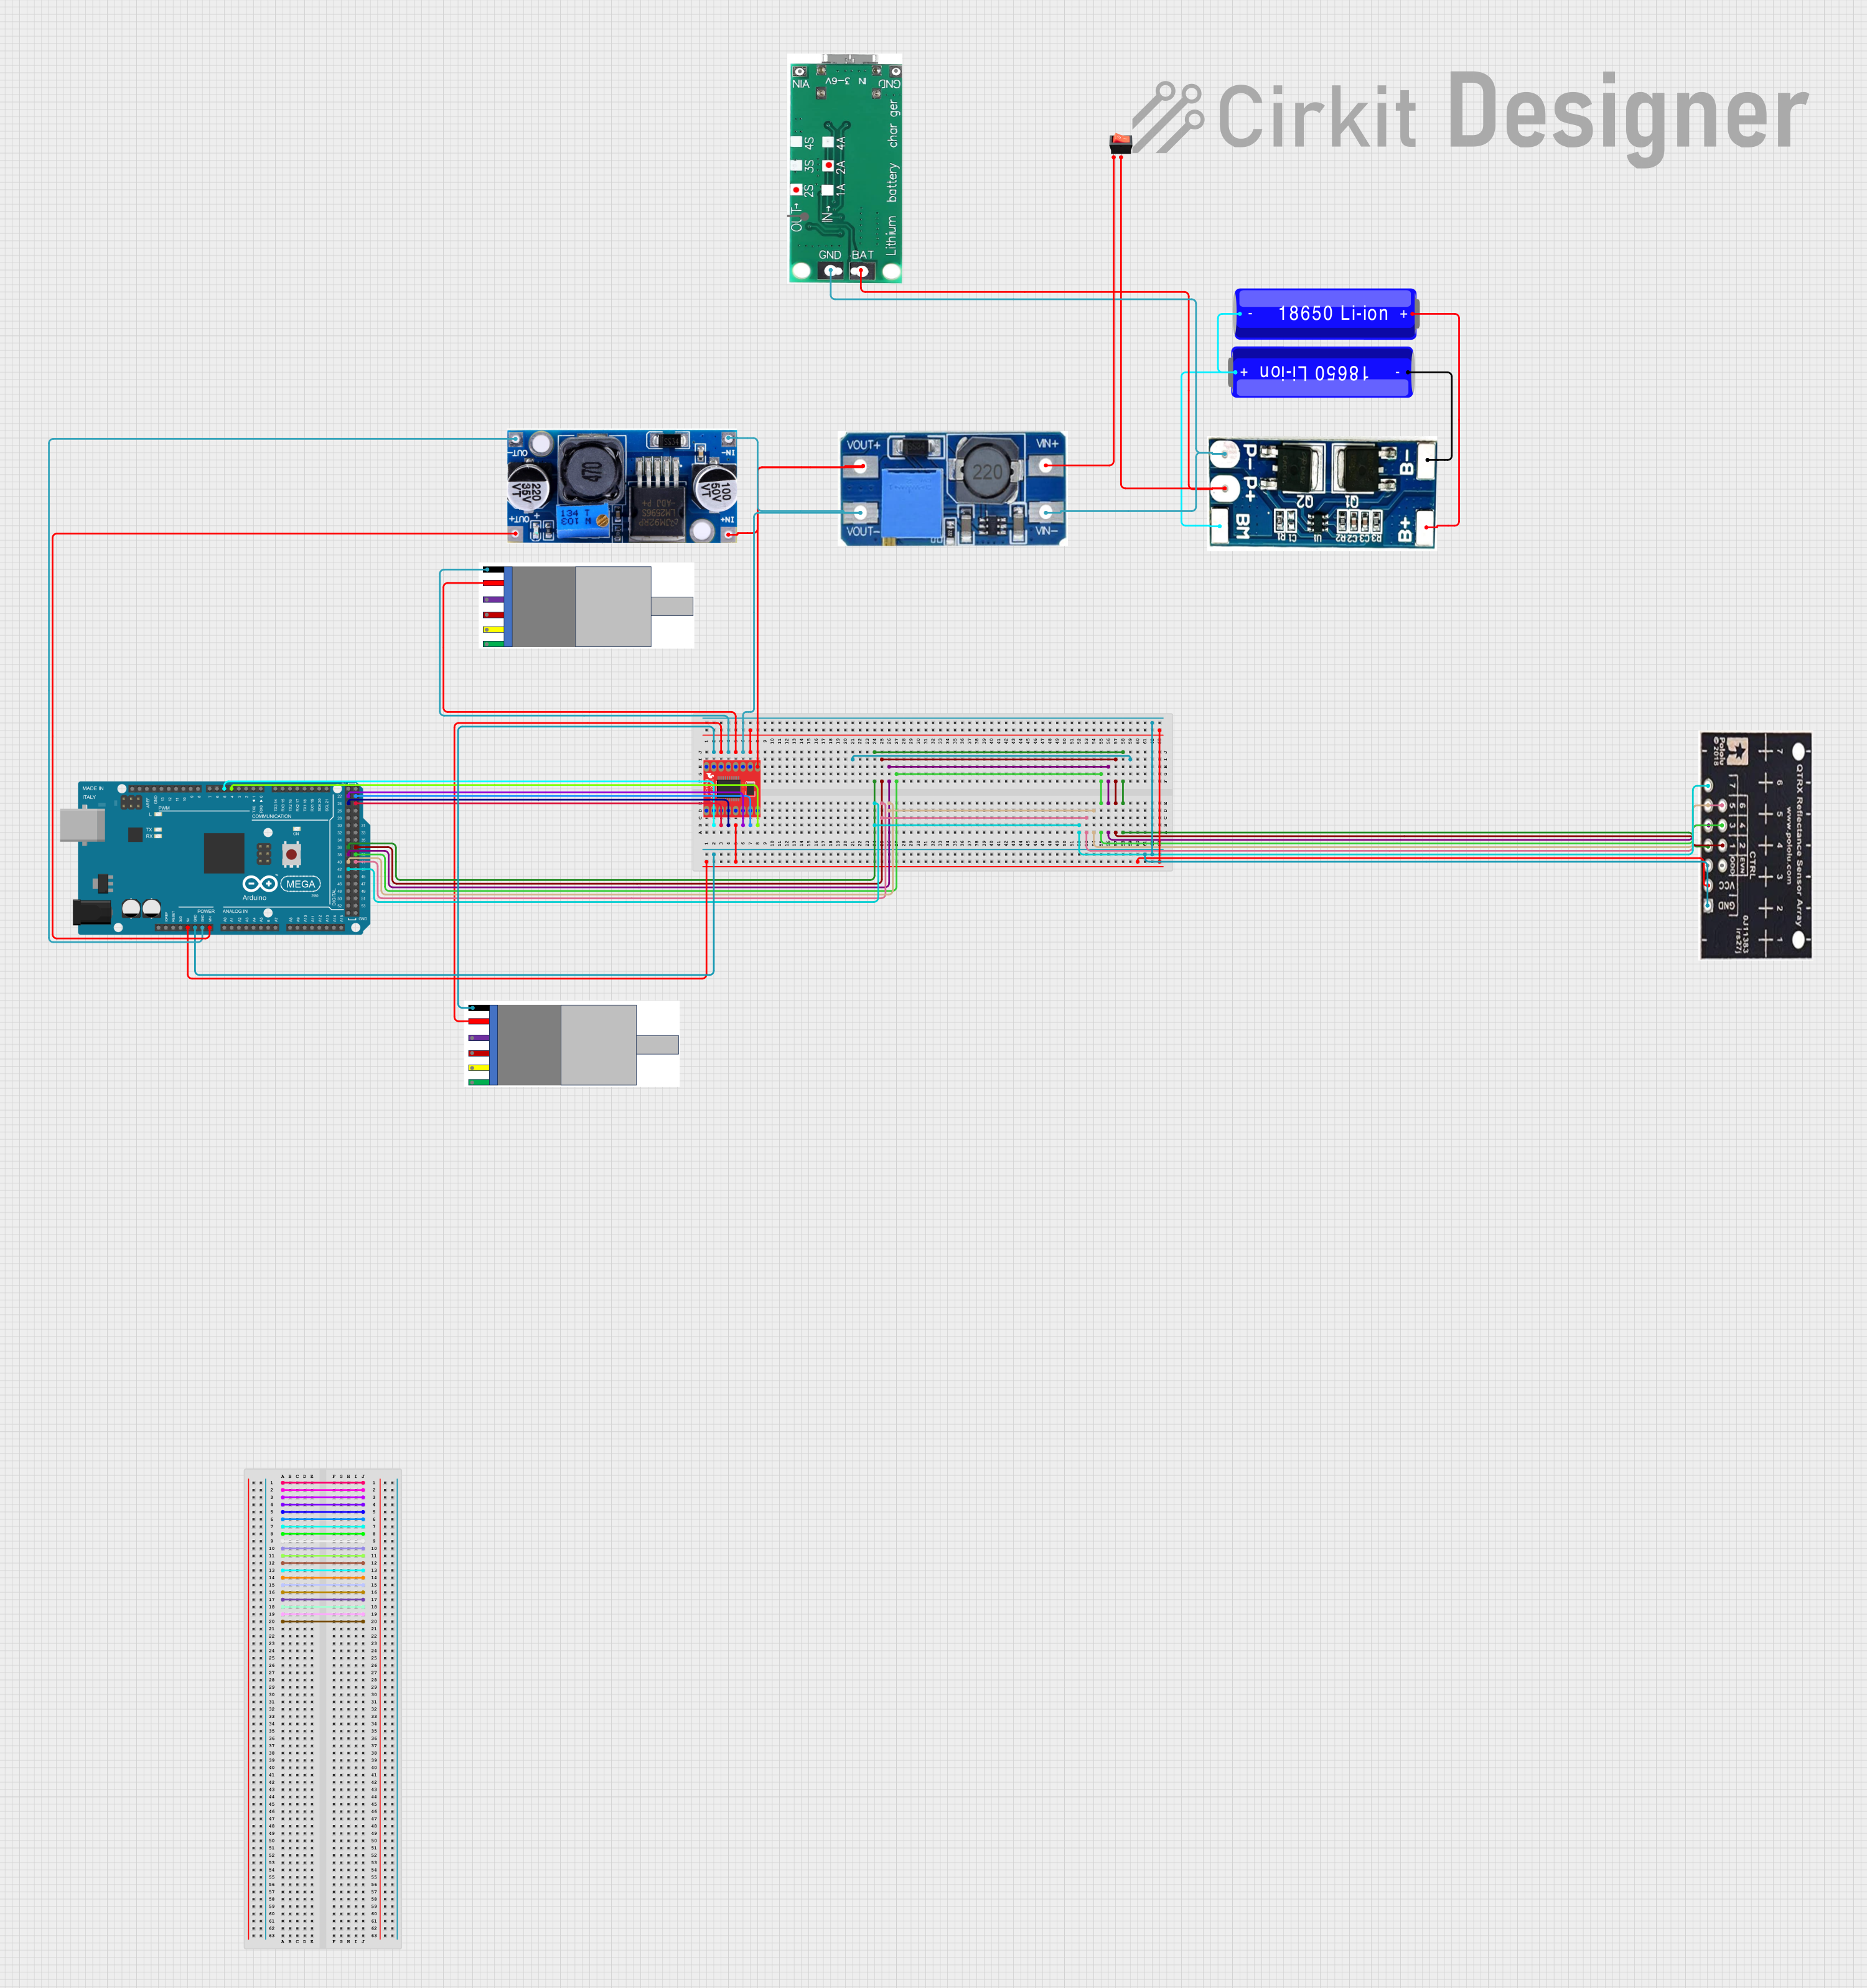
This circuit is a motor control system powered by 18650 Li-ion batteries, featuring an Arduino Mega 2560 microcontroller that controls two gear motors with integrated encoders via a TB6612FNG motor driver. It also includes a QTRX-HD-07RC reflectance sensor array for line following, and power management components such as a lithium battery charging board, a step-up boost converter, and a buck converter to regulate voltage.
Explore Projects Built with AK80-9 Tmotor
ESP32-Based Wi-Fi Controlled Robotic Car with OLED Display and Laser Shooting
This circuit is a remote-controlled shooting game system using an ESP32 microcontroller, which interfaces with a PS3 controller to control two DC motors via a TB6612FNG motor driver, and a laser for shooting. The system includes an OLED display for game status, a photocell for detecting laser hits, and a piezo buzzer for sound feedback.
ESP32-CAM and T-Display-S3 Based Obstacle-Avoiding Robot
This circuit features an ESP32-CAM module and a T-Display-S3 for user interface, connected to a motor driver controlling two hobby gearmotors. An infrared proximity sensor provides input to the system, likely for obstacle detection or distance measurement. The electrolytic capacitor is used for power supply stabilization, ensuring smooth operation of the motor driver and connected motors.
WiFi-Controlled Basket-Carrying Robot with GPS and GSM Notification
This circuit is designed for a 4-wheeled WiFi-controlled car with a basket, which uses an ESP8266 NodeMCU microcontroller for logic control. It features an IR sensor for basket full detection, a GPS module for location tracking, and a GSM module (Sim800l) for sending SMS notifications. The L298N motor driver controls four DC gearmotors for movement, and the system is powered by a Li-ion battery with a 7805 voltage regulator providing stable power to the GSM module.
Arduino Mega 2560 Battery-Powered Robotic Vehicle with Reflectance Sensor and Motor Control
This circuit is a motor control system powered by 18650 Li-ion batteries, featuring an Arduino Mega 2560 microcontroller that controls two gear motors with integrated encoders via a TB6612FNG motor driver. It also includes a QTRX-HD-07RC reflectance sensor array for line following, and power management components such as a lithium battery charging board, a step-up boost converter, and a buck converter to regulate voltage.
Common Applications and Use Cases
- Robotics: Ideal for robotic arms, mobile robots, and autonomous vehicles.
- Drones: Suitable for multirotors, fixed-wing drones, and UAVs.
- RC Vehicles: Used in remote-controlled cars, boats, and aircraft.
- Industrial Automation: Employed in automated systems requiring precise motion control.
Technical Specifications
Key Technical Details
| Specification | Value |
|---|---|
| Voltage Rating | 12V - 24V |
| Current Rating | 30A (max) |
| Power Rating | 360W |
| RPM | 3000 RPM (no load) |
| Torque Output | 0.5 Nm |
| Weight | 250g |
| Efficiency | 85% |
Pin Configuration and Descriptions
| Pin Number | Pin Name | Description |
|---|---|---|
| 1 | VCC | Power supply positive terminal |
| 2 | GND | Power supply ground terminal |
| 3 | PWM | Pulse Width Modulation control input |
| 4 | DIR | Direction control input |
| 5 | AUX | Auxiliary input for additional features |
Usage Instructions
How to Use the Component in a Circuit
- Power Connection: Connect the VCC pin to a suitable power supply (12V - 24V) and the GND pin to the ground.
- Control Signals: Connect the PWM pin to a PWM-capable microcontroller (e.g., Arduino) to control the motor speed. The DIR pin can be used to set the rotation direction.
- Auxiliary Features: If applicable, connect the AUX pin to any additional control circuitry as needed.
Important Considerations and Best Practices
- Heat Management: Ensure proper heat dissipation, as high currents can generate heat.
- Power Supply: Use a power supply that can handle the maximum current rating of the motor.
- PWM Frequency: Use a PWM frequency between 1 kHz and 20 kHz for optimal performance.
- Direction Control: Change the state of the DIR pin to reverse the motor's rotation.
Troubleshooting and FAQs
Common Issues Users Might Face
Motor Not Starting:
- Check power connections and ensure the voltage is within the specified range.
- Verify that the PWM signal is being sent correctly.
Inconsistent Speed:
- Ensure the PWM signal is stable and within the recommended frequency range.
- Check for any mechanical binding or load issues.
Overheating:
- Ensure the motor is not overloaded beyond its rated current.
- Improve ventilation or add a heatsink if necessary.
Solutions and Tips for Troubleshooting
- Testing Connections: Use a multimeter to check voltage levels at the motor pins.
- PWM Signal Verification: Use an oscilloscope to verify the PWM signal's duty cycle and frequency.
- Load Testing: Test the motor under different loads to identify performance issues.
Example Arduino Code
Here is a simple example of how to control the AK80-9 Tmotor using an Arduino UNO:
const int pwmPin = 9; // PWM control pin
const int dirPin = 8; // Direction control pin

void setup() {
  pinMode(pwmPin, OUTPUT);
  pinMode(dirPin, OUTPUT);
}

void loop() {
  // Set direction to forward
  digitalWrite(dirPin, HIGH);

  // Ramp up speed
  for (int speed = 0; speed <= 255; speed++) {
    analogWrite(pwmPin, speed);
    delay(20); // Adjust delay for ramp speed
  }

  // Hold speed for 2 seconds
  delay(2000);

  // Ramp down speed
  for (int speed = 255; speed >= 0; speed--) {
    analogWrite(pwmPin, speed);
    delay(20); // Adjust delay for ramp speed
  }

  // Hold off for 2 seconds
  delay(2000);
}
This code sets up the motor to run in one direction, gradually increasing and decreasing the speed. Adjust the delay() values to change the ramp-up and ramp-down times as needed.