Cirkit Designer Logo
Cirkit Designer
Your all-in-one circuit design IDE
Home / 
Component Documentation

How to Use SparkFun EL Sequencer: Examples, Pinouts, and Specs

Image of SparkFun EL Sequencer
Cirkit Designer LogoDesign with SparkFun EL Sequencer in Cirkit Designer

Introduction

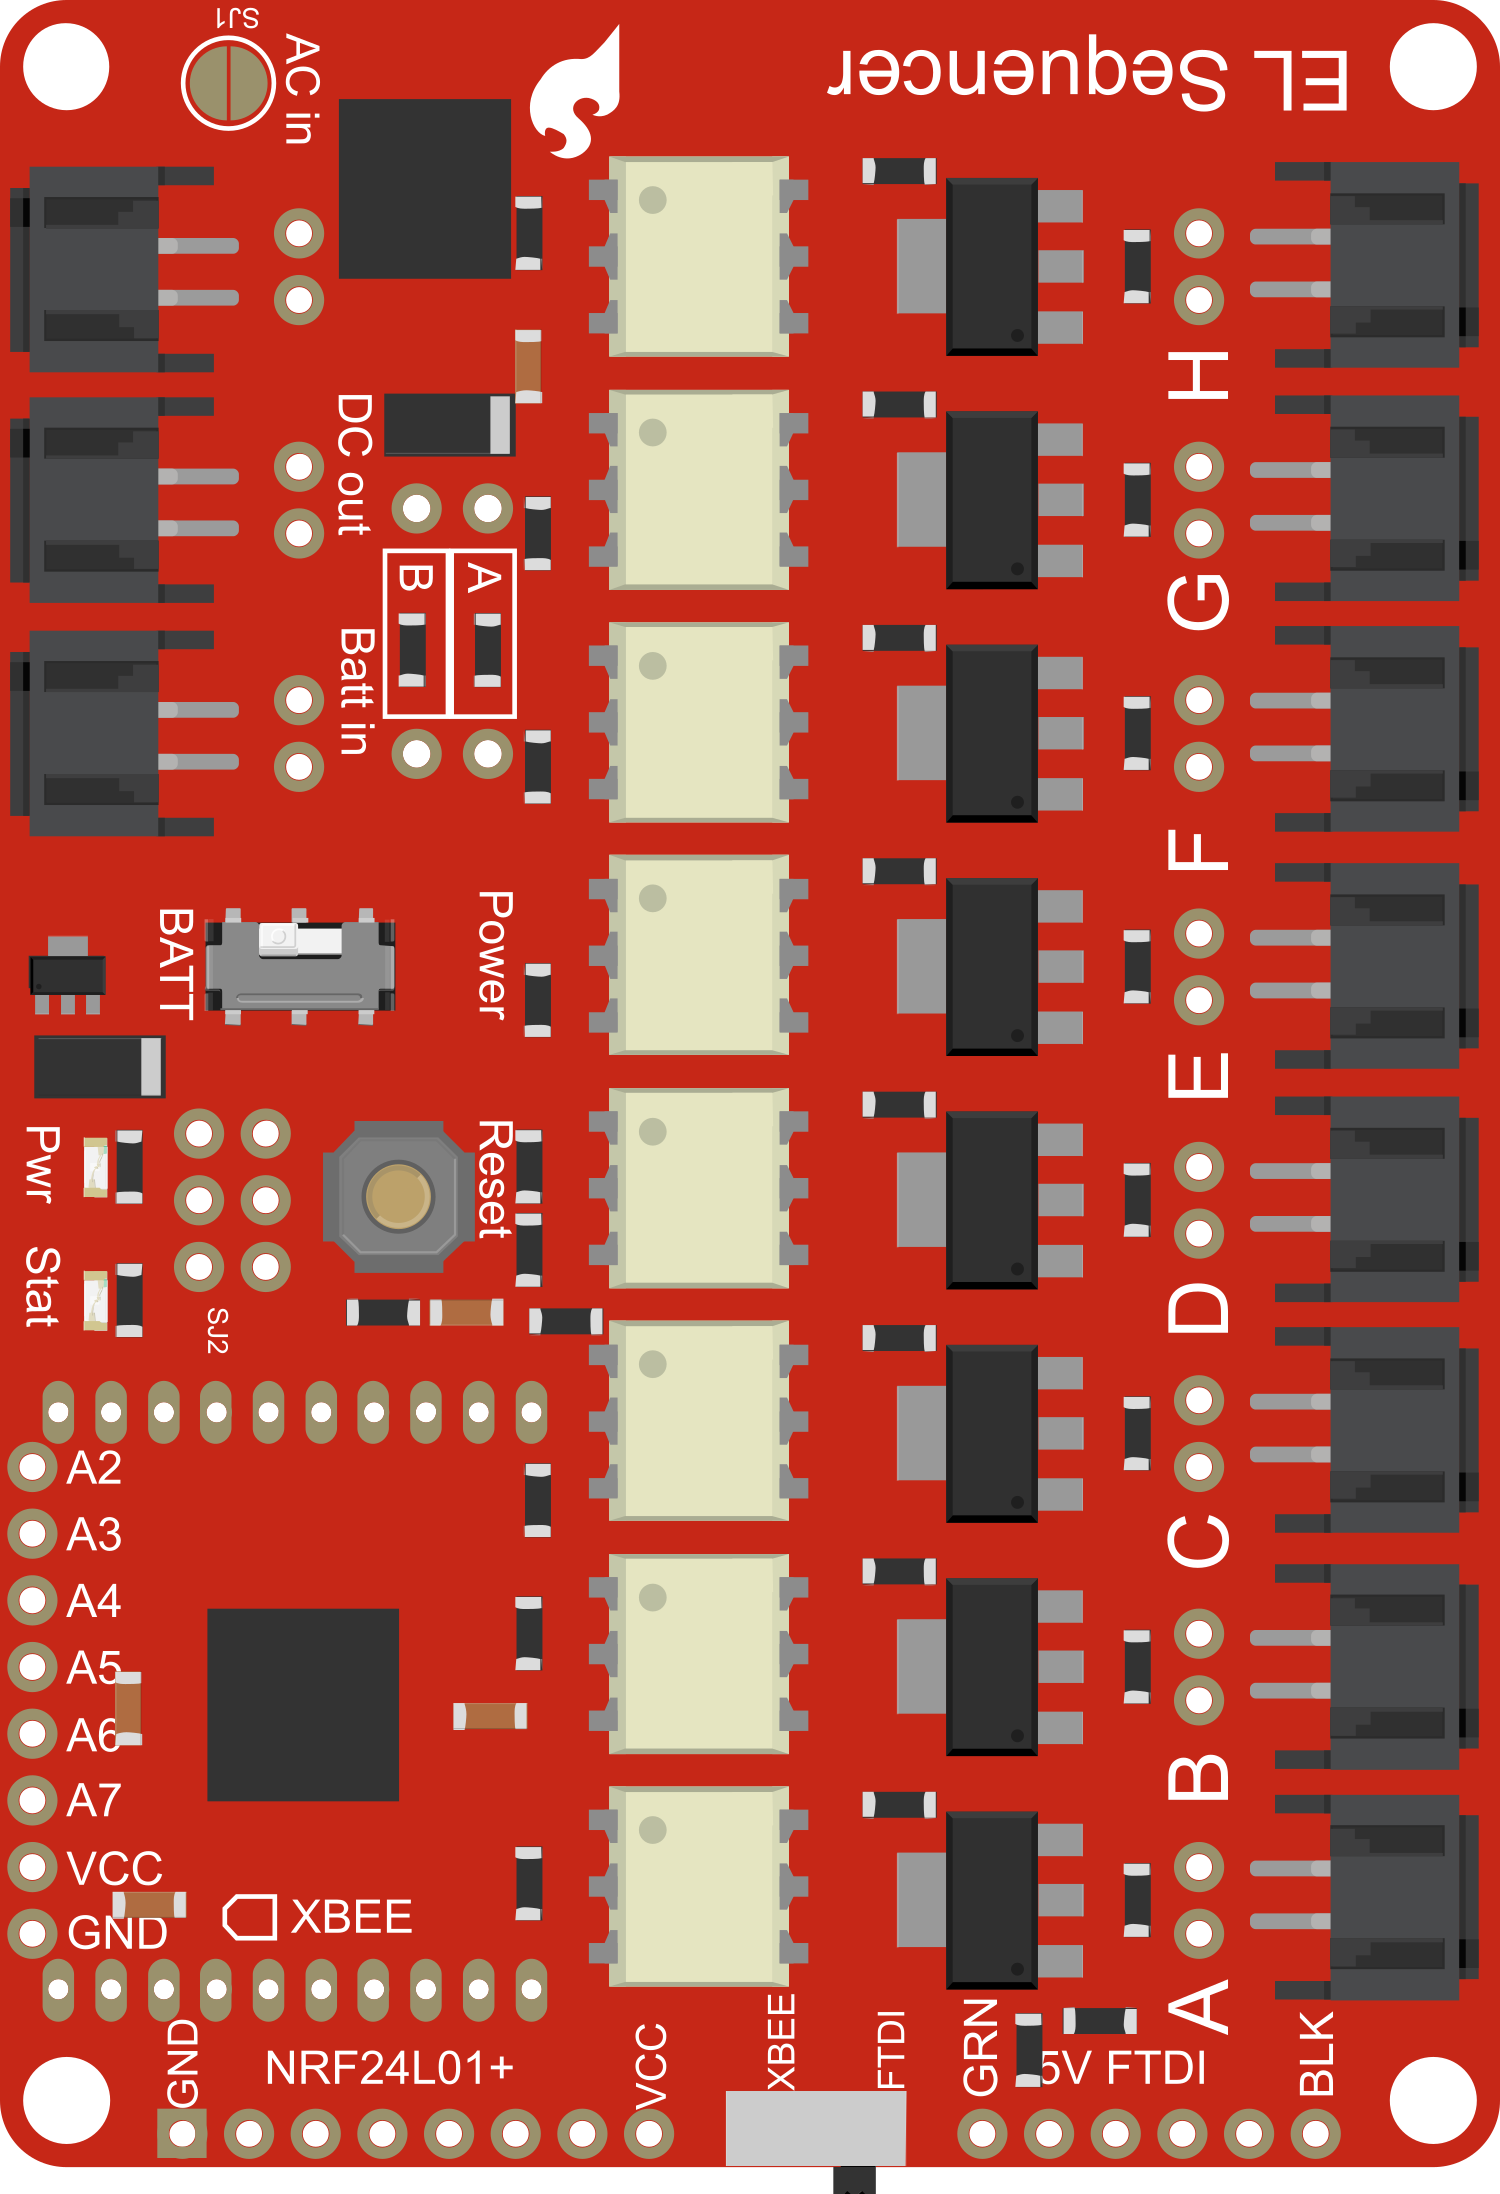
The SparkFun EL Sequencer is a board designed to control the electroluminescent (EL) wire or tape, allowing users to create dynamic lighting effects for costumes, signs, displays, and more. It is based on the ATMega328 microcontroller, which is also used in the popular Arduino UNO, making it easy to program for those familiar with Arduino IDE.

Explore Projects Built with SparkFun EL Sequencer

Use Cirkit Designer to design, explore, and prototype these projects online. Some projects support real-time simulation. Click "Open Project" to start designing instantly!
Arduino-Controlled Interactive LED and Sound System with Motion Detection
Image of project 1: A project utilizing SparkFun EL Sequencer in a practical application
This circuit features an Arduino UNO microcontroller interfaced with an Adafruit ADXL345 accelerometer, an HC-SR04 ultrasonic sensor, two SG90 servomotors, a DFPlayer Mini MP3 module, a WS2812 RGB LED strip, and a loudspeaker. The Arduino controls the LED strip and servomotors based on distance measurements from the ultrasonic sensor and plays sounds through the DFPlayer Mini when motion is detected by the accelerometer. The circuit is designed for interactive displays or installations where visual and auditory feedback is provided in response to object proximity and movement.
Cirkit Designer LogoOpen Project in Cirkit Designer
I2C-Controlled OLED Display with External EEPROM and Interactive Pushbuttons
Image of godmode: A project utilizing SparkFun EL Sequencer in a practical application
This is a microcontroller-based interactive device featuring a Wemos D1 Mini, an OLED display, external EEPROM, and an I/O expander. It includes user input buttons and status LEDs, with potential MIDI interface capabilities.
Cirkit Designer LogoOpen Project in Cirkit Designer
Arduino Mega 2560 Controlled Ghostbuster Trap Prop with MP3 Player and Haptic Feedback
Image of Trap Wiring: A project utilizing SparkFun EL Sequencer in a practical application
This circuit is designed to simulate a Ghostbuster trap prop with various interactive features. It includes an Arduino Mega 2560 to control a sequence of events such as playing audio tracks through an MP3 player module, creating vibrations with a haptic motor driver and DC motors, displaying patterns on a bi-color 24-bar LED bargraph, moving servos, and activating a relay-controlled water pump. The sequence is initiated by an IR receiver, and the circuit incorporates LEDs, resistors, a step-down buck converter for voltage regulation, and a Bluetooth module for potential wireless control.
Cirkit Designer LogoOpen Project in Cirkit Designer
Arduino 101 OLED Display Animation Project
Image of wokwi animater test: A project utilizing SparkFun EL Sequencer in a practical application
This circuit consists of an Arduino 101 microcontroller connected to a 0.96" OLED display via I2C communication. The Arduino runs a program that initializes the OLED and continuously displays an animated sequence of frames on the screen.
Cirkit Designer LogoOpen Project in Cirkit Designer

Explore Projects Built with SparkFun EL Sequencer

Use Cirkit Designer to design, explore, and prototype these projects online. Some projects support real-time simulation. Click "Open Project" to start designing instantly!
Image of project 1: A project utilizing SparkFun EL Sequencer in a practical application
Arduino-Controlled Interactive LED and Sound System with Motion Detection
This circuit features an Arduino UNO microcontroller interfaced with an Adafruit ADXL345 accelerometer, an HC-SR04 ultrasonic sensor, two SG90 servomotors, a DFPlayer Mini MP3 module, a WS2812 RGB LED strip, and a loudspeaker. The Arduino controls the LED strip and servomotors based on distance measurements from the ultrasonic sensor and plays sounds through the DFPlayer Mini when motion is detected by the accelerometer. The circuit is designed for interactive displays or installations where visual and auditory feedback is provided in response to object proximity and movement.
Cirkit Designer LogoOpen Project in Cirkit Designer
Image of godmode: A project utilizing SparkFun EL Sequencer in a practical application
I2C-Controlled OLED Display with External EEPROM and Interactive Pushbuttons
This is a microcontroller-based interactive device featuring a Wemos D1 Mini, an OLED display, external EEPROM, and an I/O expander. It includes user input buttons and status LEDs, with potential MIDI interface capabilities.
Cirkit Designer LogoOpen Project in Cirkit Designer
Image of Trap Wiring: A project utilizing SparkFun EL Sequencer in a practical application
Arduino Mega 2560 Controlled Ghostbuster Trap Prop with MP3 Player and Haptic Feedback
This circuit is designed to simulate a Ghostbuster trap prop with various interactive features. It includes an Arduino Mega 2560 to control a sequence of events such as playing audio tracks through an MP3 player module, creating vibrations with a haptic motor driver and DC motors, displaying patterns on a bi-color 24-bar LED bargraph, moving servos, and activating a relay-controlled water pump. The sequence is initiated by an IR receiver, and the circuit incorporates LEDs, resistors, a step-down buck converter for voltage regulation, and a Bluetooth module for potential wireless control.
Cirkit Designer LogoOpen Project in Cirkit Designer
Image of wokwi animater test: A project utilizing SparkFun EL Sequencer in a practical application
Arduino 101 OLED Display Animation Project
This circuit consists of an Arduino 101 microcontroller connected to a 0.96" OLED display via I2C communication. The Arduino runs a program that initializes the OLED and continuously displays an animated sequence of frames on the screen.
Cirkit Designer LogoOpen Project in Cirkit Designer

Common Applications and Use Cases

  • Wearable electronics and costumes
  • Dynamic signage and advertising
  • Art installations
  • Safety or emergency lighting
  • Themed party decorations

Technical Specifications

Key Technical Details

  • Microcontroller: ATMega328
  • Operating Voltage: 3.3V
  • Input Voltage: 2.7V - 5.5V
  • Digital I/O Pins: 8 (with PWM capability)
  • Analog Input Pins: 6
  • DC Current per I/O Pin: 40 mA
  • Flash Memory: 32 KB (ATMega328) of which 0.5 KB used by bootloader
  • SRAM: 2 KB (ATMega328)
  • EEPROM: 1 KB (ATMega328)
  • Clock Speed: 8 MHz

Pin Configuration and Descriptions

Pin Number Function Description
1-8 EL Channels Drives EL wire/tape, PWM capable for dimming
A0-A5 Analog Inputs Can be used for sensors or potentiometers
RX Serial Receive Used for receiving serial data
TX Serial Transmit Used for transmitting serial data
RST Reset Resets the microcontroller
GND Ground Common ground for circuit
VIN Voltage Input Used to power the board with an external source
5V 5V Output Regulated 5V output (when powered by VIN)
3V3 3.3V Output Regulated 3.3V output

Usage Instructions

How to Use the Component in a Circuit

  1. Powering the Board:

    • Connect a power source to the VIN and GND pins for a 5V operation.
    • Ensure that the power source does not exceed the recommended voltage.
  2. Connecting EL Wire/Tape:

    • Attach the EL wire or tape to the EL channel pins (1-8).
    • Use the corresponding ground pin for the EL return path.
  3. Programming the Board:

    • The EL Sequencer can be programmed via the Arduino IDE.
    • Select "Arduino Pro or Pro Mini" as the board type, with "ATmega328 (3.3V, 8 MHz)" as the processor.
  4. Creating Effects:

    • Use PWM on the EL channel pins to create dimming effects.
    • Sequence the activation of different channels to create dynamic patterns.

Important Considerations and Best Practices

  • Do not exceed the maximum voltage and current ratings to prevent damage.
  • Ensure proper insulation of EL wire connections to avoid short circuits.
  • Use appropriate resistors when connecting LEDs or other components to the I/O pins.
  • Avoid running high-current loads directly from the board; use external transistors or relays.

Troubleshooting and FAQs

Common Issues

  • EL wire not lighting up:

    • Check connections to ensure proper contact with the EL channel pins.
    • Verify that the power source is within the specified voltage range.
    • Ensure that the EL wire or tape is not damaged.
  • Board not responding to programming:

    • Confirm that the correct board and processor are selected in the Arduino IDE.
    • Check the USB to serial adapter connection.
    • Ensure the drivers for the USB to serial adapter are installed.

Solutions and Tips for Troubleshooting

  • Double-check all connections and solder joints for continuity and shorts.
  • Use a multimeter to verify power supply voltages and pin outputs.
  • Consult the SparkFun EL Sequencer forums and community for additional support.

FAQs

  • Can I power the EL Sequencer with a battery?

    • Yes, you can power it with a battery within the 2.7V - 5.5V range.
  • How many EL wires can I connect to the board?

    • You can connect up to 8 EL wires or tapes, one to each channel.
  • Is the EL Sequencer compatible with Arduino shields?

    • While it shares the ATMega328 microcontroller, its form factor and pinout may not be directly compatible with all Arduino shields.

Example Arduino Code

// Example code to blink EL wire connected to channel 1

#include <SoftwareSerial.h>

// Define the EL channel pin
const int elChannel1 = 2; // EL channel 1 is connected to digital pin 2

void setup() {
  // Set the EL channel as an output
  pinMode(elChannel1, OUTPUT);
}

void loop() {
  // Turn on the EL wire
  digitalWrite(elChannel1, HIGH);
  delay(1000); // Wait for 1 second
  // Turn off the EL wire
  digitalWrite(elChannel1, LOW);
  delay(1000); // Wait for 1 second
}

Remember to wrap the EL wire connections with electrical tape or heat-shrink tubing to prevent short circuits and ensure safety. Happy lighting!