How to Use MEMS NO2: Examples, Pinouts, and Specs
Introduction
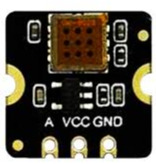
The MEMS NO2 sensor, manufactured by DFRobot (Part ID: NO2), is a Micro-Electro-Mechanical System (MEMS) sensor designed to detect nitrogen dioxide (NO2) gas. This sensor is widely used in air quality monitoring systems, environmental applications, and industrial safety equipment. Its compact size, high sensitivity, and low power consumption make it an ideal choice for portable and embedded systems.
Explore Projects Built with MEMS NO2


Explore Projects Built with MEMS NO2
Common Applications
- Air quality monitoring in urban environments
- Industrial safety systems for detecting harmful gas levels
- Smart home and IoT devices for environmental sensing
- Automotive applications for exhaust gas analysis
- Research and development in environmental sciences
Technical Specifications
The MEMS NO2 sensor is designed to provide accurate and reliable NO2 gas detection. Below are its key technical details:
Key Specifications
| Parameter | Value |
|---|---|
| Manufacturer | DFRobot |
| Part ID | NO2 |
| Gas Detected | Nitrogen Dioxide (NO2) |
| Detection Range | 0–10 ppm |
| Sensitivity | ±0.1 ppm |
| Operating Voltage | 3.3V–5V |
| Operating Current | ≤10 mA |
| Response Time | ≤30 seconds |
| Recovery Time | ≤60 seconds |
| Operating Temperature | -20°C to 50°C |
| Communication Interface | Analog Output |
| Dimensions | 20mm x 15mm x 5mm |
Pin Configuration
The MEMS NO2 sensor has a simple pinout for easy integration into circuits. Below is the pin configuration:
| Pin Name | Description |
|---|---|
| VCC | Power supply input (3.3V–5V) |
| GND | Ground |
| AOUT | Analog output signal (NO2 level) |
Usage Instructions
The MEMS NO2 sensor is straightforward to use in a circuit. Follow the steps below to integrate and operate the sensor effectively:
Circuit Connection
- Power Supply: Connect the
VCCpin to a 3.3V or 5V power source and theGNDpin to the ground of your circuit. - Signal Output: Connect the
AOUTpin to an analog input pin of your microcontroller (e.g., Arduino UNO) to read the NO2 gas concentration.
Important Considerations
- Preheating: Allow the sensor to preheat for 2–3 minutes after powering it on to stabilize its readings.
- Placement: Place the sensor in an open area for accurate gas detection. Avoid placing it near heat sources or in enclosed spaces.
- Calibration: For precise measurements, calibrate the sensor in a clean air environment (0 ppm NO2) before use.
- Power Supply: Ensure a stable power supply to avoid fluctuations in the sensor's output.
Sample Arduino Code
Below is an example of how to use the MEMS NO2 sensor with an Arduino UNO to read and display NO2 levels:
// Define the analog pin connected to the sensor's AOUT pin
const int sensorPin = A0;

void setup() {
  // Initialize serial communication for debugging
  Serial.begin(9600);
}

void loop() {
  // Read the analog value from the sensor
  int sensorValue = analogRead(sensorPin);

  // Convert the analog value to a voltage (assuming 5V reference)
  float voltage = sensorValue * (5.0 / 1023.0);

  // Convert the voltage to NO2 concentration (ppm)
  // Example conversion formula (adjust based on calibration):
  float no2Concentration = voltage * 2.0; // Replace 2.0 with your sensor's scaling factor

  // Print the NO2 concentration to the serial monitor
  Serial.print("NO2 Concentration: ");
  Serial.print(no2Concentration);
  Serial.println(" ppm");

  // Wait for 1 second before the next reading
  delay(1000);
}
Notes on the Code
- The conversion formula (
voltage * 2.0) is an example. Refer to the sensor's datasheet or perform calibration to determine the correct scaling factor. - Ensure the Arduino's analog reference voltage matches the sensor's output range for accurate readings.
Troubleshooting and FAQs
Common Issues and Solutions
No Output Signal
- Cause: Incorrect wiring or loose connections.
- Solution: Double-check the wiring and ensure all connections are secure.
Inaccurate Readings
- Cause: Insufficient preheating time or improper calibration.
- Solution: Allow the sensor to preheat for 2–3 minutes and calibrate it in clean air.
Fluctuating Output
- Cause: Unstable power supply or environmental interference.
- Solution: Use a stable power source and avoid placing the sensor near strong electromagnetic fields.
Slow Response Time
- Cause: Sensor aging or contamination.
- Solution: Clean the sensor with dry air and replace it if necessary.
FAQs
Q1: Can the MEMS NO2 sensor detect other gases?
A1: No, this sensor is specifically designed to detect nitrogen dioxide (NO2). It may have limited sensitivity to other gases, but its readings will not be accurate for them.
Q2: How do I calibrate the sensor?
A2: Place the sensor in a clean air environment (0 ppm NO2) and record the baseline analog output. Use this value to adjust your calculations in the code.
Q3: Can I use this sensor outdoors?
A3: Yes, but ensure it is protected from extreme weather conditions and direct exposure to water or dust.
Q4: What is the lifespan of the sensor?
A4: The sensor's lifespan depends on usage and environmental conditions. Under normal conditions, it can last for several years.
By following this documentation, you can effectively integrate and use the MEMS NO2 sensor in your projects. For further assistance, refer to the DFRobot datasheet or contact their support team.